
Subscribe to Our Youtube Channel
Related Manuals for Azbil MagneW 3000 FLEX


Summary of Contents for Azbil MagneW 3000 FLEX
- Page 1 CM2-MGF100-2001 MagneW 3000 FLEX Electromagnetic Flow Switch Integral Type, Remote Type Converter Model MGF User’s Manual...
- Page 2 In no event is Azbil Corporation liable to anyone for any indirect, special or consequential damages, The information and specifications in this document are subject to change without notice.
- Page 3 Thank you for purchasing Azbil Corporation MagneW 3000 FLEX Electro- Preface magnetic Flow Switch. Model MGF electromagnetic flow switches, fruit of our long experience and outstanding performance, are designed for uses for cooling water, generator coolers, and hydraulic turbine sealing water. They are multifunction convertors characterized by a wide range of applications and easy field operations.
- Page 4 • Power supply If you have any questions regarding the specifications of this device, contact Inquiries your nearest Azbil Corporation office or Azbil Corporation representative. When making an inquiry, make sure to provide the model number and product number of this device.
- Page 5 Safety Precautions Correct installation, correct operation and regular maintenance are essential to Introduction ensure safety when using this device. Don’t use the system, before reading and understanding the safety precautions described in this manual and be sure to follow the instructions on installation, operation and maintenance. Two kinds of safety precaution are used in this manual —Warning and Signal words Caution.
- Page 6 How this Manual is Organized and Used This user's manual explains the use of the system and its associated devices in Organization and Method of Use the following order: Chapter 1 This chapter explains the configuration of measuring systems based on this product, the structure of this product and the names and functions of their respective parts.
-
Page 7: Table Of Contents
Detailed Table of Contents Chapter 1 - Configuration and Structure of the Measuring Systems ................1 - 1 Outline of this chapter ............1 - 1 System Configuration ............1 - 2 Measuring System ............1 - 2 Structure of this Unit and Functions of Parts ....1 - 4 Structure of the Device ............. - Page 8 Maintenance Mode ............4 - 28 Chapter 5 - Maintenance and Troubleshooting of the Electromagnetic Flowmeter ................ 5 - 1 Outline of this chapter ............5 - 1 Functions Check ............... 5 - 2 Checking alarm contact output ......... 5 - 2 Checking the Excitation Current ........
-
Page 9: Chapter 1 - Configuration And Structure Of The Measuring Systems
Chapter 1 - Configuration and Structure of the Measuring System This chapter explains the configuration of measuring systems using this unit. Outline of this chapter • The structure of this unit and the names and functions of its respective parts are explained. -
Page 10: System Configuration
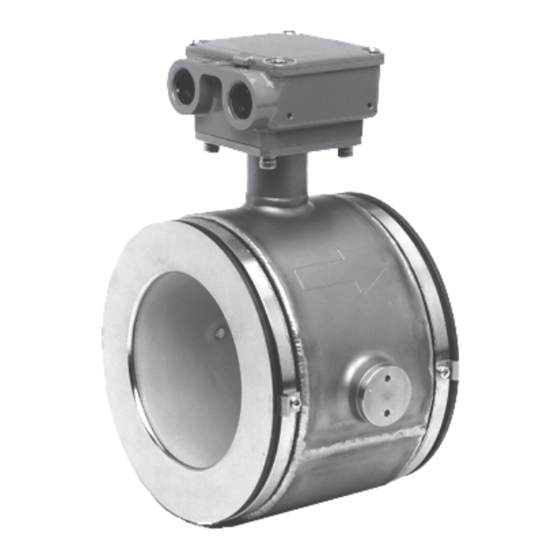
1.1 System Configuration Measuring System Depending on the way it is combined with the detector, this product is available Introduction in two configurations; integral and remote. • Integral: detector and converter are installed as an integrated unit on the pipe. •... - Page 11 Measuring System (Continued) Figure 1-2 Remote configuration Examples of flow measurement systems Converter AC power Commercially supply available cable or dedicated cable Contact output Detector Excitation output Flow signal input Fluid 1 - 3...
-
Page 12: Structure Of This Unit And Functions Of Parts
1.2 Structure of this Unit and Functions of Parts Structure of the Device This unit consists of the converter main body, the contact I/O card, data set- Main components ting device, and a terminal box. Figure 1-6 Structure of the main body Contact output card Converter main body Data setting... - Page 13 Structure of the Device (Continued) The following table explains the various parts. Converter parts and explanation Name Explanation Converter main body • Converts signal electromotive force generated in the detector into the instantaneous flow rate. Data setting device • Indicates the instantaneous flow rate. •...
- Page 14 MEMO 1 - 6...
-
Page 15: Chapter 2 - Installing The Device
Chapter 2 - Installing the Device This chapter explains the installation and wiring procedures of the device in Outline of this chapter the following order. • Selecting the installation site • Adjusting the data setting device direction • Installing the device •... -
Page 16: Before Installation
2.1 Before Installation Selecting the Installation Site (1) In order to make full use of the device functions, please observe the following Introduction criteria when selecting an installation site. Notes : • Install the product in a location with an ambient temperature of -25°C - +60°C and an ambient humidity of 5 - 100% RH to prevent equipment malfunction or output errors. -
Page 17: Installation Method
2.2 Installation Method Installing the Converter Basic installation method A convertor can be mounted in one of four ways, an integrated unit with a Installation sensor and an elbow, an integrated unit, mounting on a wall and mounting on a 2-inch pipe. Figure 2-1 Wall-mounted Mounting plate... - Page 18 Installing the Converter (Continued) Figure 2-3 Integral assembly Basic installation method Installation Figure 2-4 Mounting of Integrated Type with an Elbow 2 - 4...
-
Page 19: Electrical Wiring (1)
Electrical Wiring (1) A commercial power supply or DC 24 V ± 10% power supply is used. Introduction The following electrical wiring considerations are explained here. • Cable connection positions • Power supply and resistive load • Cable selection and installation •... -
Page 20: Electrical Wiring (2)
Electrical Wiring (1) (Continued) Terminal arrangement Terminal arrangement for integral converter On an integral converter, terminal symbols X, Y, SB, SA, A, B, C, and E are not indicated as on the remote converter, because these terminals are not used. 2 - 6... -
Page 21: Electrical Wiring (3)
Use a dedicated cable (Model: MGA12W) to connect the detector to the con- Cable between detector and verter. The signal cable used may be a dedicated cable made by Azbil converter Corporation or a commercially available cable and depends on fluid conductiv- ity, cable length, and the diameter of the detector. -
Page 22: Electrical Wiring (4)
Electrical Wiring (2) (Continued) Figure 2-6 Outer Dimensions of Signal Cables Signal Cables (Model: MGA 12W) Terminal treatment on detector side Terminal treatment on converter side For M4 screw For M4 screw Detector side Converter side For M4 screw Detector side (Model A) Detector side For M4 screw... - Page 23 Electrical Wiring (2) (Continued) Figure 2-8 Outer Dimensions of Excitation Cables Excitation Cables (Model: MGA 12W) Insulating tube For M4 screw For M4 screw Detector side Converter side Terminal treatment on detector side For M4 screw Black Detector side White (Model A) For M4 screw Black...
- Page 24 Electrical Wiring (3) Figure 2-10 Detector-to-converter connection Detector-to-con- verter connection • Wiring of dedicated cables (Model: MGA12W) Signal cable MGA12W Converter Detector Excitation cable MGA12W • Commercially available cable Signal cable 2-core single-shielded cable Converter Detector Excitation cable 2 - 10...
- Page 25 Electrical Wiring (4) The recommended wiring cable is a 600 V vinyl sheath electrical wire CVV Selecting the wiring cable (JIS C 3401) with a conductor section of 2 mm , or a twisted cable with an equivalent or higher capacity. Shielded wire is recommended for wiring at locations subject to electromag- netic noise interference.
- Page 26 MEMO 2 - 12...
-
Page 27: Chapter 3 - Operating And Stopping Of The Measuring System
Chapter 3 - Operating and Stopping of the Measuring System This chapter explains the procedures for starting up this product and making Outline of this chapter zero adjustment. It also describes stopping the system. When starting up and operating this product for the first time, carefully follow the explanation given in this chapter. -
Page 28: Start-Up
3.1 Start-up Starting up Start up the electromagnetic flowmeter according to the following steps. Procedures Procedure Step Make sure the electromagnetic flowmeter detector is prop- erly installed on the pipe. Make sure the wiring between the detector and converter has been completed properly. -
Page 29: Preparations Before Measurement
3.2 Preparations before Measurement Zero Adjustment After start-up, be sure to zero the electromagnetic flowmeter. Zero adjust- Introduction ment is performed by using the data setting device. 3 - 3... - Page 30 Method by Using the Data Setting Device Adjust the electromagnetic flowmeter so that the instantaneous flow when the Introduction fluid in the detector stands still is measured as zero. Notes: • Zero adjustment is very important for accurate flow rate measure- ment.
-
Page 31: Method Using The Data Setting Device
Method Using the Data Setting Device (Continued) Method using the Step Procedure Screen data setting device Touch the key to start zero adjustment. During ad- justment, when the large 7- * A U T O Z E R O segment displays the flow rate in %, "0.0"... -
Page 32: Stopping
3.3 Stopping Caution • Before stopping the flowmeter operation and shutting off the output to the control equipment, be sure to switch the control equipment to manual control. This will prevent the power shut-off on this unit from directly affecting the control equipment. Perform the following steps to stop flowmeter operation. -
Page 33: Setting Write Protection
3.4 Setting Write Protection This product is set up at shipment so that settings can be made in any mode. Introduction However, write protection can be set to protect data from being accidentally changed after start-up. The following write-protect levels are available. The product is set to level 0 Levels of write protect when shipped. - Page 34 MEMO 3 - 8...
-
Page 35: Chapter 4 - Operation Using The Data Setting Device
Chapter 4 - Operation Using the Data Setting Device This chapter explains how to operate this product using the data setting de- Outline of this chapter vice. The device can be operated using the 4 keys on the data setting device. -
Page 36: Functions Of The Data Setting Device
4.1 Functions of the Data Setting Device Data Setting Device Figure 4-1 shows describes the parts of the data setting device. Names of parts Figure 4-1 Names of data setter parts Main display Percent flow rate display mark Actual flow rate display mark Infrared touch sensor Auxiliary... - Page 37 Data Setting Device (Continued) The following is an explanation of the various keys on the data setting device. Part names and explanation • When operating the keys, be sure to close the cover. Only touch the keys through the glass. •...
- Page 38 Data Setting Device (Continued) Part names and Name Explanation explanation Up key • Change the parameter at the cursor position. • Display the next screen. When the cursor is located at the far left of the upper row (*, #, >) Changes the O P E R A T O R ' S screen.
-
Page 39: Operating The Display/Data Setting Device
Operating the Display/Data Setting Device Outline of the The following 4 modes are available on the device. various modes Mode Explanation This mode indicates the measuring status. MEASURING MODE The operator setting mode is used for data that are OPERATOR'S MODE registered or changed frequently. - Page 40 Operating the Display/Data Setting Device (Continued) Outline of the Mode Explanation various modes This is the engineering setting mode. It is used for ENGINEERING MODE data that are registered or changed less frequently than in the Operator’s Mode. Settings can be registered or changed when write protect is set to level 0 or 1.
-
Page 41: Screen Organization
Screen Organization The device modes are arranged as follows. Introduction Operation at start-up L CD indication flow * A U T O Z E R O R E A DY Flash SE L F CHE CK * DISPL AY SEL ECT MODE ME A SUR ING E ngineering... -
Page 42: Measuring Mode
Screen Organization (Continued) Introduction Engineering setting mode E N G I N E E R I N G M O D E 3 seconds later (*1) The aperture ranges from 15 to 250 mm. (*2) This is displayed when the unit specification is weight. S E T (*3) , (*4) Make sure that the following condition is met: X X X X X X X X... - Page 43 The MEASURING MODE is an ordinary measurement mode. Introduction Screen displays in the normal state (the flow rate exceeds the alarm values) and the abnormal state (the flow rate is equal to or below the alarm values) are explained below. Top line : Momentary % flow rate Normal state...
-
Page 44: How To Skillfully Operate The Touch Key Switches
How to Skillfully Operate the Touch Key Switches 1. As illustrated, move your finger upward from underneath the target, and completely cover the white round target. Then, move the finger downward to its original position. These motions ensure smooth key operation. If you move your finger side- ways, you may inadvertently actuate the wrong key. -
Page 45: How To Enter The Operator's Mode
How to Enter the Operator's Mode Step Procedure Screen The screen at right shows an example of display of 10 m3/h, 100% in the Measuring Mode. 1 0 . 0 m 3 / h Touch the MODE key for 0 0 0 0 0 3 2 5 4 2 T O T A L about 3 seconds. -
Page 46: Operating In Operator's Mode
Operating in Operator’s Mode The Operator’s Mode includes the following settings and adjustments. Introduction To enter the Operator’s Mode, touch the MODE key for more than three sec- onds. Screen display Description Indicated conditions Sets the damping time con- DAMPING stant AUTO ZERO Performs zero adjustment... -
Page 47: Resetting The Damping Time Constant
Resetting the Damping Time Constant Set a damping time constant to cut out minute fluctuations when transmitting Introduction the measured instantaneous flow rate to the control equipment. Check the amplitude of variation in instantaneous flow output and set the damping time constant to an appropriate value. -
Page 48: Zero Adjustment
Zero Adjustment Adjust the flowmeter so that the measured instantaneous flow rate will be zero Introduction when the fluid stands still in the detector. Notes: • Zero adjustment is very important for accurate flow measurement. Before operating the unit for the first time, be sure to zero the flowmeter. - Page 49 Zero Adjustment (Continued) Zero Adjustment Step Procedure Screen Touch the key to start zero adjustment. When the large 7- segment display shows the * A U T O Z E R O flow rate in percent, “0.0” will flash during adjustment. When zero adjustment is completed, the flashing will stop and the “ON”...
-
Page 50: Setting/Changing The Flow Rate Indication
Setting/Changing the Flow Rate Indication Selects the mode of flow rate indication for the main display: from percent Introduction display: actual flow rate display, and integrated value display. The default setting is percent display. Default setting Select either “%” (instantaneous percent flow rate), “RATE” (instantaneous Setting range actual flow rate). -
Page 51: Selecting Modes
Selecting Modes Select either the Engineering Mode (to operate the setting parameters of the Introduction electromagnetic flowmeter) or the Maintenance Mode (to perform adjust- ments or inspection). Note: • In some cases, a mode selection screen will not open, depending on the write-protect setting. - Page 52 Selecting Modes To enter the Maintenance Mode Introduction Step Procedure Screen Call up the Maintenance Mode selection screen by following the steps to enter the Operator’s * M O D E E N T E R Mode. E N G I N E E R I N G Touch the key once.
-
Page 53: Engineering Mode
Engineering Mode The Engineering Mode contains the following settings and adjustments. Introduction Screen display Description Indicated conditions Sets the ID ID SET Sets detector data EX, MGF, DIA SPAN Sets the range Selects the specific gravity Selection of a weight unit GRAVITY (t, kg, g, lb) in range setting. -
Page 54: Setting The Id
Setting the ID Sets the ID code for the electromagnetic flowmeter. Introduction Default setting XXXXXXXX The ID code can be set using up to 8 alphanumeric characters: letters (A to Z), Setting range numbers to 9), –, /, space, and period. Step Procedure Screen... -
Page 55: Detector Data Setup
Detector Data Setup This is used to set and select the constant, and diameter of the detector to be Introduction used in combination with the converter. EX300.0, MGF, DIA 050.0 will be selected. Default setting Note: • When you purchase the converter and detector in combination, your converter will contain the detector data that was set during actual flow calibration. - Page 56 Detector Data Setup (Continued) Table 4-1 Convertor-sensor combinations Default setting : Allowable setting Aperture/Sensor Model No. 15.0 25.0 40.0 50.0 65.0 80.0 100.0 125.0 150.0 200.0 250.0 Remarks: • The exciting current value (EX value) setting method varies ac- cording to sensor model numbers. Wrong setting can cause errors and equipment destruction.
-
Page 57: Setting The Range
Setting the Range This is used to set the flow rate measurement range, which means the value Introduction when the electromagnetic output reaches 100%. The lower limit of the range is zero. Flow rate: 0.0001 - 99999 Setting the range Units: , l, cm , t, kg, g... -
Page 58: Setting The Specific Gravity
Setting the Specific Gravity This is used to set the specific gravity when selecting a weight unit (t, kg, g) in Introduction range setting. Without this setting, an output error may result. 1.0000 Default setting 0.1000 - 9.9999 Setting range Step Procedure Screen... -
Page 59: Setting Alarm Contact 1
Setting alarm contact 1 An alarm is output when the momentary % flow rate value becomes equal to Introduction or smaller than the setting. Initial setting 0 - 99% Valid setting range Step Procedure Screen Display the alarm contact 1 set- ting screen according to the procedure used for selecting # A L A R M 1... -
Page 60: Setting Alarm Contact 2
Setting alarm contact 2 An alarm is output when the momentary % flow rate value becomes equal to Introduction or smaller than the setting. Initial setting 0 - 99% Valid setting range Step Procedure Screen Display the alarm contact 2 set- ting screen according to the procedure used for selecting # A L A R M 2... -
Page 61: Setting Alarm Hysteresis
Setting alarm hysteresis Set a hysteresis value for the alarm contacts. Introduction Initial setting 0 - 20% (in 1% units). Make sure that the following condition is met: Valid setting range ALARM1 + HYS < 100%. Step Procedure Screen Display the hysteresis setting screen according to the proce- dure used for selecting the EN- # A L M H Y S T E R E S I S... -
Page 62: Maintenance Mode
Maintenance Mode The Maintenance Mode includes the following adjustments and items to be Introduction checked. Refer to Chapter 6 for the operating method. OUTPUT CHECK Screen display Description MODE Check the alarm contact output loop. ALARM1 CLOSE ALARM2 CLOSE Check the excitation source. EX CHECK CALIBRATION Screen display... -
Page 63: Chapter 5 - Maintenance And Troubleshooting Of The Electromagnetic Flowmeter
Chapter 5 - Maintenance and Troubleshooting of the Electromagnetic Flowmeter This chapter describes the maintenance and inspection procedures for the Outline of this chapter electromagnetic flowmeter and the information that should be referred to dur- ing troubleshooting. First, this chapter explains the procedures used to check the converter func- tions. -
Page 64: Functions Check
5.1 Function check Checking alarm contact output Alarm contact output can be checked using an electromagnetic flow switch. Introduction CLOSE Initial setting CLOSE or OPEN Valid setting range Step Procedure Screen Display the alarm contact out- put checking screen according to the procedure used for se- >... -
Page 65: Checking The Excitation Current
Checking the Excitation Current It is possible to check the excitation current value that flows into the coil in the Introduction detector and its flow direction. This check is not possible for integral models. Step Procedure Screen Open the excitation current check screen by following the steps to enter the Maintenance >... -
Page 66: False Signal Input By Calibrator
False Signal Input by Calibrator The electromagnetic flowmeter is provided with a dedicated calibrator, which Introduction has the function of generating the same signal as the flow rate signal from the detector. The converter function can be checked using this false signal. When a problem occurs in the converter, use this method to judge whether When to use detector or the converter is responsible for the problem. -
Page 67: Troubleshooting
5-2 Troubleshooting Overview If a problem occurs at electromagnetic flowmeter start-up and operation, the Introduction following three causes should be considered. Inconsistency between the electromagnetic flowmeter’s specifications and the actual operating conditions Missetting or misoperation Electromagnetic flowmeter malfunction If a problem occurs during electromagnetic operation, the converter’s self- diagnostic function will classify it as serious or minor. -
Page 68: Errors At Start-Up
Errors at Start-up When a problem occurs at start-up, perform the following procedures. Troubleshooting If the problem remains, it is possible that the electromagnetic flowmeter has been damaged. Contact the reference listed on the last page of this manual. Trouble Check points and treatment No indication on display •... -
Page 69: Errors During Operation
Errors during Operation When a problem occurs during operation, perform the following procedures. Troubleshooting 1. Check against the table on this page for symptoms of the error. If found, perform the steps indicated in the table. 2. When the problem cannot be solved, it is possible that the electromagnetic flowmeter has been damaged. -
Page 70: Error Messages And Treatment (Display)
Error Messages and Treatment (Display) Hardware check is executed in the Measuring Mode. Hardware check Perform the proper measures immediately. While an error code (Err-01 to Err-05) is being displayed, the output for the abnormal situation will be as preset in the Engineering Mode. Error codes for E r r - 0 1 serious trouble... - Page 71 Error Messages and Treatment (Display) (Continued) Missetting diagnostics are executed in the Engineering Mode. Checking for mis- setting When a setting is incorrect, the error will be displayed for one second and then the incorrectly-set screen will appear. (To view the error contents again, press the MODE key.) Note: Press the MODE key for more than 5 seconds, and the data will return to the status obtaining before entering the Engineering Mode.
- Page 72 ご注文・ご使用に際してのご承諾事項 平素は当社の製品をご愛用いただき誠にありがとうございます。 さて、 本資料により当社製品 (システム機器、 フィールド機器、 コントロールバルブ、 制御機器) をご注文 ・ ご使用いただく際、 見積書、契約書、カタログ、仕様書、取扱説明書などに特記事項のない場合には、次のとおりとさせていただきます。 1.• 保証期間と保証範囲 1.1•保証期間 当社製品の保証期間は、ご購入後またはご指定場所に納入後1年とさせていただきます。 1.2•保証範囲 上記保証期間中に当社側の責により故障が生じた場合は、納入した製品の代替品の提供または修理対応品の提 供を製品の購入場所において無償で行います。ただし、次に該当する場合は、この保証の対象範囲から除外さ せていただきます。 ①• お客さまの不適当な取り扱い•ならびに•ご使用の場合• (カタログ、仕様書、取扱説明書などに記載されている条件、環境、注意事項などの不遵守) ②• 故障の原因が当社製品以外の事由の場合 ③• 当社•もしくは•当社が委託した者以外の改造•または•修理による場合 ④• 当社製品の本来の使い方以外で使用の場合 ⑤• 当社出荷当時の科学・技術水準で予見不可能であった場合 ⑥• その他、天災、災害、第三者による行為などで当社側の責にあらざる場合 なお、ここでいう保証は、当社製品単体の保証を意味するもので、当社は、当社製品の故障により誘発される お客さまの損害につきましては、損害の如何を問わず一切の賠償責任を負わないものとします 。 2.•適合性の確認 お客さまの機械 ・ 装置に対する当社製品の適合性は、 次の点を留意の上、 お客さま自身の責任でご確認ください。 ①•...
- Page 73 4.• 長期ご使用における注意事項 一般的に製品を長期間使用されますと、電子部品を使用した製品やスイッチでは、絶縁不良や接触抵抗の増大 による発熱などにより、製品の発煙・発火、感電など製品自体の安全上の問題が発生する場合があります。お 客さまの機械、装置の使用条件・使用環境にもよりますが、仕様書や取扱説明書に特記事項のない場合は、10 年以上は使用しないようお願いいたします。 5.• 更新の推奨 当社製品に使用しているリレーやスイッチなど機構部品には、開閉回数による磨耗寿命があります。 また、電解コンデンサなどの電子部品には使用環境・条件にもとづく経年劣化による寿命があります。当社製 品のご使用に際しては、仕様書や取扱説明書などに記載のリレーなどの開閉規定回数や、お客さまの機械、装 置の設計マージンのとり方や、使用条件・使用環境にも影響されますが、仕様書や取扱説明書に特記事項のな い場合は 5 〜 10 年を目安に製品の更新をお願いいたします。 一方、システム機器、フィールド機器(圧力、流量、レベルなどのセンサ、調節弁など) は、製品により部品の 経年劣化による寿命があります。経年劣化により寿命ある部品は推奨交換周期が設定してあります。推奨交換 周期を目安に部品の交換をお願いいたします。 6.• その他の注意事項 当社製品をご使用するにあたり、品質・信頼性・安全性確保のため、当社製品個々のカタログ、仕様書、取扱 説明書などの技術資料に規定されています仕様(条件・環境など) 、注意事項、危険・警告・注意の記載をご理 解の上厳守くださるようお願いいたします。 7.• 仕様の変更 本資料に記載の内容は、 改善その他の事由により、 予告なく変更することがありますので、 予めご了承ください。 お引き合い、仕様の確認につきましては、当社支社・支店・営業所• または• お近くの販売店までご確認くださ るようお願いいたします。 8.• 製品・部品の供給停止 製品は予告なく製造中止する場合がありますので、予めご了承ください。 修理可能な製品について、製造中止後、原則...
- Page 75 Document Number : CM2-MGF100-2001 Document Name : MagneW 3000 FLEX Electromagnetic Flow Switch (Integral Type, Remote Type Converter) Model MGF Date : Dec. 2014 Rev.3 Issued / Edited by : Azbil Corporation...
Need help?
Do you have a question about the MagneW 3000 FLEX and is the answer not in the manual?
Questions and answers