Table of Contents
Advertisement
Available languages
Available languages
Quick Links
INada029V01_ES
A90-091
MANUAL DE USUARIO
ADVERTENCIA
El fabricante y el vendedor renuncian ciertamente a toda responsabilidad por
las lesiones personales, los daños a la propiedad o las pérdidas, ya sean
directas, indirectas o incidentales, que resulten de la instalación de manera
incorrecta, el uso inadecuado, el mantenimiento impropio o la negligencia de
este equipo.
Lea cuidadosamente el manual del usuario antes de utilizar este equipo y guarde el
manual bien para las referencias futuras.
Advertisement
Table of Contents

Related Manuals for HOMCOM A90-091


Summary of Contents for HOMCOM A90-091
- Page 1 INada029V01_ES A90-091 MANUAL DE USUARIO ADVERTENCIA El fabricante y el vendedor renuncian ciertamente a toda responsabilidad por las lesiones personales, los daños a la propiedad o las pérdidas, ya sean directas, indirectas o incidentales, que resulten de la instalación de manera incorrecta, el uso inadecuado, el mantenimiento impropio o la negligencia de este equipo.
- Page 2 Precauciones de Seguridad – ¡Lea todas las instrucciones antes de utilizar el equipo! 1. Monte esta bicicleta estática de manera correcta, utilizando las piezas originales suministradas según las instrucciones de instalación. Antes de realizar el montaje, inspeccione si los paquetes están en buenas condiciones y si las piezas de repuesto están presentes completamente de acuerdo con las precauciones de transporte y con referencia a la “Lista de Partes”...
- Page 3 para garantizar que los niños no la utilizan sin la supervisión de un adulto. 15. Asegúrese de que ninguna parte del cuerpo de otra persona esté en contacto con la bicicleta estática al hacer ejercicio. 16. En el motivo de proteger el medio ambiente, nunca deseche los paquetes o baterías, y colóquelos en un cubo de basura designado u otro punto especial de recolección de desechos.
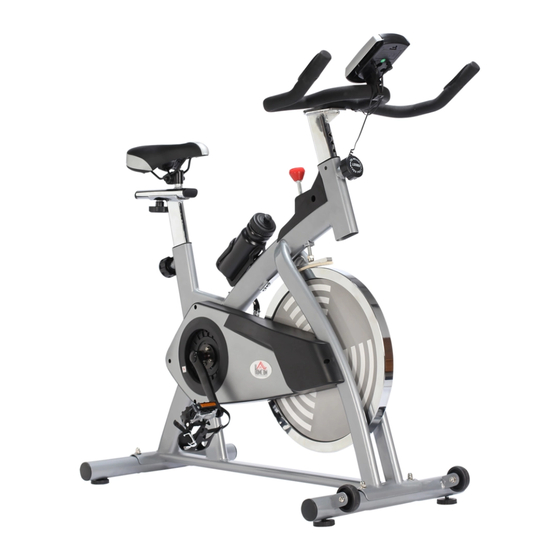
- Page 4 Lista de Partes Número de Descripción Cantidad pieza Marco principal Perno Arandela Tuercas Estabilizador delantero Estabilizador trasero Perilla de seguridad Poste de soporte del asiento Barra de asiento horizontal Asiento Perilla ajustable Tornillo Soporte para computadora Barra del manillar Pedal Izquierdo/Derecho Computadora Tuerca ciega Arandela plana...
-
Page 5: Instrucciones De Montaje
INSTRUCCIONES DE MONTAJE Solo se necesitan 4 sencillos pasos para cumplir el montaje y luego estará listo para empezar a entrenar: se necesitan 30 minutos para montar la bicicleta estática aproximadamente . PASO 1 Fije los estabilizadores delantero (05) y trasero (06) al marco principal (01). 2. - Page 6 PASO 3 1. Fije el sillín (01) a la barra de asiento horizontal (09); vea la ilustración siguiente. 2. Deslice la barra del asiento horizontal (09) en el poste de soporte del asiento (08), para bloquearla en el lugar correctamente con la perilla ajustable (11) - vea la ilustración siguiente.
- Page 7 PASO 4 1. Fije el pedal marcado con la letra “L” (15) al brazo de la manivela marcado con le letra “L” girando en el sentido contrario a las agujas del reloj hasta que quede apretado firmemente; vea la ilustración siguiente. 2.
- Page 8 INSTRUCCIONES DE EJERCICIO El uso de su BICICLETA ESTÁTICA le brindará varios beneficios: mejorará su condición física, tonificará los músculos y junto con una dieta controlada en calorías le ayudará a perder peso. 1. Fase de calentamiento Esta fase le ayuda a que la sangre fluya por el cuerpo y a que los músculos funcionen de manera correcta.
-
Page 9: Tonificación Muscular
Esta fase debe durar por lo menos 12 minutos, aunque la mayoría de las personas empieza aproximadamente a los 15-20 minutos. 3. Fase de enfriamiento Esta fase es para dejar que su sistema cardiovascular y sus músculos se relajen. Esta es una repetición del ejercicio de calentamiento, p. Ej. reduzca su ritmo, se necesitan aproximadamente 5 minutos. -
Page 10: Funciones De Botones
cambie la altura. Una vez ajuste la altura a la deseada, vuelva a colocar la perilla de ajuste y apriete en su lugar. La perilla de control de tensión se puede ajustar la resistencia de los pedales. Una alta resistencia dificulta pedalear, una baja resistencia facilita pedalear. - Page 11 USER MANUAL WARNING Manufacturer and seller expressly disclaim any and all liability for personal injury, property damage or loss, whether direct, indirect, or incidental, resulting from the incorrect attachment, improper use, inadequate maintenance, or neglect of this product. -11-...
- Page 12 Safety Precau�ons – Please Read the Instruc�on before Using! 1. Assemble this product properly, using original parts supplied, according to the installa�on instruc�ons. Before assembly, inspect whether packages are in good condi�on and whether spare parts are complete in accordance with transport precau�ons with reference to the supplied list of spare parts. 2.
-
Page 13: Exploded-View Assembly Drawing
EXPLODED-VIEW ASSEMBLY DRAWING -13-... -
Page 14: Part List
PART LIST Part number Descrip�on Quan�ty Main frame Bolt Washer Nuts Front Stabilizer Rear Stabilizer Safety Knob Seat Support Post Horizontal seat bar Seat Adjustable Knob Screw Computer holder Handle bar Pedal L/R Computer Cap nut Flat washer Handlebar Support Post -14-... - Page 15 ASSEMBLY INSTRUCTIONS 4 easy steps to assemble then you’re ready to workout – it takes approx 30 mins to assemble. STEP 1 Fix the front (05) and back stabilizers (06) to the main frame (01). 2. Lock into the proper place with the bolts (02), washers (03) provided – see the illustra�ons. STEP 2 1.
- Page 16 STEP 3 1. Fix the saddle (01) to the horizontal seat bar (09) – see the illustra�on. 2. Slide the horizontal seat bar (09) into the seat support post (08) , to lock in the proper place with the adjustable knob (11) – see the illustra�on. 3.
- Page 17 STEP 4 1. Firmly fix the pedal marked L (15) to the crank arm marked L in a an�-clockwise direc�on un�l �ght – see the illustra�on. 2. Now firmly fix the pedal marked R (15) to the crank arm marked R in a clockwise direc�on un�l �ght –...
- Page 18 INNER THIGH FORWARD BENDS CALF / ACHILLES SIDE BENDS OUTER THIGH 2. The Exercise Phase This is the stage where you put the effort in. A�er regular use , the muscles in your legs will become more flexible. Work to your own pace but it is very important to maintain a steady tempo throughout.
- Page 19 INNER THIGH FORWARD BENDS CALF / ACHILLES SIDE BENDS OUTER THIGH 2. The Exercise Phase This is the stage where you put the effort in. A�er regular use , the muscles in your legs will become more flexible. Work to your own pace but it is very important to maintain a steady tempo throughout.
- Page 20 connec�ons are correct. MUSCLE TONING To tone muscle while on your exercise cycle you will need to have the resistance set quite high. This will put more strain on your leg muscles and may mean you cannot train for as long as you would like. If you are also trying to improve your fitness you need to alter your training program.
- Page 21 CALORIE:ACCUMULATES CALORIE CONSUMPTION DURING EXERCISE MAXIMUM VALUE IS 999.9CAL (THIS DATA IS A ROUGH GUIDE FOR COMPARISON OF DIFFERENT EXERCISE SESSIONS THAT CANNOT BE USED IN MEDICAL TREATMENT). NOTE 1. WHEN STOP EXERCISEING,THERE WILL BE A STOP SIGN SHOWN ON THE UPPER-LEFT CORNER.
Need help?
Do you have a question about the A90-091 and is the answer not in the manual?
Questions and answers