Table of Contents
Advertisement
Quick Links
800001076/800002076/800003076/800004076
800001077/800002077/800003077/800004077
800001078/800002078/800003078/800004078
800001079/800002079/800003078/800004079
RAISED GARDEN BED
3 LEVELS
1 LEVEL KIT CONTAINS:
•
Composite straight boards 4' x 2
•
Composite boards curved 4' x 6
•
Stacking Brackets x 16
•
Stacking Stakes x 8
•
Plugs x 32
•
Caps x 8
2 LEVEL KIT CONTAINS:
•
Composite straight boards 4' x 6
•
Composite boards curved 4' x 12
•
Stacking Brackets x 28
•
4-way Brackets x 8
•
Stacking Stakes x 16
•
Plugs x 72
•
Caps x 8
Layout your timbers along the borderline and connect each timber together by inserting
the top of the stake through the bracket loops with the stake pointing to the sky. This
enables you to freely position your border to get your desired location.
FOR INDOOR & HARD SURFACE:
If you plan to assemble raised bed on a hard surface, use
hacksaw to remove the spike of each stake. Use these cut
Trim stake spike with
down stakes for the base level only of your raised garden.
hacksawfor use indoor
or on hard surfaces
Customer Service: 1800-914-9835 |
support@frameitall.com
© Frame It All. All Rights Reserved.
LAZY CURVE
4 LEVELS
3 LEVEL KIT CONTAINS:
•
Composite straight boards 4' x 8
•
Composite boards curved 4' x 18
•
Stacking Brackets x 44
•
4-way Brackets x 8
•
Stacking Stakes x 24
•
Plugs x 104
•
Caps x 8
4 LEVEL KIT CONTAINS:
•
Composite straight boards 4' x 12
•
Composite boards curved 4' x 24
•
Stacking Brackets x 56
•
4-way Brackets x 16
•
Stacking Stakes x 24
•
Plugs x 144
•
Caps x 8
ASSEMBLY INSTRUCTIONS
STEP 1a:
Assemble the timbers by sliding one end of timber into channel end
of one of the brackets. Use plugs to cover the holes on both sides to
lock the bracket in place.
Repeat this process on the opposite end of the timber flipping the bracket in the opposite
direction (see image
). Bracket 2 x straight boards
in this way.
STEP 1b:
Connect 3 curved boards with the bracket
orientation A for the outward-curving sections
and 3 curved boards with orientation B for
the inward-curving sections.
STEP 2:
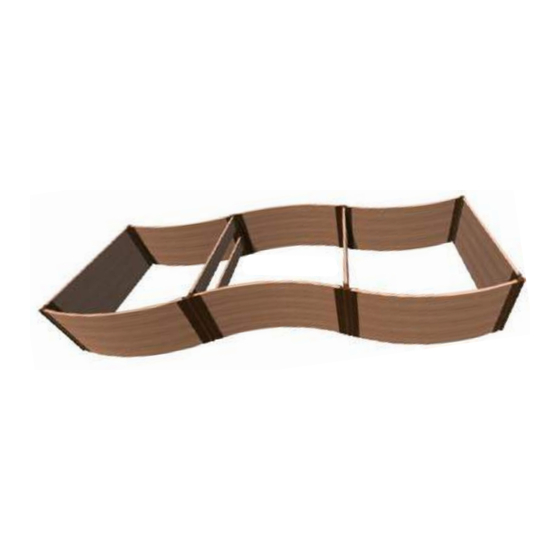
Layout the base level of your raised garden in the wavy shape below, using 2 x 4' straight
& 6 x 4' curved timbers. Insert stake through the hole of the bracket and into each of the
corners to lock all sides in place.
STEP 2a:
For one level, add caps to each of the top corner joints to finish off the raised garden.
How the Joints Work
Use a Cap to
complete the
top level.
Use stacking
stakes for
ground level
Use plugs (included)
frames and
Use plugs to
stacking
to cover the holes on
cover the holes
additional levels.
– two plugs are
both side of timbers
required per
bracket (1 on
each side)
HAPPY GARDENING!
Use stacking
Stacking stake fit
stake when
into the tops other
creating a
Stacking stakes
multi-level
Advertisement
Table of Contents

Subscribe to Our Youtube Channel
Related Manuals for FRAME IT ALL 800001076


Summary of Contents for FRAME IT ALL 800001076
- Page 1 Use plugs to stacking to cover the holes on cover the holes Customer Service: 1800-914-9835 | additional levels. – two plugs are both side of timbers required per support@frameitall.com bracket (1 on each side) © Frame It All. All Rights Reserved.
- Page 2 STEP 3: STEP 4: For level 2, connect 6 curved boards and 4 straight boards in the following Layout the boards for the second level flat on the ground while referencing the diagram patterns and quantities. below. Place the cross board for level 2 on top of the upside stakes to ensure it will fit. Once adjustments have been made, the stakes can be hammered into the ground and the second level can be stacked.
Need help?
Do you have a question about the 800001076 and is the answer not in the manual?
Questions and answers