Advertisement
CONTENT
In this box you will find:
- 1 x camera
- 1 x 32GB SD card
- 3 x thermal paper rolls
- 3 x sticker plates
- 1 x wrist strap
- 1 x user manual
- 1 x USB-C charge cable
- 5 x markers
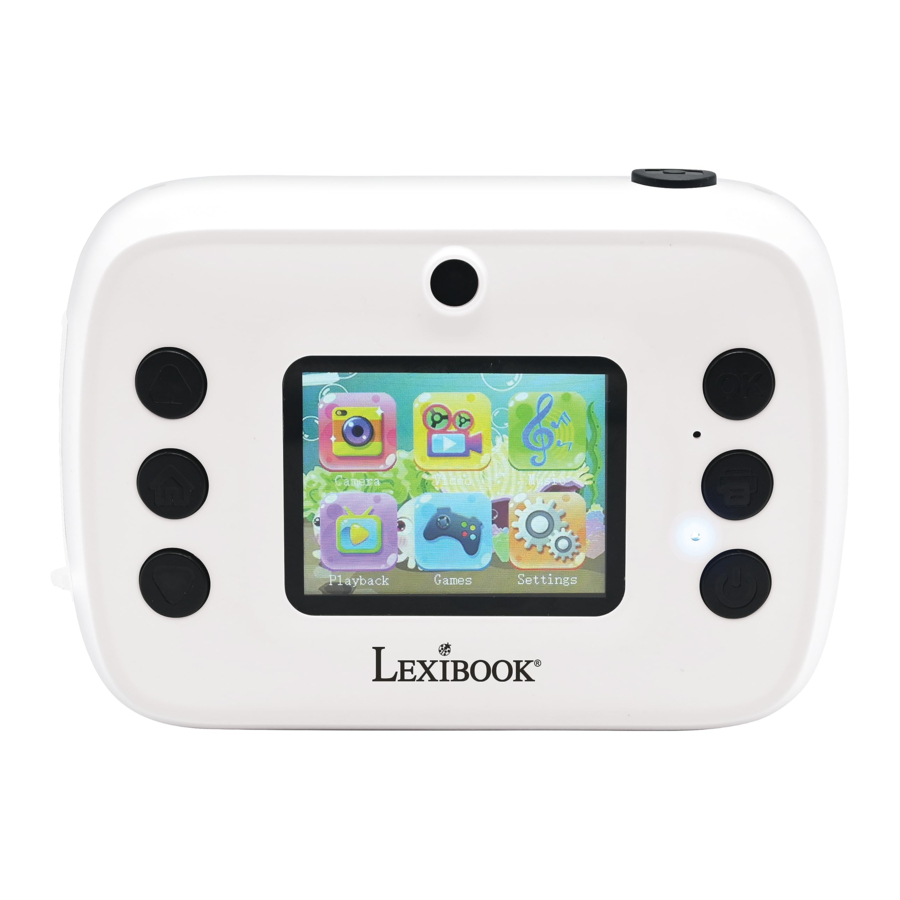
GETTING TO KNOW YOUR CAMERA

- Power button
- Menu button
- Left button
- Right button
- Printer mode button
- OK button
- Shooting button
- Back camera
- Flash
- Front camera
- Rubber cover
- USB-C charging slot and file transfer
- Power completely cut off button / reset button
- SD/TF card slot
- Battery indicator
- Front case for paper reload

All packaging materials, such as tape, plastic sheets, wire ties and tags are not part of this product and should be discarded for your child's safety.
POWER SOURCES
The digital camera operates with the USB type C charging cable (included) 5.0V ![]() 1.2A.
1.2A.
Battery: Lithium battery 7.4V ![]() 600mAh.
600mAh.
Charging the device:
- Check that the unit is switched off.
- Remove the rubber cover base of the camera (11).
- Use the supplied USB cable to connect the USB-C port (12) of the camera, connect the other end to a charger. The camera will start to charge, the Red Battery indicator will turn on (15).
- Once the charging finishes, the Red Battery indicator will be off.
- Danger of explosion if battery is incorrectly replaced. Please only replace it with the same or equivalent battery.
- The battery should not be exposed to high temperatures, such as sunlight, fire or anything similar.- Mal-function or loss of memory may be caused by strong frequency interference or electrostatic discharge. Should any abnormal function occur, switch it off and then on again, or unplug the USB cable.
- Minimum distances around the apparatus for sufficient ventilation.
- No naked flame source, such as candles, should be placed on the product.
- The ventilation should not be impeded by covering the ventilation openings with items, such as newspapers, table-cloths, curtains, etc. - Use of the device in moderate climates.
- Batteries should be disposed safely. Take them to the collection container in order to protect the environment.
- Replacement of a battery with an incorrect type that can defeat a safeguard (for example, in the case of some lithium battery types);
- Disposal of a battery into fire or a hot oven, or mechanically crushing or cutting of a battery, that can result in an explosion;
- Leaving a battery in an extremely high temperature surrounding environment that can result in an explosion or the leakage of flammable liquid or gas; and
- A battery subjected to extremely low air pressure that may result in an explosion or the leakage of flammable liquid or gas.
CAMERA SET UP
Remove the protective film from the lens and screen before using the camera. Make sure that the switch button/reset button (13) is switched downward.
Note: If don't use the camera in a long time, it is suggested to switch the button to cut off the power completely by switching it upward.
Note: It can be used as a reset button. When camera crashes, use it to reset by switching upward and then downward the button.
Power On/Off
Press and hold the Power button (1) for 2 seconds to power on, the screen will display on the Menu page.
Press and hold the Power button (1) for 2 seconds to power off, the screen will be off.
Installation of the included 32GB memory card or any other memory card
To store pictures or videos, you need to insert a micro-SD card (32GB SD card already included) into your digital camera:
- Turn off the camera
- Open the rubber cover that protects the micro-SD card slot (11).
- Insert the micro-SD card carefully into the micro-SD card slot (14) and push firmly until you hear a "click" sound.
- To remove the card, push it in slightly to release it from the slot.
Installation of the thermal paper roll (3 rolls included)
- Open the small front case (16) pulling forward the 2 slots located on both sides of the camera.
- Insert one roll of thermal paper inside the compartment.
- Make sure that the end of the paper is facing upward.
- Leave a small amount of paper protruding from the top before closing the compartment.
- Pass the paper through the slot.
- Close the small front case.
FUNCTIONS AND MODES
Menu Setting
Power on the camera and short press left (3) or right (4) button to choose the Menu Setting Icon, short press OK button (6) to enter Menu setting.
Use the buttons (3) and (4) to move in the menu.
Press the OK button (6) to select your mode between photo, video, games, or MP3.

Photo Mode
- In the photo mode, long press on the ok button (6) to switch between front and back camera.
- If you want the camera to automatically print your picture once taken, press the printer mode button (5). A little printer icon will appear on the top right of your screen.
- If you don't want the camera to print it automatically, press again the (5) button. The icon will disappear.
- Short press shooting button (7) to take a photo.
- Long press on the (3) button to zoom in, up to x10
- Long press on the (4) button to zoom out
- Short press the arrows (3), (4), to scroll through the filters
- Press the menu button (2) to go back to the menu
Photo Effects
Once in Photo Mode, you have access to different frames (8 in total), effects (14 in total) and shooting modes (4 in total). Short press buttons (3) and (4) to cycle through all the modes. You have access to 4 different shooting functions. The mode icon will appear in the upper left corner of the screen:
 3 seconds timer before taking the picture.
 5 seconds timer before taking the picture.
 10 seconds timer before taking the picture.
 Makes a "drawing" effect on the picture in black and white.
Video Mode
- Short press shooting button (7), the working indicator will be flashing, the camera starts to take a video.
- Short press shooting button (7) again to stop video recording, the working indicator will stop flashing.
- Short press the Menu button (2) to be back to the Menu.
Preview mode
- Short press left (3) or right (4) button to choose the needed files.
- To play the taken video, short press OK button (5) to play and short press again to pause the video.
If, when taking the picture, you chose not to print your picture automatically and you want to print it now:
- Go in the "Preview" mode.
- With the arrows (3) and (6), go to the desired picture.
- Make sure that the "printer mode" is activated by clicking on (5) and that the printer icon is on the top right corner of the screen. If not, short press again (5) until you can see the icon.
- Short press OK (6).
- The picture will be printed.
Game Mode
The camera has 4 games. Short press left (3) or right (4) button to choose your desired game and short press OK button (6) to start the game.
MP3 Mode
- Power on the camera and short press Left (3) or Right (4) button to choose the MP3 Mode Icon.
- Short press OK button (6) to enter MP3 Mode.
- The audio files on the SD card will be played automatically.
- Briefly press the left (3) or right (4) buttons to select the desired audio file.
- Briefly press the OK button (3) to pause the audio file.
- Briefly press button (7) to change the volume. To return to the list of your audio files, press button (7) briefly.
- Briefly press the Home button (2) to return to the home page.
Flash
Once the camera is in photo mode
- Briefly press the OK button (6) to turn the flash on and off.
- A sun or a half-moon icon will appear at the top of the screen. If the sun icon is showing, the flash will automatically turn ON when taking the picture. If the moon icon is showing, no flash will be activated when taking the picture.
Do not use the flash within 1m of the subject
SPECIFICATIONS
| Screen | 2 Inch |
| Storage | Micro SD card supports up to 32GB |
| Photo File Format | JPG |
| Languages | French, English, German, Spanish, Portuguese, Italian, Dutch |
| Video File Format | AVI |
| Video Resolution | 720P (1280 x 720pixels 30fps) / 1080P (1920 x 1080pixels 15fps) / 1440P (2560 x 1440pixels) |
| Audio File Format | MP3 |
| Photo Size | 3M / 5M / 8M / 10M / 20M / 24M / 30M / 48M |
| Photo Frames | Support 8 Frames |
| Battery | Built-in 600mAh Li-ion battery |
| Print Mode | Gray printing or Dot printing |
Connecting your camera to a PC
- There are two ways to connect the content of your camera to your computer:
- Connect the USB-C cable supplied to the PC and the camera.
- Remove the micro-SD card and put it into a card reader and insert the card reader into your computer.
- Open "My Computer" or "Windows Explorer" on your computer.
- A "Removable Disk" will appear. Double click on it to view the contents.
- Now you can copy and save your photos and video files to your computer.
EPILEPSY WARNING
Read before you or your children use video games. Some people are prone to epileptic seizures or losses of consciousness as a result of seeing certain flickering lights or objects often present in daily life. These people are at risk from seizures when they watch certain television images or play certain video games. Such incidents can happen even if the person has no previous medical history of epilepsy. If you or a member of your family has ever displayed symptoms linked with epilepsy (seizures or loss of consciousness) while watching flickering lights or images, consult your doctor before use. Parents are advised to supervise their children while playing video games. If you or your child shows any of the following symptoms: dizziness, vision problems, eye or muscle tenseness, loss of consciousness, involuntary movements or seizures, cease playing immediately and consult your doctor.
Precautions to take in any case while using a video game:
- When you use a video game which can be connected to a TV screen, stand or sit relatively far from the TV screen and as far as the connection cable allows it.
- Use preferably video games which have a small screen. Avoid playing video games if you are tired or lack some sleep.
- Make sure to play in room which is well lit.
- While playing video games, take 10 to 15 minute breaks every hour.

Documents / ResourcesDownload manual
Here you can download full pdf version of manual, it may contain additional safety instructions, warranty information, FCC rules, etc.
Advertisement


Need help?
Do you have a question about the DJ150 and is the answer not in the manual?
Questions and answers