Advertisement
CRAFTSMAN
I _"°
_ '°"_'1
Double Insulated
Model No.
315.269210
18/32
7/16
13132
Save this manual
for
future reference
CAU'nON:
Read and
follow aH Safety RuUes and
Operating
Rnstructions before
first use of this product.
Customer
HeUp Line: 1-800-932-3188
o Safety
o Features
o Operation
o Maintenance
o Parts List
Sears,
Roebuck
and Co.,
3333
Bevedy
Rd., Hoffman
Estates,
RL 60179
USA
Visit the Craftsman
Web page: www.sears.com/craftsman
983000-028
1-03
US
Advertisement
Table of Contents

Related Manuals for Craftsman 315.26921


Summary of Contents for Craftsman 315.26921
- Page 1 Read and follow aH Safety RuUes and Operating Rnstructions before first use of this product. Customer HeUp Line: 1-800-932-3188 Sears, Roebuck and Co., Visit the Craftsman Web page: www.sears.com/craftsman 983000-028 1-03 18/32 7/16 3333 Bevedy Rd., Hoffman 13132 o Safety...
-
Page 2: Full One Year Warranty
FULL ONE YEAR WARRANTY ON CRAFTSMAN If this rRRFTSMRN router fails due to a defect in material or workmanship within one year from the date of purchase, Sears wiii replace it, free of charge. WARRANTY SERVICE IS AVAILABLE STORE OR SEARS SERVICE CENTER IN THE UNITED STATES. -
Page 3: Personal Safety
WARNING:Read andunderstand a H instructions. Failure tofollowaHinstructions Hsted beUow, mayresuUt in eUectric shock, f ire and/orserious personal injury. SAVE THESE INSTRUCTmONS WORK AREA [] Keep your work area ctean and well Jit. CUuttered benches and dark areas invite accidents. [] Do not operate power tooJs in expJosive atmo- spheres, such as in the presence of flammable tiquids, gases, or dust. - Page 4 SERVICE [] TooJ servicemustbe performed only by qualio fied repair personnel. Service or maintenance performed by unqualified personnel could result in a risk of injury. NoJd tooJ by insulated gripping surfaces contact hidden wiring or its cord. Contact with a "live" wire will make exposed metal parts of the tool "live" and ADDITIONAL RULES FOR SAFE...
- Page 5 important: Some of the following symbols may be used on your tool. Please study them and barn their meaning. Proper interpretation of these symbols wiii allow you to operate the tool better and safer. SYMBOL NAME Volts Amperes Hertz Watt Minutes Alternating Current No Load Speed...
- Page 6 Rfany parts are damaged or missing, contact your nearest Sears Retail Store to obtain replacement attempting to operate router. A wrench, a 1/4 in. collet assembly, and this operator's manual are also included= 0 - 1-1/2 in.
-
Page 7: Double Insulation
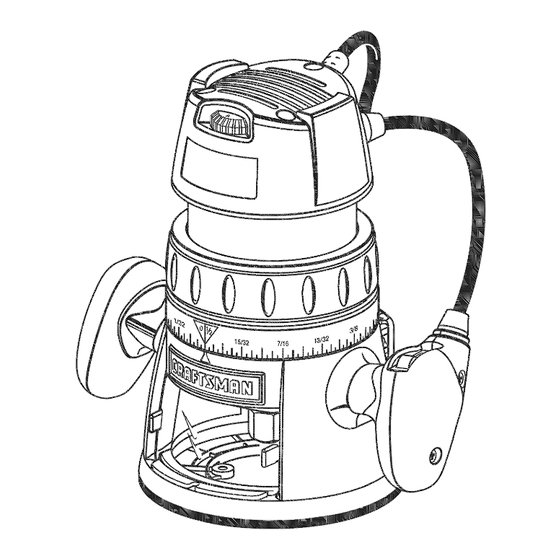
If your tool does not operate when plugged into an outlet, double-check the power supply. SWmTCH To turn the router ON, toggle the switch to the l position. To turn the router OFF, toggle the switch to the O position. SPINDLE... - Page 8 POWER HANDLE WRENCH 1/4in. COLLET ASSEMBLY DEPTH ADJUSTING LOCKING SPINDLE LOCK COLLET NUT Fig:1 WARNmNG: Do not allow familiarity with your router to make you careUess, Remember that a careUess fraction of a second is sufficient to inflict severe injury,...
- Page 9 COLLET CUTTER WRENCH DEPRESS SPINDLELOCK [] Lay router down on table to gain easy access to collet nut. [] Place wrench provided onto collet nut and turn couterclockwise WARNING: immediately after use, be careful not to touch the cutter or collet with your hands or fingers.
-
Page 10: Adjusting Depth Of Cut
[] Unplug your router. WARNING: Failure to unplug your router could result in accidental starting causing serious [] Place router on a fiat surface and loosen locking arm. See Figure 3. LOCKING LOOSEN [] Turn depth adjusting ring until cutter is inside subbase. - Page 11 The variabie speed controi selector allows you to adjust router speed from 15,000 to 25,000 RPM. There is a six-step scab (A to F) on the variabHe speed controH seHector.
- Page 12 Test difficuUt setups on scrap -- Don't waste Uumber. 7" PUaneach operation before you begin, 7" Provide for smoother operation by cleaning your router frequendy, Shake router or Mow with an air jet to remove sawdust buildup, 7" Think safety by thinking ahead. STARTING/STOPPING ROUTER [] Grasp handles using both hands, See Figure 9.
- Page 13 EDGE ROUTING [] Place router on edge of workpiece, making sure the router bit does not contact workpiece. [] Turn router on and let motor build to its full speed. [] Begin your cut, gradually feeding cutter into workpiece. WARNING: Keep a firm grip on router with both hands at aii times.
- Page 14 Feeding Too Slow Utis aBo possiMe to spoil a cut by moving the router forward too sbwUy. When it is advanced into the work too sbwUy, a revoMng bit does not dig into new wood fast enough to take a bite; instead, it simpUy scrapes away sawdust-Hke partbbs.
- Page 15 (and, also, the possibility of damage to your router motor and bit). A deep cut requires a slower feed than a shallow one, and a too deep cut will cause you to slow the feed so much that the bit is no longer cutting, it is scraping, instead.
- Page 16 Position the straightedge parallel to the line of cut and offset the distance between the cutting edge of the cutter and the edge of the router base, Hold the router base against the straightedge and rout the groove, When routing a groove wider than the diameter of the...
-
Page 17: Routing With Guide Bushings
Whenever the workpiece thickness together with the desired depth of cut (as adjusted by router depth setting) are such that only the top part of the edge is WHOLE EDGE SHAPING to be shaped (leaving at bast a 1/16 inch thick uncut Fig. -
Page 18: Extension Cords
Extension cords suitable for use with your router are available at your nearest Sears Retail Store. WARNING: Always wear safety goggles or safety glasses with side shields during power tool operation or when blowing dust. - Page 19 BoxJoint Template WARNING: The use of attachments oFaccessories ROUTER TABLES With a router table your router is converted high-speedshaper. WARNING: Only use router tables with proper guarding for the cutter and with "on board" switch controlled receptacles (Part No, 9-25188)=...
- Page 20 CRAFTSMAN ROUTER- MODEL NUMBER 315.'269210 SEENOTE NOTE: The assemMy shown represents an important part of the douMe insuUated system, To avoid the possibility of aUterafion or damage to the system, service shouUd be performed by your nearest Sears repair center,...
-
Page 21: Parts Ust
CRAFTSMAN The model number wiii be found on a plate attached to the motor housing. Always mention the model number | in aii correspondence regarding your ROUTER or when ordering repair parts. SEE BACK PAGE FOR PARTS Part 983014-001 982899-014... - Page 22 For repair-in your home-of lawn and garden equipment, no matter who made it, no matter who sold it! For the replacement owner's manuals that you need to do-it-yourself. For Sears professional and items like garage door openers and water heaters. 1-8 00-4-MY-H 0 ME®...
Need help?
Do you have a question about the 315.26921 and is the answer not in the manual?
Questions and answers