Advertisement
Quick Links
Advertisement

Related Manuals for National Instruments Phase Matrix PXI-1420


Summary of Contents for National Instruments Phase Matrix PXI-1420
- Page 1 PXI MICROWAVE Model PXI-1420 MW DOWNCONVERTER MODULE Quick Start Guide Quick Start Guide PXI-1420 CCN 12801 Manual Assy Part Number 5585112-01 Manual Text Part Number 5580112-01 Rev Phase Matrix, Inc. 4600 Patrick Henry Drive, Santa Clara CA 95054 Tel: 1-408-610-6810 www.phasematrix.com...
- Page 2 Do not proceed beyond a ments are traceable to the United States National Instruments®, NI®, WARNING notice until the indi- National Institute of Standards and Tech- ni.com®, LabVIEW®, nology.
-
Page 3: Table Of Contents
Quick Start Guide Introducing the PXI-1420 MW Downconverter Module Congratulations on purchasing a Phase Matrix PXI-1420 MW Downconverter Module! To get the most out of your purchase, it is recommended that this be read carefully and completely. Quick Start Guide In this document... -
Page 4: Step 1. Confirm Module Operating Requirements
LabVIEW does not support Windows NT/Me/98/95, any of the Windows Server NOT E editions, or Windows XP x64. LabVIEW does support Windows 7 (64-bit version). LabVIEW or the LabVIEW Run-Time Engine does support Windows 2000 with Service Pack 3 or later. Phase Matrix PXI-1420 MW Downconverter Module... -
Page 5: Step 2. Perform Hardware Installation/Configuration
• Remove each module from its package and inspect it for loose components or any signs of damage. Notify Phase Matrix if any module appears damaged in any way. • Do not install damaged modules into a system. Phase Matrix PXI-1420 MW Downconverter Module... - Page 6 • Keep the module free of dust by cleaning only with compressed air. • Do not clean the module with any solvents or liquids. • To prevent damage to the module caused by ESD or contamination, handle the module using the edges or the metal bracket. Phase Matrix PXI-1420 MW Downconverter Module...
- Page 7 Phase Matrix recommends installing slot blockers in adjacent vacant PXI slots to NOT E maximize cooling air flow to the PXI modules. A PXI Chassis Slot Blocker Kit (National Instruments part number 778678-01) is available for purchase at www.ni.com. Plug-in and power-on the PXI chassis.
- Page 8 To avoid ESD, do not touch the exposed connector pins or any exposed circuitry on the device. When not in use, PXI modules should be stored in the original antistatic envelope to avoid damage. Phase Matrix PXI-1420 MW Downconverter Module...
-
Page 9: Step 3. Perform Software Installation/Configuration
PXI remote controller. in the laptop and a PXI/PXI Express module in slot 1 of the PXI system, Reboot the PXI remote controller. connected by a copper cable. Phase Matrix PXI-1420 MW Downconverter Module... - Page 10 Device drivers are available at: www.phasematrix.com PXI hardware does not support “hot-swap” capabilities! CAUTION Before installing the PXI-1420 MW Downconverter Module, the PXI chassis must be powered off and unplugged to prevent damage to PXI modules. Phase Matrix PXI-1420 MW Downconverter Module...
- Page 11 If you accept the terms of the EULA, select “I accept this Agreement” and select Next to continue. • If you do not accept the agreement, you will not be able to install the software. Phase Matrix PXI-1420 MW Downconverter Module...
- Page 12 Figure 4 Example of Copying Device Driver Files Select Next to continue. Figure 5 Example of Completing the Installer Windows should display a message indicating that the installation was successful. Select Finish to complete the device driver installation. Phase Matrix PXI-1420 MW Downconverter Module...
- Page 13 The actual screen that appears will have the label of the module Soft Front Panel being installed, so instead of “PXI-14XX,” the label is displayed as either “PXI-1410,” “PXI-1420,” “PXI-1430B,” “PXI-1440,” or “PXI-1450B.” Phase Matrix PXI-1420 MW Downconverter Module...
- Page 14 Enter the destination directory for the PXI-1420’s Soft Front Panel executables or browse to a destination directory by selecting the Browse button. Once the file path has been entered, select Next to continue to the Software License Agreement. Phase Matrix PXI-1420 MW Downconverter Module...
- Page 15 If you do not agree, you will not be able to install the software. Figure 9 Example Summary of Files Being Installed Review the list of files to be installed and select Next to begin the installation. Phase Matrix PXI-1420 MW Downconverter Module...
- Page 16 Quick Start Guide Figure 10 Example of Completing Soft Front Panel Installation Wizard Select Finish to complete the Soft Front Panel installation. Phase Matrix PXI-1420 MW Downconverter Module...
- Page 17 Select the Hardware tab and select Device Manger. Select the View pull-down menu. Select Devices by connection and the device should appear under "NI-VISA PXI Devices" with the label as "PM14XX." * PM14XX will actually display as PXI-1420 MW Downconverter Module. Phase Matrix PXI-1420 MW Downconverter Module...
- Page 18 Select Uninstall and a popup window is displayed with a conformation to continue with the uninstall process. Figure 12 Example of Confirming Device Driver Removal Select OK to confirm the prompt and uninstall the device driver. Phase Matrix PXI-1420 MW Downconverter Module...
-
Page 19: Step 4. Review Hardware And Software Front Panels
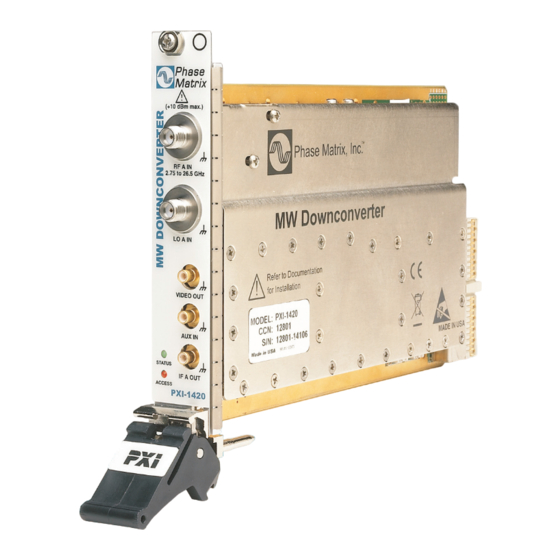
Quick Start Guide Step 4. Review Hardware and Software Front Panels Phase Matrix PXI-1420 MW Downconverter Module... - Page 20 Hardware Front Panel Figure 13 Hardware Front Panel of the PXI-1420 MW Downconverter Module The maximum power input to the input connector (RF A IN 2.75 GHz to 26.5 GHz) CAUTION must not exceed +10 dBm! Phase Matrix PXI-1420 MW Downconverter Module...
- Page 21 RF A IN 2.75 GHz to 26.5 GHz SMA (f) connector is used to input a microwave signal that is to be down converted. This microwave signal can be supplied one of two ways: Phase Matrix PXI-1420 MW Downconverter Module...
- Page 22 Care should be used when connecting this IF A OUT to a digitizer or other equipment. When the IF A OUT normal operating range is exceeded, the overload indicator will be illuminated. (Refer to Table Phase Matrix PXI-1420 MW Downconverter Module...
- Page 23 IF signal is supplied through the AUX IN connector which bypasses the down conversion circuitry. This IF signal can be used to supply an input signal to the IF A IN input connector of the PXI-1440 IF Downconverter Module. Phase Matrix PXI-1420 MW Downconverter Module...
- Page 24 IF ATTEN 1 (dB) This slide control (along with an entry box) is used to select the level of IF attenuation and may be changed by pointing to the slide control and dragging it up or down to select Phase Matrix PXI-1420 MW Downconverter Module...
- Page 25 PXI-1420; the signal is directed to the IF A OUT connector. • When RF A IN (2.75 GHz to 26.5 GHz) is selected, the signal, after being down converted, is directed to the IF A OUT connector. Phase Matrix PXI-1420 MW Downconverter Module...
- Page 26 This number indicates the internal real-time ambient temperature of the module in degrees Celsius. Status Indicator The Status Indicator displays messages related to system configuration. Messages may be errors or warnings. Phase Matrix PXI-1420 MW Downconverter Module...
- Page 27 Although data values can be viewed from this tab, the Soft Front Panel cannot be used to modify or overwrite the data values. These stored data values are normally utilized by the driver in real-time correction applications. Phase Matrix PXI-1420 MW Downconverter Module...
- Page 28 (EEPROM). This EEPROM controls the PXI related configuration such as the manufacture ID, etc. Last Cal Date displays the date that the last calibration was run and that the calibration file was created. FPGA Date Displays the applicable FPGA version date. Phase Matrix PXI-1420 MW Downconverter Module...
- Page 29 AUX IN port. The data values are stored in the PXI-1420’s memory during each measurement and are displayed as port response over frequency. Use the Horizontal Slider Bar to view correction values to the left and right of the values currently being displayed. Phase Matrix PXI-1420 MW Downconverter Module...
- Page 30 (flatten) the IF filter response. The IF Filter is centered at 250 MHz and has approximately 350 MHz of BW. Use the Horizontal Slider Bar to view correction values to the left and right of the values currently being displayed. Phase Matrix PXI-1420 MW Downconverter Module...
-
Page 31: Step 5. Confirm Basic Module Operation
Table 5 Equipment Requirements to Confirm Basic Module Operation Qty Equipment Description Agilent 83650A Signal Generator, 26.5 GHz Agilent 8566B Spectrum Analyzer NI PXIe-1065 PXI chassis NI PXI-8106 PXI Embedded Controller with Windows 7/XP Display Phase Matrix PXI-1420 MW Downconverter Module... - Page 32 0 dB PXI-1450B Local Oscillator Module Frequency 3.5 GHz PXI-1420 MW Downconverter Module (Refer to the Set IF Gain Control to provide 38 dB of gain. “IF Center Frequency and Bandwidth Check" page 33 Phase Matrix PXI-1420 MW Downconverter Module...
- Page 33 Set the Signal Generator frequency to 10.25 GHz and the output power to -40 dBm. Set the LO frequency to 3.5 GHz. Using the Soft Front Panel of the PXI-1420: • Set the Select INPUT Path to RF A IN. Phase Matrix PXI-1420 MW Downconverter Module...
- Page 34 Sweep the Signal Generator RF frequency from 10 GHz to 10.5 GHz, keeping the output level constant. Confirm that the maximum fluctuation, at the IF A OUT connector, between 75-425 MHz is less than or equal to 3 dB. Phase Matrix PXI-1420 MW Downconverter Module...
- Page 35 Check that the STATUS LED is Green. (Refer to page 21.) Check that the ACCESS LED switches each time that a path is selected. (Refer to page 21.) Contact Phase Matrix Customer Support for additional help. Phase Matrix PXI-1420 MW Downconverter Module...
- Page 36 • Under what conditions did the problem occur? • Did the unit work and then fail? • What other equipment was connected to the PXI module when the problem occurred? Phase Matrix PXI-1420 MW Downconverter Module...
- Page 37 Mark the carton to indicate that it contains a fragile electronic instrument. Ship the PXI module to Phase Matrix at the following address: Phase Matrix, Inc. 4600 Patrick Henry Dr. Santa Clara CA 95054 Tel: 1-408-610-6810 www.phasematrix.com Phase Matrix PXI-1420 MW Downconverter Module...
- Page 38 DECLARATION OF CONFORMITY Manufacturer’s Name: Phase Matrix, Inc. Manufacturer’s Address: 4600 Patrick Henry Drive Santa Clara CA 95054 Product Name: Preselector, MW Downconverter, RF Downconverter, IF Downconverter, Local Oscillator, LO Distributor Model Number: PXI-1410, PXI-1420, PXI-1430, PXI-1440, PXI-1450, PXI-1455 Statement: Phase Matrix, Inc.
Need help?
Do you have a question about the Phase Matrix PXI-1420 and is the answer not in the manual?
Questions and answers