Table of Contents
Advertisement
Quick Links
Advertisement
Table of Contents

Related Manuals for Makita DVC560PT2


Summary of Contents for Makita DVC560PT2
- Page 1 INSTRUCTION MANUAL Cordless Upright Cleaner DVC560 Read before use.
-
Page 2: Specifications
WARNING • This machine is not intended for use by persons including children with reduced physical, sensory or mental capabilities, or lack of experience and knowledge. • Children should be supervised to ensure that they do not play with the cleaner. •... -
Page 3: Safety Warnings
Intended use EC Declaration of Conformity The appliance is intended for collecting dry dust. The For European countries only appliance is suitable for commercial use, for example in The EC declaration of conformity is included as Annex A hotels, schools, hospitals, factories, shops, offices and to this instruction manual. rental businesses. - Page 4 16. MAINTAIN THE CLEANER WITH CARE. Keep When battery pack is not in use, keep it away the cleaner clean for better and safer per- from other metal objects, like paper clips, formance. Follow instructions for changing coins, keys, nails, screws or other small metal accessories.
- Page 5 SAVE THESE INSTRUCTIONS. CAUTION: Only use genuine Makita batteries. Use of non-genuine Makita batteries, or batteries that have been altered, may result in the battery bursting causing fires, personal injury and damage. It will also void the Makita warranty for the Makita tool and charger. 5 ENGLISH...
-
Page 6: Parts Description
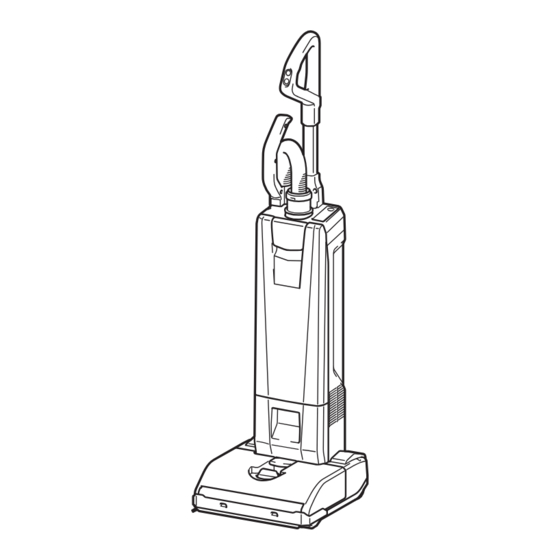
PARTS DESCRIPTION Handle Switch plate Pipe grip Hose Indication panel Lever (for the dust box Dust box cover Carrying handle cover) Lock (for battery cover) Adjusting lever Battery cover Corner nozzle Round brush Foot lever Caster wheel Side brush Suction hose Joint Aluminum pipe Pipe holder... - Page 7 Pipe connecting ASSEMBLY Insert the tip of the aluminum pipe to the joint, and then attach the aluminum pipe to the pipe holder. CAUTION: Always be sure that the appli- ance is switched off and the battery cartridge is removed before carrying out any work on the appliance. CAUTION: Always wear dust mask during assembly or maintenance.
-
Page 8: Installing Or Removing Battery Cartridge
To remove the battery cartridge, slide it from the appli- Installing or removing battery ance while sliding the button in front of the cartridge. cartridge CAUTION: Always install the battery cartridge fully. If not, it may accidentally fall out of the appli- CAUTION: Always switch off the appliance ance, causing injury to you or someone around you. - Page 9 Unfold the filter bag fully. Unfold the filter bag if it is folded. Insert the filter bag into the slot on the holder so that the side with mark enters first. Lock the dust box cover certainly. Hook the latch of the holder. CAUTION: Be careful not to pinch your fin- gers when hooking the latch, and when closing the dust box cover. Removing the filter bag CAUTION: Handle the filter bag softly.
-
Page 10: Functional Description
Press the check button on the battery cartridge to indi- FUNCTIONAL cate the remaining battery capacity. The indicator lamps light up for a few seconds. DESCRIPTION Indicator lamps Remaining capacity CAUTION: Always be sure that the appli- ance is switched off and the battery cartridge is Lighted Blinking removed before adjusting or checking function on... -
Page 11: Remaining Battery Capacity
NOTE: This indicator does not work when the appli- Battery indicator status Remaining battery ance operates in "lower noise level (1)" mode. capacity NOTE: This indicator may not work depending on the Blinking usage environment. Charge the NOTE: The indicator automatically goes out approxi- battery mately one minute after the appliance is switched off. - Page 12 To lock the appliance in upright position, raise up the Lighting up the LED lamp handle forward until the foot lever locks the position with click. CAUTION: Do not look in the light or see the source of light directly. The appliance is equipped with the LED lamps.
-
Page 13: Carrying Handle
Otherwise falling If the side brush gets short, take the appliance to the accident may occur. Makita service center for replacement CAUTION: Do not carry the appliance with anything other than the carrying handle. -
Page 14: Using The Attachments
To maintain product SAFETY and RELIABILITY, repairs, any other maintenance or adjustment should To use the hose, pull out the aluminum pipe from the be performed by Makita Authorized or Factory Service hose while pushing the lever. Centers, always using Makita replacement parts. To install the hose, insert the hose into the aluminum Storage pipe until it clicks. -
Page 15: Cleaning The Hepa Filter
NOTICE: If the hair of the brushroll gets short, ask the Makita To prevent the filter from being dam- service center for new one. aged, do not use following tools and similar items... - Page 16 Remove threads and hairs from the brushroll How to clear the clog using scissors. Remove the cap and clean debris. NOTICE: Do not operate the appliance with the intake flow path clogged. Continuous use with the intake flow path clogged results in reduced suction power. Remove the bottom plate, and then remove the brushroll.
-
Page 17: Troubleshooting
TROUBLESHOOTING Before asking for repairs, conduct your own inspection first. If you find a problem that is not explained in the manual, do not attempt to disassemble the machine. Instead, ask Makita Authorized Service Centers, always using Makita replacement parts for repairs. Symptom Probable cause Remedy Not working Battery cartridges are installed improperly. Install the battery cartridges as described in this manual. -
Page 18: Optional Accessories
OPTIONAL ACCESSORIES CAUTION: These accessories or attachments are recommended for use with your Makita tool specified in this manual. The use of any other accessories or attachments might present a risk of injury to persons. Only use accessory or attachment for its stated purpose. If you need any assistance for more details regard- ing these accessories, ask your local Makita Service Center. - Page 20 Makita Europe N.V. Jan-Baptist Vinkstraat 2, 3070 Kortenberg, Belgium Makita Corporation 3-11-8, Sumiyoshi-cho, Anjo, Aichi 446-8502 Japan 885802A229 www.makita.com 20210201...
Need help?
Do you have a question about the DVC560PT2 and is the answer not in the manual?
Questions and answers