Table of Contents
Advertisement
Quick Links
R
Assembly Instructions
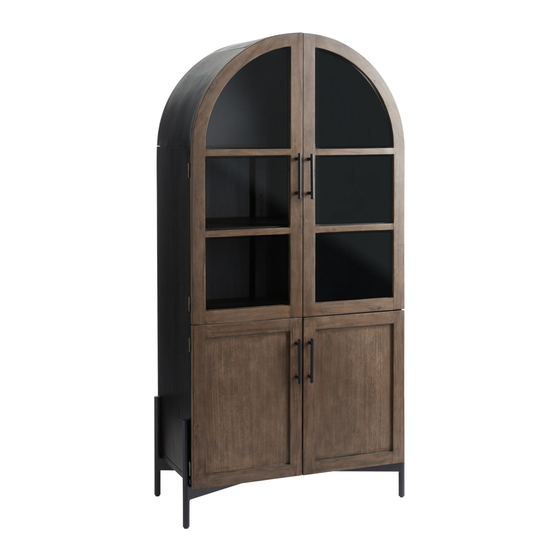
Amira Arch-Top 4-Door Cabinet
SKU 618189
Thank you for your purchase. If you have any questions pertaining to the assembly of this
furniture piece, please contact the nearest World Market store. If you are not near a store,
please call our customer service call center toll free at 877-967-5362 for assistance.
ALL PRODUCTS SOLD AT WORLD MARKET ARE NOT
FOR COMMERCIAL USE AND ARE INTENDED FOR
RESIDENTIAL USE ONLY
2023.07.26
PAGE 1
Advertisement
Table of Contents

Related Manuals for World Market Amira 618189


Summary of Contents for World Market Amira 618189
- Page 1 Thank you for your purchase. If you have any questions pertaining to the assembly of this furniture piece, please contact the nearest World Market store. If you are not near a store, please call our customer service call center toll free at 877-967-5362 for assistance.
-
Page 2: Component List
Component List Q.TY LABEL PICTURE DESCRIPTION Left Top Frame FRONT FRONT Right Top Frame Middle Top Frame FRONT Fixed Upper Shelf FRONT Adjustable Shelf Fixed Lower Shelf FRONT Bottom Panel FRONT Upper Horizontal Back Support Lower Horizontal Back Support PAGE 2... - Page 3 Component List Q.TY LABEL PICTURE DESCRIPTION Vertical Back Support Left Side Frame Right Side Frame Lower Left Back Panel Lower Right Back Panel Upper Back Panel PAGE 3...
- Page 4 Component List Q.TY LABEL PICTURE DESCRIPTION Upper Left Door (Tempered Glass) Upper Right Door (Tempered Glass) Lower Left Door Lower Right Door Base Frame 1 Base Frame 2 Handle PAGE 4...
-
Page 5: Hardware List
Hardware List Q.TY LABEL PICTURE DESCRIPTION Cam lock Ø15 mm Cam Screw Connecting Screw M7 x 50 mm Shelf Pin Ø6 Pan head Screw M3.5 x 15 mm Short Allen Bolt M6 x 25 mm Long Allen Bolt M6 x 50 mm Lock Washer Ø6 x Ø10.5 x T2 mm Flat Washer Ø6 x Ø16 x T2 mm H-10... -
Page 6: Assembly Preparation
Assemble on a clean non-marring surface (such as the product's packing foam). Do not discard any packaging until the product has been fully assembled. In case of missing parts, please contact your nearest World Market store or call our customer service call center at call 1-877-967-5362. -
Page 7: Assembly Steps
Assembly Steps Step 1 (H-2) Cam Screw x 22 (T-2) Phillips Screwdriver Step 1.1: TOP OF PANELS Step 1.2: Step 1.3: Make sure Cam Screws are tightened fully as shown Step 1.1: Install Cam Screws (H-2) into the pre-drilled holes on Left Side Frame (L-1) and Right Side Frame (L-2) as shown. - Page 8 Step 2 FRONT Please note the orientation of L-1 and L-2 Panel. The TOP of the panel is indicated where the shelf pin hole grids stop and there is a flat gap. Using a second person to assist you, attach Lower Horizontal Back Support (J) to Right Side Frame (L-2) by inserting previously installed Cam Screws (H-2) and dowels into receiving holes.
- Page 9 Step 3.2 (H-1) Cam Lock x 2 (T-1) Allen key Follow Arrow direction Attach Upper Horizontal Back Support (H) to the Fixed Upper Shelf (D) by inserting pre-installed dowels as shown. There are 2 Cam Locks (H-1) to install into the corresponding holes along Fixed Upper Shelf (D) as illustrated. Make sure arrows on Cam Locks point to the screw upon insertion.
- Page 10 Step 3.4 FRONT Using a second person to carefully hold the assembly, attach Fixed Upper/ Lower Shelf (D/F), Upper/ Lower Horizontal Back Support (H/J) and Bottom Panel (G) to Left Side Frame (L-1) by inserting pre-installed Cam Screws (H-2) and dowels into corresponding holes. After this step, entire assembly should be able to stand on its own.
- Page 11 Step 4.1 (H-1) Cam Lock x 12 (T-1) Allen key Follow Arrow direction FRONT There are a total of 12 Cam Locks (H-1) to install into the corresponding holes along Upper Horizontal Back Support (H), Lower Horizontal Back Support (J), Fixed Upper Shelf (D) and Fixed Lower Shelf (F) as illustrated. Make sure arrows on Cam Locks point to the screw upon insertion.
- Page 12 Step 4.2 (H-3) Connecting Screw x 10 (T-1) Allen key FRONT Install and secure Lower Horizontal Back Support (J), Left Side Frame (L-1) and Right Side Frame (L-2) to Bottom Panel (G) using Connecting Screws (H-3). Engage all screws before fully tightening using Allen Key (T-1). Step 5 (H-1) Cam Lock x 4 (T-1) Allen key...
- Page 13 Step 6 (H-1) Cam Lock x 4 (T-1) Allen key FRONT Insert Cam Locks (H-1) into the Left/ Right Side Frame (L-1/L-2) following the orientation directions above. The arrow on the Cam Lock (H-1) must point towards the Cam Screw (H-2) when first inserting the Cam Lock. There are two Cam Locks per each of the panels.
- Page 14 Step 8.1 (H-5) Pan Head Screw x 21 (T-2) Phillips Screwdriver (T-3) Triangle FRONT Triangle 90° 90° Triangle Using the provided Triangle (T-3) check each corner of the assembly to ensure it is square. Adjust assembly as needed. Once satisfied, carefully attach the Lower Left Back Panel (M-1) to the back of the assembly as shown. Take note the direction on the Lower Left Back Panel (M-1).
- Page 15 Step 9 (H-10) Handle Bolt x 8 (T-2) Phillips Screwdriver (H-11) Flat Washer x 8 H-10 H-11 Position and secure Handles (T) to Upper Left/ Right Door (P-1/P-2) and Lower Left/ Right Door (Q-1/Q-2) with Handle Bolts (H-10) and Flat Washers (H-11), stacking the hardware in the order as shown. Tighten the bolts using a Phillips Screwdriver (T-2) (not included).
- Page 16 Step 11 FRONT Position and secure Upper Left Door (P-1) and Upper Right Door (P-2) to Left Side Frame (L-1) & Right Side Frame (L-2) by inserting male hinges into female hinges, which are pre-installed. Step 12 (H-4) Shelf Pin x 10 Insert Shelf Pins (H-4) into the desired hole locations on Left Side Frame (L-1), Right Side Frames (L-2) and Vertical Back Support (K).
- Page 17 Step 13: Leveling Instruction ADJUSTABLE LEVELER NOTE: Levelers can be used for adjustment if needed. If RIGHT DOOR appears higher than Adjust the FRONT LEFT leveler until the LEFT DOOR doors are even. LEFT RIGHT DOOR DOOR If LEFT DOOR appears higher than the Adjust the FRONT RIGHT leveler RIGHT DOOR until doors are even.
- Page 18 Anti-Tip Measures WARNING Furniture tip overs can result in death or serious injuries. To reduce the likelihood of tip over, this product should be used with the enclosed Anti-Tip Kit. This Anti-Tip Kit is only a deterrent. It is not a substitute for proper adult supervision. Manufacturer and retailer assume no liability for improper installation or excess loads placed on screws, brackets, or straps.
-
Page 19: Care And Maintenance
• Place heaviest items in the lowest drawers. Not intended for clothing storage use. All products sold at World Market are not for commercial use and are intended for residential use only. Care & Maintenance DO NOT put hot items directly on furniture surface. - Page 20 Customer Service Call Center, Toll Free at 877-967-5362. For valid warranty claims, World Market will repair or replace the product, or offer a full or par�al credit, in the sole discre�on of World Market. This LIMITED ONE-YEAR WARRANTY gives you specific legal rights and you may also have other rights which vary from state to state.
Need help?
Do you have a question about the Amira 618189 and is the answer not in the manual?
Questions and answers