Table of Contents
Advertisement
Quick Links
Advertisement
Table of Contents

Subscribe to Our Youtube Channel
Related Manuals for Empisal 760C


Summary of Contents for Empisal 760C
- Page 1 INSTRUCTION MANUAL EMPISAL COMPLETE FREE ARM OVER LOCKE...
- Page 3 Safety instructions Like any other electrical device, a overlock machine can cause serious, even life-threatening injuries.To avoid this, and in order to work safely: • Before initial use of your overlock machine, read these operating instructions thoroughly. • Keep the operating instructions in a suitable place near the machine. When passing the appliance on to others, always enclose the operating instructions.
- Page 4 • Keep your work space tidy. An untidy workplace can lead to accidents. • Provide adequate lighting when working! • Do not wear loose clothing or jewellery, as these can be caught in the moving parts. You should also wear a hair net if you have long hair. •...
- Page 5 INTRODUCTION THANK YOU FOR CHOOSING OUR OVERLOCK MACHINE This overlock machine can stitch dependable seams on all kinds of fabric, both light and heavy, including cotton, wool, rayon, tricot, jersey, and knits. You do not need a special table for this portable machine. We suggest that you read this instruction manual carefully before you start to operate the machine.
-
Page 6: Table Of Contents
TABLE OF CONTENTS NAME OF MAIN COMPONENTS ....................5-6 SETTING UP YOUR MACHINE ...................... 7-9 The position of thread pole ....................7 Cone holders ........................7 Spool caps ........................... 7 Connecting the foot control ....................8 Controlling sewing speed ..................... 8 Safety switch ........................ -
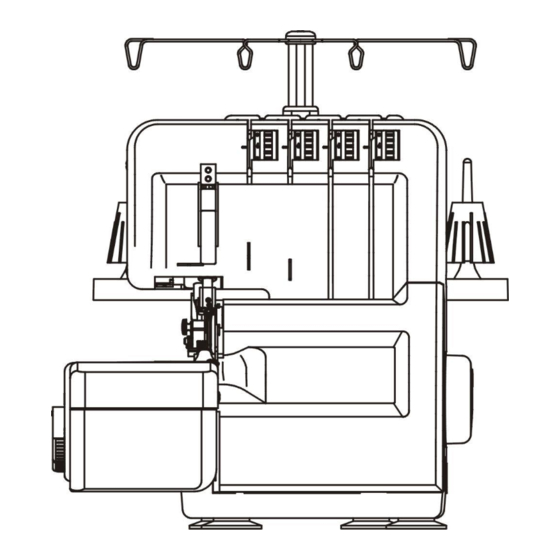
Page 7: Name Of Main Components
NAME OF MAIN COMPONENTS 1. Thread pole 2. Lower looper thread tension dial 3. Spool pin 4. Spool holder 5. Handwheel 6. Base 7. Machine socket 8. Power switch 9. Front cover 10. Support bed 11. Free arm 12. Needle plate 13. - Page 8 1. Upper looper 2. Lower looper 3. Free arm 4. Lower knife 5. Cutting width adjustment knob 6. Presser foot 7. Upper knife...
-
Page 9: Setting Up Your Machine
SETTING UP YOUR MACHINE Set your Overlock machine on a sturdy flat surface. Positioning catches [ THE POSITION OF THREAD POLE ] Pull up thread pole to its highest point before threading. Turn the thread pole so the thread guides come right above the spool pins. -
Page 10: Connecting The Foot Control
[ CONNECTING THE FOOT CONTROL ] Push foot control plug into the machine socket and then into main socket. Turn on the power switch. This power switch controls both the machine power and sewing light. Machine socket Power supply plug Power switch Machine plug Power supply... -
Page 11: Accessories
ACCESSORIES Tweezers Brush Spare upper cutter Needles Hexagon wrench key Machine cover Screwdriver Instruction manual Spool caps... -
Page 12: Using The Machine
USING THE MACHINE [ HAND WHEEL ] Always turn handwheel toward you, i.e. the same direction as on a household sewing machine. [ FRONT COVER ] To open front cover, slide the hollow to the right as far as it will go then pull front cover toward you. -
Page 13: Looper Threading
LOOPER THREADING Warning: Before contriving please adjust main control switch to (OFF). Correct threading is important otherwise uneven stitches or thread breakage may result. A convenient threading chart is placed on the front panel inside the front cover. In addition, each thread guide is colored for threading indication. -
Page 14: Needle Threading
NEEDLE THREADING 5. Turn the hand wheel toward you until needles are fully raised. 6. Pass the right and left needle threads as illustrated. Important: The thread must lie correctly ○ between the two discs inside the tension dials. Pass through the needle eyes from front to back as illustrated. -
Page 15: Trial Sewing
TRIAL SEWING When the overlock has been threaded for the first time or re-threaded because of thread breakage during sewing, start sewing in the following manner. Holding the end of threads between your left finger tips, turn the handwheel slowly toward you two or three times and check the thread chain. -
Page 16: Adjusting Thread Tensions
ADJUSTING THREAD TENSIONS Thread tensions will vary according to the type and thickness of both thread and fabric. Adjust the thread tension of the machine accordingly while checking the seam. Thread tension: Turn dial toward smaller numbers, tension becomes loose. Turn dial toward larger numbers, tension becomes tight. -
Page 17: Adjusting The Needle Thread Tensions
It is necessary to adjust the thread tension for the seams shown below. [ ADJUSTING THE NEEDLE THREAD TENSIONS ] The left needle thread tension is too loose. The right needle thread tension is too loose. Back side Back side Front side Front side Tighten the left needle thread tension. -
Page 18: Machine Adjustment Chart
MACHINE ADJUSTMENT CHART The best tension for one fabric may not be correct for another. The required tensions depend upon stiffness and thickness of fabric, thread size and type. If necessary, readjust referring to the chart below. Fabrics Threads Needle Stitch length Standard Setting Light-weight... -
Page 19: Changing The Thread
CHANGING THE THREAD (TYING ON) It is simple to change the thread in the following manner. Cut the thread above the spool pin, and knot ends of old and new threads together. Set the tension dials to "O" and raise the presser foot. -
Page 20: Adjustment Of Stitich Length
ADJUSTMENT OF STITCH LENGTH There are nine setting adjustments which can be made from 1.0 to 5.0 mm. Most overlock work is done with a basic stitch length setting of 2.5-3.5 mm. Stitch length adjustment knob (lnner dial) [ STITCH LENGTH SETTING ] Stitches Stitch length 2.0 –... -
Page 21: Cutting Width
CUTTING WIDTH The proper cutting width differs with the type of fabric. Check the seams each time, and adjust the cutting width as follows. 1. Turn the hand wheel toward you until the needles are at the lowest position. 2. Open the front cover and free arm. 3. -
Page 22: Changing The Needle
CHANGING THE NEEDLE Turn the power switch to "OFF" Hexagon wrench key before changing the needles. Do not use any needle which is bent or blunt. 1. Turn the hand wheel toward you until the needles are fully raised. 2. Open the front cover and lower the presser foot. -
Page 23: Replacing The Cutters
REPLACING THE CUTTERS Turn the power switch to "OFF" before replacing the cutter blades. The lower cutter is made of special material and does not usually need to be replaced. However, should it become damaged, it can be replaced by your local dealer. To replace the upper cutter when it becomes dull : 1. -
Page 24: Three Thread Narrow And Wide Overlock Stitch
THREE THREAD NARROW AND WIDE OVERLOCK STITCH This machine is a 3/4 thread convertible overlock. Hexagon wrench key Remove either the right or left needle. Your machine is now ready for use as a 3-thread overlock. Refer to "CHANGING THE NEEDLE". 4 mm (0.16”) Back side Using the needle on the right only, the stitch... -
Page 25: Free Arm Sewing
FREE ARM SEWING Remove the support bed as illustrated which easily converts from a flat bed to free arm. Convenient for sewing pant legs, sleeves and cuffs, etc. Free arm Support bed CONVERTIBLE PRESSER FOOT The special presser foot, is set for normal overlock with the letter N adjacent to the vertical screw at front of presser foot. -
Page 26: Rolled And Narrow Edge
ROLLED AND NARROW EDGE To carry out either of the above sewing tasks proceed as follows. (1) Refer to page 23 for special foot position setting. (2) Turn the handwheel toward you until needles are fully raised. (3) Open front cover and remover left needle. See page 20. (4) Set stitch length between 1.0-2.0 mm. -
Page 27: Rolled Hemming
Important: If necessary, adjust the stitch length and cutting width. Threads Fabrics Rolled hemming Narrow hemming .Georgette .Spun polyester .Spun polyester No. 50 - 80 No. 50 - 80 .Lawn Needle thread .Polyester continuous .Polyester continuous .Crepe-de-chine No. 50 - 80 No. -
Page 28: Differential Feed
DIFFERENTIAL FEED The differential feed prevents wavy seams in knitted fabrics and also movement between the layers of fabric. It also ensures pucker-free seams on lightweight fabrics. [ DIFFERENTIAL FEED MECHANISM ] There are two sets of feed teeth, one front and one rear. The two sets of feed teeth move independently. -
Page 29: Wavy Knits & Gathering
[ WAVY KNITS & GATHERING ] For perfectly flat seams in stretchy knit garments, the front feed teeth need to feed faster than the rear feed teeth to prevent stretching the fabric. To Gather, the front feed teeth will also need to feed faster than the rear feed teeth. -
Page 30: Trouble Shooting Guide
TROUBLE SHOOTING GUIDE Check items below before calling for service. Problem Cause Corrective action Page 1. Needles are bent, blunt or 1. Replace with new needles. points are damaged. 2. Needles not inserted 2. Insert the needles correctly to Needles break correctly. -
Page 31: Cleaning And Lubricating
CLEANING AND LUBRICATING Warning: When cleaning the machine or changing its lamp, disconnect it from the mains. You avoid accidents through electric shock. To keep your machine running smoothly ; it is necessary to clean using the brush from the accessory box now and then. - Page 32 STORING THE MACHINE • Store the machine in its box or in a clean, dry place. • Never wrap the power cord around the machine. SERVICING THE MACHINE If the unit is not operating correctly, please check the following: • You have followed the instructions correctly. •...
- Page 33 PLEASE AFFIX YOUR PROOF OF PURCHASE/RECEIPT HERE IN THE EVENT OF A CLAIM UNDER WARRANTY THIS RECEIPT MUST BE PRODUCED. W A R R A N T Y 1. Home of Living Brands (Pty) Ltd (“Home of Living Brands”) warrants to the original purchaser of this product (“the customer”) that this product will be free of defects in quality and workmanship which under normal personal, family or household use and purpose may manifest within a period of 1 (one) year from the date of purchase (“warranty period”).
- Page 36 760453102 16.12.02...
Need help?
Do you have a question about the 760C and is the answer not in the manual?
Questions and answers