Mono Eco Connect FG159 Installation And Operation Manual
Hide thumbs
Also See for Eco Connect FG159:
- Installation and operation manual (112 pages) ,
- Quick start manual (36 pages) ,
- Installation and operation manual (110 pages)
Table of Contents
Advertisement
MONO Eco Connect
Convection Oven
Installation and Operation Manual
EN
Oven Serial Number _________________________________
Oven Code
Condenser Serial Number ____________________________ (if fitted)
In the event of an enquiry, please quote these serial numbers.
FG1BX-UK-MAN-0200 | Rev. C23 (July 2023)
138
149
150
153
158
159
MonoEquip.com
170
173
4/5/7/10-Tray | Steam
Advertisement
Table of Contents

Related Manuals for Mono Eco Connect FG159


Summary of Contents for Mono Eco Connect FG159
- Page 1 MonoEquip.com MONO Eco Connect Convection Oven Installation and Operation Manual Oven Serial Number _________________________________ Oven Code Condenser Serial Number ____________________________ (if fitted) In the event of an enquiry, please quote these serial numbers. 4/5/7/10-Tray | Steam FG1BX-UK-MAN-0200 | Rev. C23 (July 2023)
- Page 2 Eco Connect Convection Ovens | 4/5/7/10-Tray | Steam Installation and Operation Manual MONO FG1BX-UK-MAN-0200 | Rev. C23 (July 2023)
- Page 3 The reset-button hole can be at position 1 or 2 depending on the model B. Rear panel of 10-tray oven. The reset-button hole can be at position 1 or 2 depending on the model Reset-button hole on the rear panel of a 7-tray oven FG1BX-UK-MAN-0200 | Rev. C23 (July 2023) MONO...
- Page 4 Indicates a potential hazard with a medium risk that could result in death or serious physical injury if not avoided. Indicates a hazardous situation that could result in minor or moderate CAUTION injury if not avoided MONO FG1BX-UK-MAN-0200 | Rev. C23 (July 2023)
- Page 5 The supply to this machine must be protected by a 30mA-rated Type ‘A’ Residual Current Device (RCD). Before installation, it is recommended that a qualified and competent electrician first tests the electrical outlet (power socket) for electrical safety. FG1BX-UK-MAN-0200 | Rev. C23 (July 2023) MONO...
- Page 6 Place an out-of-service notice on the oven. Contact your oven supplier or MONO Equipment for technical assistance. Ovens must be maintained and serviced at appropriate intervals to ensure the oven operates at optimum levels. See the Maintenance section on page 59.
-
Page 7: Table Of Contents
User settings (oven setup)........................38 Factory settings (oven setup) ....................... 41 Changing the passwords ........................43 Diagnostics ............................45 7. Using the USB port ....................47 Using the USB port to import recipes ....................47 FG1BX-UK-MAN-0200 | Rev. C23 (July 2023) MONO... - Page 8 Part 3: FG158 4/5-tray 60cm x 40cm oven spares section ..............78 Part 4: FG153 4/5-tray 40cm x 60cm oven spares section ..............86 11. Condenser Unit (Option) ..................94 12. Passwords ....................... 113 MONO FG1BX-UK-MAN-0200 | Rev. C23 (July 2023)
-
Page 9: Introduction
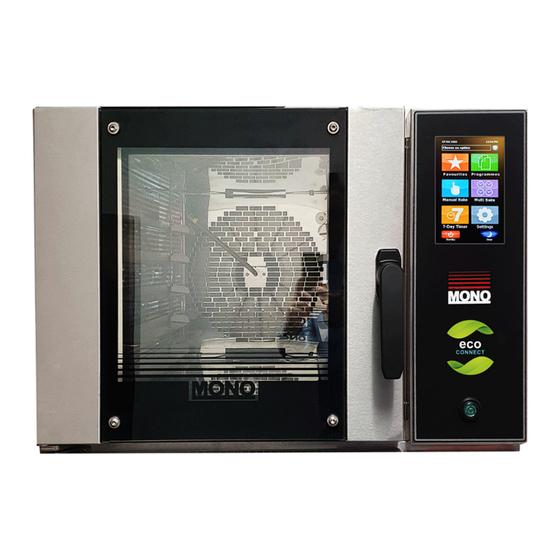
Thank you for purchasing this MONO Eco Connect Oven. “A combination of clean industrial design and the latest technology.” The MONO convection oven range is designed to take the baking Industry’s standard trays. Ovens in the range are of stainless steel construction, and selected models have removable tray racks ... - Page 10 Eco Connect Convection Ovens | 4/5/7/10-Tray | Steam Installation and Operation Manual Figure 1: MONO Eco Connect Oven features Double-latch door handle – see page 4 Power On/Off switch Touchscreen Identification / Serial number plate Damper flue – do not cover the flue...
-
Page 11: Specifications
See the Power section on pages 12 and 16 for further information. See the Condenser Unit chapter on page 94. Can be stacked with a 4/5-tray oven only. Base units are 300 mm up to 920 mm high. Available Optional extra FG1BX-UK-MAN-0200 | Rev. C23 (July 2023) MONO... -
Page 12: Electrical Specifications
(Contact factory) (Contact factory) 40cm x 60cm 40cm x 80cm 10-Tray 18” x 26” 18” x 30” 415 Vac (50 Hz), 3-phase + neutral + earth 32 Amps 40cm x 60cm 40cm x 80cm MONO FG1BX-UK-MAN-0200 | Rev. C23 (July 2023) -
Page 13: Environmental Specifications
2.5 metres of cable factory-fitted with a LEGRAND (or equivalent) plug Display 7-inch HD TFT resistive touchscreen, portrait format Environmental specifications Table 3: Environmental Noise level Less than 85 dB Water supply Required. See pages 17 and 19 Drainage Not required FG1BX-UK-MAN-0200 | Rev. C23 (July 2023) MONO... -
Page 14: Safety
Stop using it. − − Do not attempt any repairs. − Contact MONO Equipment for technical assistance. Never operate the oven with any covers or panels removed. All utility connections to the oven must comply with the statuary requirements of ... - Page 15 Never climb onto the roof of the oven. Only use the oven for baking bread, pastries, and cakes. Contact MONO Equipment for other product-baking machines. No unauthorised modifications to the oven are permitted. FG1BX-UK-MAN-0200 | Rev. C23 (July 2023)
-
Page 16: Installation
Figure 3: Main power supply connections NOTE L2 and L3 are for three-phase installations only. See the Specifications section for electrical specifications. MONO FG1BX-UK-MAN-0200 | Rev. C23 (July 2023) -
Page 17: Water Supply
When operating the oven in a hard water area, ensure that an efficient water-softening device protects the water supply to the equipment. MONO Equipment is not responsible for installing and maintaining an adequate water supply to the oven, which should comply with local water regulations. -
Page 18: Ambient Working Temperatures
It is the customer’s sole responsibility to arrange for adequate ventilation. Any component malfunctioning during the guarantee period found to have been subject to excessive humidity or ambient working temperature above 40 °C (115 °F) would not be covered by the component manufacturer guarantee or MONO’s product warranty. MONO... -
Page 19: Isolation
(Figure Figure 4: View of rear connections on a MONO Eco Connect Convection Oven Turn the appropriate valve 90° anti-clockwise ( ) to turn off the water supply. -
Page 20: Touchscreen Operations
Create an oven on/off schedule for every day of the week. Manual Bake Baking using manual controls. Favourites Easy selection of most frequently used baking recipe programs. NOTE: The images are for illustration purposes and may differ from your oven. MONO FG1BX-UK-MAN-0200 | Rev. C23 (July 2023) -
Page 21: Starting And Operating Using Ready-Made Recipes (Programs)
The oven then goes through a boot-up sequence. Please wait. NOTE The images are for illustration purposes and may differ from your oven. When a start-screen (wallpaper) appears, touch the screen anywhere to display the main screen. FG1BX-UK-MAN-0200 | Rev. C23 (July 2023) MONO... - Page 22 See Chapter 7for how to do updates using the USB flash drive (if supported). Select a baking recipe (a) Touch the baking recipe required (e.g., blueberry muffins). (b) If prompted, select Full Load or Half Load depending on the oven loading. MONO FG1BX-UK-MAN-0200 | Rev. C23 (July 2023)
- Page 23 To maintain the heat in the oven, do not leave the door open for longer than needed. The actual oven temperature fluctuates during a bake – this is normal and not an oven fault. FG1BX-UK-MAN-0200 | Rev. C23 (July 2023) MONO...
- Page 24 Press the +2 mins to continue the bake for a further two minutes. This time extension is adjustable in the Settings menu. − 10. Remove the trays and close the door to preserve the heat. MONO FG1BX-UK-MAN-0200 | Rev. C23 (July 2023)
-
Page 25: Manual Bake (No Program Mode)
When the time is 00:00, and the Start button is touched, the timer counts upwards until the bake is stopped. If the screen shows HEATING, wait until the oven is up to temperature before touching Start. FG1BX-UK-MAN-0200 | Rev. C23 (July 2023) MONO... - Page 26 6. When the timer is counting down and reaches 00:00, a sounder is heard. A BAKE OVER message also flashes on the screen. Touch Stop to stop the sounder. 7. The bake can be stopped at any time by touching Stop. MONO FG1BX-UK-MAN-0200 | Rev. C23 (July 2023)
-
Page 27: Setting The Time And Date
NOTE Default passwords for the various access levels are in the Passwords section of this manual. However, for security reasons, the passwords section may have been removed. Touch the Time & Date box. FG1BX-UK-MAN-0200 | Rev. C23 (July 2023) MONO... - Page 28 Touch Save () to confirm new settings. Touch the Home button to return to the main screen. NOTE See the User Settings section of this manual for complete information about the main oven settings. MONO FG1BX-UK-MAN-0200 | Rev. C23 (July 2023)
-
Page 29: Setting Up A New Program
Eco Connect Convection Ovens | 4/5/7/10-Tray | Steam Setting up a new program Touch the Programs tile. Choose the category or number group required. Touch the Info (i) button of the next free recipe slot. Touch the Options button. FG1BX-UK-MAN-0200 | Rev. C23 (July 2023) MONO... - Page 30 Repeat steps (c) to (e) for each item needed in that baking phase. If required, select the next baking phase (i.e. touch 2) and adjust the items in the same way. Touch Save to confirm the completed recipe settings. MONO FG1BX-UK-MAN-0200 | Rev. C23 (July 2023)
- Page 31 Touch Save to confirm the tray layout. Add the new product recipe to the list. (a) Touch the Save as… box (b) Input a name for the product recipe, and then touch OK. Touch the Home button to finish. FG1BX-UK-MAN-0200 | Rev. C23 (July 2023) MONO...
-
Page 32: Multi Bake Operation
Set a timer Touch a time-setting box. Adjust the bake time required using up and down keys. Touch the OK () button. Repeat steps (a) to (c) to set different bake time sequences, if required. MONO FG1BX-UK-MAN-0200 | Rev. C23 (July 2023) - Page 33 (a) Touch a heat-setting box. (b) Type in temperature required. (c) Touch OK to confirm the temperature. Start the bake. (a) Load the oven. (b) Touch the Start button (next to the bake time required). FG1BX-UK-MAN-0200 | Rev. C23 (July 2023) MONO...
- Page 34 10. Touch the Stop button at any time to end a bake, and the same settings are useable again. NOTE The settings are reusable until the Cancel button is touched. Then, cancelling clears the settings for the next time the Multi-bake function is needed. MONO FG1BX-UK-MAN-0200 | Rev. C23 (July 2023)
-
Page 35: 7-Day Timer
Touch the day an oven operation is required. Set the On-time. (a) Touch the On tile of a time panel. (b) Set the time using the keys in the pop-up box that appears, and then touch Save (A). FG1BX-UK-MAN-0200 | Rev. C23 (July 2023) MONO... - Page 36 (b) Set the time using the keys in the box that appears, and then touch Save (A). Touch Save (B) to confirm the 7-day timer settings. NOTE Remember to leave the oven in Standby mode for this 7-day timer function to work. MONO FG1BX-UK-MAN-0200 | Rev. C23 (July 2023)
-
Page 37: Putting The Oven Into Standby Mode
The Standby button turns the oven off until the screen is touched again. Putting the oven into Sleep mode If enabled in the oven settings, the Sleep button instructs the oven to maintain temperature to a pre-set value. FG1BX-UK-MAN-0200 | Rev. C23 (July 2023) MONO... -
Page 38: User Settings (Oven Setup)
NOTE Default passwords for the various access levels are in the Passwords section of this manual. However, for security reasons, the passwords section may have been removed. Touch the General settings box (A). MONO FG1BX-UK-MAN-0200 | Rev. C23 (July 2023) - Page 39 Touch the Left Arrow and Right Arrow buttons to access the pages of oven settings. Page 1 Page 3 Page 2 5. To make an adjustment, touch the item and change the setting. 6. Touch the Save () button when all the oven settings are as required. FG1BX-UK-MAN-0200 | Rev. C23 (July 2023) MONO...
- Page 40 Set these as required for each level to be used. Chart Interval Time interval in seconds that the bars show on the heat and bake time progress charts. Screen Brightness Adjusts the brightness of the viewing screen for user comfort MONO FG1BX-UK-MAN-0200 | Rev. C23 (July 2023)
-
Page 41: Factory Settings (Oven Setup)
Default passwords for the various access levels are in the Passwords section of this manual. However, for security reasons, the passwords section may have been removed. Touch the High level settings box (A). FG1BX-UK-MAN-0200 | Rev. C23 (July 2023) MONO... - Page 42 Enter the High Level Settings password, and then touch OK. Touch the Factory settings box (B). Touch the Left Arrow and Right Arrow buttons to access the pages of oven settings. Page 1 Page 2 Page 3 MONO FG1BX-UK-MAN-0200 | Rev. C23 (July 2023)
-
Page 43: Changing The Passwords
Default passwords for the various access levels are in the Passwords section of this manual. However, for security reasons, the passwords section may have been removed. Touch the High level settings box (A). FG1BX-UK-MAN-0200 | Rev. C23 (July 2023) MONO... - Page 44 Touch the first New Password box (C), and enter the new password. Touch the second New Password box (D), and enter the new password again. Touch the OK () button. NOTE Make sure you keep a record of the new password. MONO FG1BX-UK-MAN-0200 | Rev. C23 (July 2023)
-
Page 45: Diagnostics
(a) Touch the Settings/Service panel (A). (b) Touch the Down Arrow button until the Diagnostic box (B) appears. (c) Touch the Diagnostics box (C). (d) Touch OK to clear the Attention window (D). FG1BX-UK-MAN-0200 | Rev. C23 (July 2023) MONO... - Page 46 The red square changes to a green square (E). 2. Touch the same item again to end the test. The green square changes back to a red square. − 3. Touch the Back button to exit diagnostics mode. MONO FG1BX-UK-MAN-0200 | Rev. C23 (July 2023)
-
Page 47: Using The Usb Port
Enter the Oven Settings password and touch the OK () button. NOTE Default passwords for the various access levels are in the Passwords section. However, for security reasons, the passwords section may have been removed. FG1BX-UK-MAN-0200 | Rev. C23 (July 2023) MONO... - Page 48 Touch the Down Arrow button (C) to display the next page of high-level settings. Touch the Import recipes from the USB box (D). Touch the Upload recipe archive from the USB box (E). MONO FG1BX-UK-MAN-0200 | Rev. C23 (July 2023)
- Page 49 11. Wait for the Operation Completed window to be displayed, and then touch OK (H). 12. Exit by touching the Cancel button four times. 13. Remove the USB flash drive from the USB socket. 14. The recipe upload procedure is now complete. FG1BX-UK-MAN-0200 | Rev. C23 (July 2023) MONO...
- Page 50 Enter the Oven Settings password and touch the OK () button. NOTE Default passwords for the various access levels are in the Passwords section. However, for security reasons, the passwords section may have been removed. MONO FG1BX-UK-MAN-0200 | Rev. C23 (July 2023)
- Page 51 Touch the High Level Settings box on the main options screen. Enter the High Level Settings password, and then touch OK. Touch the Import From USB box (C). Touch the Upload Recipes box (D). FG1BX-UK-MAN-0200 | Rev. C23 (July 2023) MONO...
- Page 52 10. Wait for the Operation Completed window to be displayed, and then touch the box. 11. Exit by touching the Home button. 12. Remove the USB flash drive from the USB socket. 13. The recipe upload procedure is now complete. MONO FG1BX-UK-MAN-0200 | Rev. C23 (July 2023)
-
Page 53: Cleaning
Regular cleaning and maintenance of an appliance is essential for optimal performance and longevity. Therefore, it is important to follow a manufacturer’s recommended cleaning instructions. Follow our simple daily and weekly cleaning guidelines to ensure your MONO Convection Oven correctly functions and has durability. -
Page 54: Weekly Cleaning Instructions
Re-secure the inner glass with the screws when finished cleaning. Figure 6: Location of the two screws for releasing the inner glass A. Undo the two screws to release the inner glass for cleaning MONO FG1BX-UK-MAN-0200 | Rev. C23 (July 2023) -
Page 55: Monthly Cleaning Instructions
Each sheet is marked at the front with either an ‘R’ (right) or an ‘L’ (left) to ensure each is refitted to − the correct side of the oven. Screw the perforated panels back onto the oven sides and clip the runners back in place. FG1BX-UK-MAN-0200 | Rev. C23 (July 2023) MONO... - Page 56 Removing and installing a runner rack A. Top pin slots B. Bottom pin slots C. Instructions in Figure 9 are viewed from this direction and show the left-hand rack. 4T = 4-trays side 5T = 5-trays side MONO FG1BX-UK-MAN-0200 | Rev. C23 (July 2023)
- Page 57 A. Place slots nearest oven wall over top pins B. Swing rack to line up bottom slots with the bottom pins C. Lower rack onto bottom pins D. Rack held in place by the top and bottom pins FG1BX-UK-MAN-0200 | Rev. C23 (July 2023) MONO...
- Page 58 Eco Connect Convection Ovens | 4/5/7/10-Tray | Steam Installation and Operation Manual Figure 10: Check for the correct number of runners on the left and right sides A. 4-tray runners B. 5-tray runners MONO FG1BX-UK-MAN-0200 | Rev. C23 (July 2023)
-
Page 59: Maintenance
Unsafe equipment is dangerous. Do not use the appliance. Isolate the power supply and contact MONO Equipment or your appointed service agent. Check for frayed or bare cables. Do not use the machine if frayed or bare cables are visible. -
Page 60: Spare Parts
When ordering the spares, contact the Spares Department. Please quote the machine serial number (A) as found on the silver information plate of the machine and on the front cover of this manual. MONO Equipment Limited Queensway, Swansea West Industrial Park, Swansea, SA5 4EB, United Kingdom E-mail: spares@monoequip.com... -
Page 61: Part 1: Fg150 10-Tray Oven Spares Section
C. Cooling Fan and Damper ..... (Part 1 / Section 3 on Page 65) D. Water System ....... (Part 1 / Section 4 on Page 66) E. Baking Chamber and Door Parts . (Part 1 / Section 5 on Page 68) FG1BX-UK-MAN-0200 | Rev. C23 (July 2023) MONO... - Page 62 Heating element 240 Vac for 7 kW oven B847-04-074 Heating element 220 Vac for 7 kW oven Top not shown. NOTE Part numbers are referenced from electrical drawing M1500E25-75100 in the Electrical Manual. MONO FG1BX-UK-MAN-0200 | Rev. C23 (July 2023)
- Page 63 Table 6: Item numbers in Figure 12 Item Number Part Number Part Description Motor and Element Connections B888-30-014 Overheat thermostat NOTE Part numbers are referenced from electrical drawing M1500E25-75100 in the Electrical Manual. FG1BX-UK-MAN-0200 | Rev. C23 (July 2023) MONO...
- Page 64 PT-10A (Top Forward) B801-08-031 Fan motor contactors PT-10B (Top Reverse) PT-11A (Bottom Forward) PT-11B (Bottom Reverse) B801-18-005 Interlock unit X2 NOTE Part numbers are are referenced from electrical drawing M1500E25-75100 in the Electrical Manual. MONO FG1BX-UK-MAN-0200 | Rev. C23 (July 2023)
- Page 65 Damper solenoid R/H oven B869-75-018 Rear fan unit B842-85-025 Rear fan unit fuse B842-85-039 Auxiliary power outlet fuse 150-02-01000 Damper bracket 158-02-00600 Coupling NOTE Part numbers are referenced from electrical drawing M1500E25-75100 in the Electrical Manual. FG1BX-UK-MAN-0200 | Rev. C23 (July 2023) MONO...
- Page 66 Water solenoid (including hoses) A900-34-087 Hose – blue (not shown attached) 150-07-00800 Delivery pipe – long 150-07-00700 Delivery pipe - short NOTE Part numbers are referenced from electrical drawing M1500E25-75100 in the Electrical Manual. MONO FG1BX-UK-MAN-0200 | Rev. C23 (July 2023)
- Page 67 Delivery pipe - short A900-34-321 Bulkhead coupling A900-34-387 Equal elbow 150-00-11300 150-07-00500 Delivery pipe NOTE Complete steam assembly kit is part number 150-07-00003. Includes 150-01-07700 (pipe guide bracket x 2) and 150-07-00400 (double solenoid inlet valve). FG1BX-UK-MAN-0200 | Rev. C23 (July 2023) MONO...
- Page 68 Eco Connect Convection Ovens | 4/5/7/10-Tray | Steam Installation and Operation Manual Part 1 | Section 5 | Baking Chamber and Door Parts (FG150) Figure 18: Baking Chamber and Door Parts (FG150) MONO FG1BX-UK-MAN-0200 | Rev. C23 (July 2023)
- Page 69 Bottom hinge R/H oven 149-03-04100 Outer door glass 150-03-10100 Inner door glass B482-07-037 Door switch A900-27-254 Handle/Catch/Latch assembly NOTE Complete door assembly is part number 150-03-14400 (L/H) and 150-03-14401 (R/H). State which is required. FG1BX-UK-MAN-0200 | Rev. C23 (July 2023) MONO...
-
Page 70: Part 2: Fg159 4/5-Tray 18" X 30" Oven Spares Section
C. Damper ......... (Part 2 / Section 3 on Page 73) D. Water System ....... (Part 2 / Section 4 on Page 74) E. Baking Chamber and Door Parts . (Part 2 / Section 5 on Page 76) MONO FG1BX-UK-MAN-0200 | Rev. C23 (July 2023) - Page 71 Item Number Part Number Part Description B720-74-005 Fan motor unit B847-04-068 Heating element, 240 Vac B847-04-073 Heating element, 220 Vac NOTE Part numbers are referenced from electrical drawing M159E25-75000 in the Electrical Manual. FG1BX-UK-MAN-0200 | Rev. C23 (July 2023) MONO...
- Page 72 B801-08-021 Element contactor B869-75-018 Rear cooling fan B888-30-014 Overheat thermostat B842-85-042 Light fuse B842-85-025 Fan fuse B842-85-039 Auxiliary socket fuse NOTE Part numbers are referenced from electrical drawing M159E25-75000 in the Electrical Manual. MONO FG1BX-UK-MAN-0200 | Rev. C23 (July 2023)
- Page 73 Part Number Part Description B749-83-003 Damper solenoid L/H oven B749-83-004 Damper solenoid R/H oven 158-02-00300 Damper solenoid bracket 158-02-00600 Coupling NOTE Part numbers are referenced from electrical drawing M159E25-75000 in the Electrical Manual. FG1BX-UK-MAN-0200 | Rev. C23 (July 2023) MONO...
- Page 74 Water inlet assembly (including hose) A900-34-253 Copper pipe (10 mm OD x 20 SWG) A900-34-321 Bulkhead coupling (under insulation) A900-34-087 Hose – blue NOTE Part numbers are referenced from electrical drawing M159E25-75000 in the Electrical Manual. MONO FG1BX-UK-MAN-0200 | Rev. C23 (July 2023)
- Page 75 Bulkhead coupling B847-04-068 Heating element, 240 Vac B847-04-073 Heating element, 220 Vac 150-00-11300 Individual part numbers not available for pipes. All pipes made from A900-34-253 Copper Pipe 10 mm O/D x 20 SWG wall. FG1BX-UK-MAN-0200 | Rev. C23 (July 2023) MONO...
- Page 76 Eco Connect Convection Ovens | 4/5/7/10-Tray | Steam Installation and Operation Manual Part 2 | Section 5 | Baking Chamber and Door Parts (FG159) Figure 25: Baking Chamber and Door Parts (FG159) MONO FG1BX-UK-MAN-0200 | Rev. C23 (July 2023)
- Page 77 Bottom hinge R/H oven 153-03-04000 Outer door glass 159-03-06600 Inner door including glass B482-07-037 Door switch A900-27-254 Handle/Catch/Latch assembly NOTE Complete door assembly part numbers are: 159-03-06500 (L/H hinge door) and 159-03-06501 (R/H hinge door). FG1BX-UK-MAN-0200 | Rev. C23 (July 2023) MONO...
-
Page 78: Part 3: Fg158 4/5-Tray 60Cm X 40Cm Oven Spares Section
C. Damper and fan ......(Part 3 / Section 3 on Page 81) D. Water System ....... (Part 3 / Section 4 on Page 82) E. Baking Chamber and Door Parts . (Part 3 / Section 5 on Page 84) MONO FG1BX-UK-MAN-0200 | Rev. C23 (July 2023) - Page 79 Item Number Part Number Part Description B720-74-005 Fan motor unit B847-04-067 Heating element, 240 Vac B847-04-074 Heating element, 220 Vac NOTE Part numbers are referenced from electrical drawing M158E25-75200 in the Electrical Manual. FG1BX-UK-MAN-0200 | Rev. C23 (July 2023) MONO...
- Page 80 Fan motor reverse contact B801-08-021 Element contactor B888-30-014 Overheat thermostat B842-85-042 Light fuse B842-85-025 Fan fuse B842-85-039 Auxiliary socket fuse NOTE Part numbers are referenced from electrical drawing M158E25-75200 in the Electrical Manual. MONO FG1BX-UK-MAN-0200 | Rev. C23 (July 2023)
- Page 81 B749-83-003 Damper solenoid L/H oven B749-83-004 Damper solenoid R/H oven B869-75-018 Rear cooling fan 158-02-00300 Damper solenoid bracket 158-02-00600 Coupling NOTE Part numbers are referenced from electrical drawing M158E25-75200 in the Electrical Manual. FG1BX-UK-MAN-0200 | Rev. C23 (July 2023) MONO...
- Page 82 A900-34-253 Copper pipe (10 mm OD x 20 SWG) A900-34-321 Bulkhead coupling (under insulation) A900-34-087 Hose – blue (not shown) NOTE Part numbers are referenced from electrical drawing M158E25-75200 in the Electrical Manual. MONO FG1BX-UK-MAN-0200 | Rev. C23 (July 2023)
- Page 83 Bulkhead coupling B847-04-067 Heating element, 240 Vac B847-04-074 Heating element, 220 Vac 150-00-11200 Individual part numbers not available for pipes. All pipes made from A900-34-253 Copper Pipe 10 mm O/D x 20 SWG wall. FG1BX-UK-MAN-0200 | Rev. C23 (July 2023) MONO...
- Page 84 Eco Connect Convection Ovens | 4/5/7/10-Tray | Steam Installation and Operation Manual Part 3 | Section 5 | Baking Chamber and Door Parts (FG158) Figure 32: Baking Chamber and Door Parts (FG158) MONO FG1BX-UK-MAN-0200 | Rev. C23 (July 2023)
- Page 85 Bottom hinge R/H oven 158-03-06000 Outer door glass 158-03-41600 Inner door glass B482-07-037 Door switch A900-27-254 Handle/Catch/Latch assembly NOTE Complete door assembly part numbers are: 158-03-05900 (L/H hinge door) and 158-03-05901 (R/H hinge door). FG1BX-UK-MAN-0200 | Rev. C23 (July 2023) MONO...
-
Page 86: Part 4: Fg153 4/5-Tray 40Cm X 60Cm Oven Spares Section
C. Damper and fan ......(Part 4 / Section 3 on Page 89) D. Water System ....... (Part 4 / Section 4 on Page 90) E. Baking Chamber and Door Parts . (Part 4 / Section 5 on Page 92) MONO FG1BX-UK-MAN-0200 | Rev. C23 (July 2023) - Page 87 Item Number Part Number Part Description B720-74-005 Fan motor unit B847-04-067 Heating element, 240 Vac B847-04-074 Heating element, 220 Vac NOTE Part numbers are referenced from electrical drawing M158E25-75200 in the Electrical Manual. FG1BX-UK-MAN-0200 | Rev. C23 (July 2023) MONO...
- Page 88 Fan motor reverse contact B801-08-021 Element contactor B888-30-014 Overheat thermostat B842-85-042 Light fuse B842-85-025 Fan fuse B842-85-039 Auxiliary socket fuse NOTE Part numbers are referenced from electrical drawing M158E25-75200 in the Electrical Manual. MONO FG1BX-UK-MAN-0200 | Rev. C23 (July 2023)
- Page 89 B749-83-003 Damper solenoid L/H oven B749-83-004 Damper solenoid R/H oven B869-75-018 Rear cooling fan 158-02-00300 Damper solenoid bracket 158-02-00600 Coupling NOTE Part numbers are referenced from electrical drawing M158E25-75200 in the Electrical Manual. FG1BX-UK-MAN-0200 | Rev. C23 (July 2023) MONO...
- Page 90 A900-34-253 Copper pipe (10 mm OD x 20 SWG) A900-34-321 Bulkhead coupling (under insulation) A900-34-087 Hose – blue (Not shown) NOTE Part numbers are referenced from electrical drawing M158E25-75200 in the Electrical Manual. MONO FG1BX-UK-MAN-0200 | Rev. C23 (July 2023)
- Page 91 Bulkhead coupling B847-04-067 Heating element, 240 Vac B847-04-074 Heating element, 220 Vac 150-00-11200 Individual part numbers not available for pipes. All pipes made from A900-34-253 Copper Pipe 10 mm O/D x 20 SWG wall. FG1BX-UK-MAN-0200 | Rev. C23 (July 2023) MONO...
- Page 92 Eco Connect Convection Ovens | 4/5/7/10-Tray | Steam Installation and Operation Manual Part 4 | Section 5 | Baking Chamber and Door Parts (FG153) Figure 39: Baking Chamber and Door Parts (FG153) MONO FG1BX-UK-MAN-0200 | Rev. C23 (July 2023)
- Page 93 Bottom hinge L/H oven 158-03-05201 Bottom hinge R/H oven 153-03-01700 Outer/inner door glass B482-07-037 Door switch A900-27-254 Handle/Catch/Latch assembly NOTE Complete door assembly part numbers are: 153-03-05900 (L/H hinge door) and 153-03-05901 (R/H hinge door). FG1BX-UK-MAN-0200 | Rev. C23 (July 2023) MONO...
-
Page 94: Condenser Unit (Option)
Safety ............page 98 Installation ..........page 99 Operation ..........page 102 Spares ............page 103 Other versions that may be fitted ..page 105 NOTE See the Electrics Manual for electrical information. MONO FG1BX-UK-MAN-0200 | Rev. C23 (July 2023) - Page 95 Eco Connect Convection Ovens | 4/5/7/10-Tray | Steam Introduction (condenser unit) A condenser unit can be fitted to a MONO oven (or stacked ovens). The thermostatic control can be adjusted to operate in most ambient temperatures. A simple water connection (washing machine type fitting) and a hose to drain are required to operate efficiently.
- Page 96 Eco Connect Convection Ovens | 4/5/7/10-Tray | Steam Installation and Operation Manual Dimensions (condenser unit) Figure 41: Dimensions of a condenser unit Water out Water in Rear of the oven MONO FG1BX-UK-MAN-0200 | Rev. C23 (July 2023)
- Page 97 Washing machine type connection to the normal water supply via steam water connection to the oven(s). Noise Less than 85 dB Weight Approximately 18 kg / 39.7 lb (excluding water) FG1BX-UK-MAN-0200 | Rev. C23 (July 2023) MONO...
- Page 98 While the oven is in operation (and for some time after use), touching the − condenser or the surroundings is inadvisable because of conducted heat. No unauthorised modifications to the condenser are permitted. Only use MONO spare parts on this condenser. MONO FG1BX-UK-MAN-0200 | Rev. C23 (July 2023)
- Page 99 If fixing holes are not present on the top sheet of the oven, they should be marked and drilled at this stage. Position the condenser correctly and mark hole positions (centre of each slot). Remove the condenser and drill holes of 6.5 mm diameter at four positions. FG1BX-UK-MAN-0200 | Rev. C23 (July 2023) MONO...
- Page 100 Eco Connect Convection Ovens | 4/5/7/10-Tray | Steam Installation and Operation Manual Figure 42: Installation of a condenser unit MONO FG1BX-UK-MAN-0200 | Rev. C23 (July 2023)
- Page 101 Eco Connect Convection Ovens | 4/5/7/10-Tray | Steam Figure 43: Water pipe connections Condenser solenoid Oven #1 Oven #2 Bracket fixings for the water tap Mains water supply inlet Tee-pipe for double oven connection FG1BX-UK-MAN-0200 | Rev. C23 (July 2023) MONO...
- Page 102 It is suggested that, as a starting point, the thermostat is set at 60. It can then be decreased if the performance drops or increased if it is found that the water is being replaced too often. Figure 44: Thermostat control on the condenser Thermostat control Setting position MONO FG1BX-UK-MAN-0200 | Rev. C23 (July 2023)
- Page 103 Eco Connect Convection Ovens | 4/5/7/10-Tray | Steam Spares (condenser unit) This section is for Engineer use only Do not attempt any modifications to the condenser or oven. If in doubt, contact Mono Equipment for advice. Figure 45: Main parts of the condenser unit FG1BX-UK-MAN-0200 | Rev.
- Page 104 Reducer ¼-in. BSP (male) x ¼-in. BSPT (male) A900-34-245 Elbow B811-33-001 Spacer B839-17-003 Cable gland type 251 B842-17-005 Cable gland type 206-6096 B842-30-003 Thermostat B842-40-002 Fan guard B842-50-005 Porcelain connecting block B869-75-033 B867-83-011 Solenoid valve MONO FG1BX-UK-MAN-0200 | Rev. C23 (July 2023)
- Page 105 The following evaporation design versions could be fitted to your oven. They only require to be plugged into the socket at the rear of the oven (Figure 45). This connection powers the fan and evaporation pad. No drain is required. Figure 46: Plugging in the condenser unit FG1BX-UK-MAN-0200 | Rev. C23 (July 2023) MONO...
- Page 106 Eco Connect Convection Ovens | 4/5/7/10-Tray | Steam Installation and Operation Manual Figure 47: Condenser unit FG150/AC5 MONO FG1BX-UK-MAN-0200 | Rev. C23 (July 2023)
- Page 107 Installation and Operation Manual Eco Connect Convection Ovens | 4/5/7/10-Tray | Steam Figure 48: Condenser assembly FG155/X38 FG1BX-UK-MAN-0200 | Rev. C23 (July 2023) MONO...
- Page 108 Eco Connect Convection Ovens | 4/5/7/10-Tray | Steam Installation and Operation Manual Figure 49: Condenser assembly FG158/AC1 MONO FG1BX-UK-MAN-0200 | Rev. C23 (July 2023)
- Page 109 Installation and Operation Manual Eco Connect Convection Ovens | 4/5/7/10-Tray | Steam Figure 50: Reduced height condenser FG158/AC3 FG1BX-UK-MAN-0200 | Rev. C23 (July 2023) MONO...
- Page 110 Eco Connect Convection Ovens | 4/5/7/10-Tray | Steam Installation and Operation Manual Figure 51: Reduced height condenser FG158/AC4 MONO FG1BX-UK-MAN-0200 | Rev. C23 (July 2023)
- Page 111 Installation and Operation Manual Eco Connect Convection Ovens | 4/5/7/10-Tray | Steam Figure 52: Condenser FG159/AC1 FG1BX-UK-MAN-0200 | Rev. C23 (July 2023) MONO...
- Page 112 Eco Connect Convection Ovens | 4/5/7/10-Tray | Steam Installation and Operation Manual (Intentional Empty Page) MONO FG1BX-UK-MAN-0200 | Rev. C23 (July 2023)
-
Page 113: Passwords
Oven setting access – setting time/date, etc. 2413 High-level settings access. NOTE If the passcodes have been changed and are not available, contact MONO Equipment for a master number that opens all screens. FG1BX-UK-MAN-0200 | Rev. C23 (July 2023) MONO... - Page 114 Eco Connect Convection Ovens | 4/5/7/10-Tray | Steam Installation and Operation Manual (Intentional Empty Page) MONO FG1BX-UK-MAN-0200 | Rev. C23 (July 2023)
- Page 115 Installation and Operation Manual Eco Connect Convection Ovens | 4/5/7/10-Tray | Steam FG1BX-UK-MAN-0200 | Rev. C23 (July 2023) MONO...
- Page 116 MONO Equipment is the leading designer and manufacturer of bakery equipment in the United Kingdom. This proud heritage of British craftmanship, combined with a reputation for creating high-quality, innovative products, can be traced back to its origins in 1947. All our bakery equipment is manufactured to the most stringent NQA ISO9001:2015 &...
Need help?
Do you have a question about the Eco Connect FG159 and is the answer not in the manual?
Questions and answers