Table of Contents
Advertisement
Available languages
Available languages
Quick Links
Advertisement
Table of Contents

Subscribe to Our Youtube Channel
Related Manuals for VALBERG BITH 60 X 756C


Summary of Contents for VALBERG BITH 60 X 756C
- Page 2 WARRANTY CONDITION This product is guaranteed for a period of 2 years from the date of purchase* against any failure resulting from a manufacturing or material defect. This warranty does not cover defects or damage resulting from incorrect installation, improper use or abnormal wear of the product.
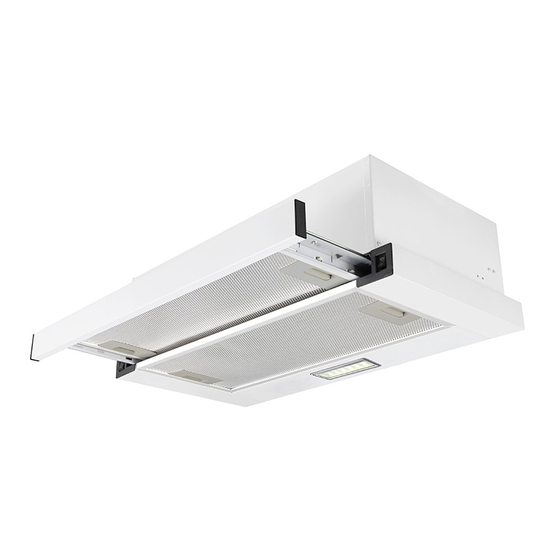
- Page 3 05/2022 - V4 Extractor fan Hotte aspirante Afzuigkap Campana extractora 959006 - BITH 60 X 756C INSTRUCTIONS FOR USE ....02 CONSIGNES D'UTILISATION ....14 GEBRUIKSAANWIJZINGEN ....26 INSTRUCCIONES DE USO ....38...
- Page 9 Thanks! T h a n k y o u f o r c h o o s i n g t h i s VA L B E R G p ro d u c t . Chosen, tested and recommended by ELECTRO DEPOT, t h e p ro d u c t s o f t h e VA L B E R G b r a n d a re e a s y t o u s e , re l i a b le a n d o f a n i m p e c c a b le s t a n d a rd .
- Page 10 Table of contents Preparations prior to installation Using the appliance Installation (extraction outdoors) Installation without an outdoor opening Control and use Maintenance Useful information Troubleshooting...
-
Page 11: Using The Appliance
Using the appliance Preparations prior to installation A. If there is an exterior vent outlet, your extractor fan can be connected to this. As shown below, using an extractor hose (non-inflammable material or flexible, aluminium or enamelled hose with an internal diameter of 150 mm) (Figure PEASE NOTE: The ventilation ducts are not supplied. - Page 12 Using the appliance C. The extractor fan must be installed at a distance of 65~75 cm above the hob for optimum efficacy. (Figure...
- Page 13 Using the appliance Installation (extraction outdoors) CAUTION: Follow the warnings given in the instructions with regard to using the appliance in the mode that extracts air into the room. Fixing to a wall 1. Drill 2 holes, 8 mm in diameter, in a suitable location, centring them in relation to the hole at the back of the extractor fan.
- Page 14 Using the appliance Fixing under a cabinet 1. Drill 4 holes, 6 mm in diameter, under the wall cabinet. 2. Install the extractor fan under the wall cabinet and fix it using the 4 screws provided. (Figure PEASE NOTE: The extendable hose is an optional accessory and is not supplied.
- Page 15 Using the appliance Installation without an outdoor opening Recycling version Ask your activated carbon filter vendor about transforming the extractor from the evacuation version to the recycling version. Install the activated carbon filter (cassette): • Check that the diameter of the activated carbon filter matches that of the outlet. •...
- Page 16 Using the appliance PEASE NOTE: The installation of a carbon filter reduces the fan’s extraction power. It is recommended the extractor fan be turned on for a few minutes before starting to cook. Likewise, it is recommended turning it off 15 minutes after finishing cooking in order to eliminate as much of the odours and stale air as possible.
- Page 17 Using the appliance Control and use Mechanical switch Lamp button On the left-hand side of the extractor. Speed button On the right-hand side of the extractor. « = » : fast speed « - » : slow speed “O”: Off...
-
Page 18: Useful Information
Useful information Maintenance Turn off and unplug the appliance before cleaning it. Periodic cleaning Use a soft cloth, dampened with warm soapy water or household detergent. Do not use a metal pad, abrasive or chemical products/tools, or a hard-bristled brush to clean the appliance. - Page 19 Useful information – Maximum electrical power: 2 W – Voltage range: 220-240 VAC – Dimensions: 120 mm...
-
Page 20: Troubleshooting
Useful information Troubleshooting Problems Causes Solutions • The fan blades are • Turn off the appliance The lamp is on, but the fan jammed. and have it repaired by a is not working. qualified repairer only. • The motor is damaged. •... - Page 21 Merci ! M e rc i d ’ a v o i r c h o i s i c e p ro d u i t VA L B E R G . Choisis, testés et recommandés par ELECTRO DEPOT, le s p ro d u i t s d e l a m a rq u e VA L B E R G v o u s a s s u re n t u n e u t i l i s a t i o n s i m p l e , u n e p e r f o r m a n c e f i a b l e e t u n e q u a l i t é...
- Page 22 Utilisation de l’appareil Table de matières Préparatifs avant l’installation Utilisation de Installation (extraction vers l’extérieur) l’appareil Installation sans ouverture vers l’extérieur Contrôle et utilisation Entretien Informations Dépannage pratiques Les notices sont aussi disponibles sur le site http://www.electrodepot.fr/sav/notices/ http://www.electrodepot.be/fr/sav/notices...
- Page 23 Utilisation de l’appareil Préparatifs avant l’installation A. S’il y a une bouche de sortie donnant sur l’extérieur, votre hotte aspirante peut y être raccordée. Comme montré ci-dessous, au moyen d’une gaine d’extraction (matériau ininflammable ou tuyau flexible, aluminium, émaillé d’un diamètre interne de 150 mm) (Figure REMARQUE : Les gaines de ventilation ne sont pas fournies.
-
Page 24: Utilisation De L'appareil
Utilisation de l’appareil C. La hotte aspirante doit être placée à une distance de 65~75 cm au-dessus du plan de cuisson pour une efficacité optimale. (Figure... - Page 25 Utilisation de l’appareil Installation (extraction vers l’extérieur) ATTENTION : Respectez les mises en garde contenues dans la notice d’utilisation concernant l’utilisation de l’appareil dans le mode extraction de l’air hors de la pièce. Fixation murale 1. Percez 2 trous de Ø8 mm dans un endroit approprié en les centrant par rapport au trou du dos de la hotte aspirante.
- Page 26 Utilisation de l’appareil Fixation sous un meuble 1. Percez 4 trous de 6 mm de diamètres sous le placard suspendu. 2. Installez la hotte aspirante sous le placard suspendu et fixez-la avec les 4 vis fournies. (Figure REMARQUE : La gaine extensible est un accessoire optionnel et n’est pas fournie.
- Page 27 Utilisation de l’appareil Installation sans ouverture vers l’extérieur Version recyclage Pour transformer la hotte version évacuation en version recyclage, demandez à votre vendeur des filtres à charbon actif. Installez le filtre à charbon actif (cassette) : • Vérifiez que le diamètre du filtre à charbon actif correspond à celui de la sortie d’évacuation. •...
- Page 28 Utilisation de l’appareil REMARQUE : L’installation d’un filtre à charbon diminue la puissance d’aspiration de la hotte. Il est conseillé de mettre la hotte en service quelques minutes avant de commencer à cuisiner. De même, il est conseillé de l’arrêter 15 minutes après avoir terminé...
- Page 29 Utilisation de l’appareil Contrôle et utilisation Bouton à bascule mécanique Bouton de la lampe Sur le côté gauche de la hotte. Bouton de la vitesse Sur le côté droit de la hotte. « = » : vitesse rapide « - » : vitesse lente «...
-
Page 30: Informations Pratiques
Informations pratiques Entretien Avant de nettoyer l’appareil, éteignez-le et débranchez sa fiche. Nettoyage périodique Utilisez un chiffon doux et légèrement humecté avec de l’eau savonneuse tiède ou du détergent ménager. N’utilisez pas de tampon métallique, de produit/ustensile abrasif ou chimique, ni de brosse à poils durs pour nettoyer l’appareil. Nettoyage mensuel du filtre à... - Page 31 Informations pratiques • Utilisez une lampe de type DBR-2-H-120 ou une alternative équivalente (code ILCOS D selon le standard IEC 61231). – Modules LED, à ballast intégré – Puissance électrique maximale : 2 W – Plage de tension : AC 220-240V –...
-
Page 32: Dépannage
Informations pratiques Dépannage Problèmes Causes Solutions • Les pales du ventilateur • Éteignez l’appareil La lampe est allumée, mais sont coincées. et faites-le réparer le ventilateur ne fonctionne exclusivement par un • Le moteur est pas. réparateur qualifié. endommagé. • Changez l’ampoule •... - Page 33 Proficiat met uw keuze voor een product van VALBERG. De selectie en de testen van de toestellen van VALBERG g e b e u re n v o l le d i g o n d e r c o n t ro le e n s u p e r v i s i e v a n E L E C T R O D E P O T.
- Page 34 Gebruik van het toestel Inhoudstafel Voorbereidingen voorafgaand aan de installatie Gebruik van het Installatie (afvoer naar buiten) toestel Installatie zonder opening naar buiten Controle en gebruik Onderhoud Praktische informatie Reparatie...
- Page 35 Gebruik van het toestel Voorbereidingen voorafgaand aan de installatie A. Als een afvoergat naar buiten uitgeeft, kan uw afzuigkap hierop worden aangesloten. Zoals hieronder aangegeven, met behulp van een afvoerbuis (onbrandbaar materiaal of een flexibeles lang, a luminium, geëmailleerd met een binnendiameter van 150 mm) (Afbeelding OPMERKING: Uitlaatbuis dampkap niet meegeleverd B.
-
Page 36: Gebruik Van Het Toestel
Gebruik van het toestel C. De afzuigkap moet worden geplaatst op een afstand van 65~75 cm boven de kookplaat voor een optimaal rendement. (Afbeelding... - Page 37 Gebruik van het toestel Installatie (afvoer naar buiten) LET OP: Volg de waarschuwingen in de handleiding over het gebruik van het apparaat in de modus luchtafvoer buiten de ruimte. Wandmontage 1. Boor 2 gaten van Ø8 mm op een geschikte plaats, gecentreerd ten opzichte van de opening in de achterkant van de afzuigkap.
- Page 38 Gebruik van het toestel Bevestiging onder een meubel 1. Boor 4 gaten van 6 mm diameter onder de opgehangen kast. 2. Installeer de afzuigkap onder de opgehangen kast en maak ze vast met de 4 meegeleverde schroeven. (Afbeelding OPMERKING: De uitzetbare koker is een optioneel accessoire en wordt niet meegeleverd.
- Page 39 Gebruik van het toestel Installatie zonder opening naar buiten Filterversie Om de dampkap van de afzuigversie naar de filterversie om te bouwen, vraag uw dealer om actieve koolstoffilters. Installeer de actieve koolstoffilter (cassette) : •Controleer of de diameter van de actieve koolstoffilter overeenkomt met die van de evacuatieuitlaat. •...
- Page 40 Gebruik van het toestel OPMERKING: De installatie van een koolstoffilter vermindert het afzuigvermogen van de dampkap.We raden aan om de dampkap enkele minuten voor het bereiden van gerechten in te schakelen. Het wordt tevens aanbevolen het apparaat 15 minuten ingeschakeld te houden eenmaal het eten bereid is voor een optimale verwijdering van geuren en afvoer van vervuilde lucht.
- Page 41 Gebruik van het toestel Controle en gebruik Mechanische schakelknop Lichtknop Op de linkerkant van de afzuigkap. Snelheidsknop Op de rechterkant van de afzuigkap. « = »: hoge snelheid « - »: lage snelheid « O »: Stop...
-
Page 42: Praktische Informatie
Praktische informatie Onderhoud Alvorens het apparaat te reinigen, schakel het uit en trek de stekker uit het stopcontact. Periodieke reiniging Gebruik een zachte doek, licht bevochtigd met warm water en zeep of een schoonmaakmiddel. Gebruik geen staalwol, schurende of chemische producten/voorwerpen, stijve borstel om het apparaat te reinigen. - Page 43 Praktische informatie • Gebruik type lamp (of gebruik in alternatief type lamp) DBR-2-H-120 (ILCOS D-code volgens de norm IEC 61231). - LED modules, zelf-ballast - Maximale wattage: 2W - Spanningsbereik: AC 220-240V - Afmetingen: 120 mm...
- Page 44 Praktische informatie Reparatie Probleemstellingen Oorzaken Oplossingen • De bladen van de • Schakel het apparaat uit De lamp brandt maar de ventilator zitten vast. en laat het repareren door ventilator functioneert niet. een erkend reparateur. • De motor is beschadigd. •...
- Page 45 ¡Muchas gracias! M u c h a s g r a c i a s p o r h a b e r e le g i d o n u e s t ro p ro d u c t o VA L B E R G .
- Page 46 Utilización del aparato Índice Preparativos previos a la instalación del aparato Utilización del Instalación (con evacuación de humos hacia el exterior) aparato Instalación sin abertura hacia el exterior Mandos y utilización Mantenimiento Información práctica Resolución de problemas...
- Page 47 Utilización del aparato Preparativos previos a la instalación del aparato A. De existir ya un conducto de evacuación de humos con salida al exterior, podrá conectar a este su campana extractora. Según se muestra en la imagen contigua, podrá efectuar dicha conexión utilizando un tubo de extracción (de material no inflamable o tubo flexible de aluminio esmaltado de un diámetro interior de 150 mm) (Figura OBSERVACIONES:...
-
Page 48: Utilización Del Aparato
Utilización del aparato C. Para garantizar su óptima eficacia de funcionamiento, la campana extractora deberá instalarse a una altura de entre 65 y 75 cm por encima de la superficie de la hornilla o placa de cocción. (Figura... - Page 49 Utilización del aparato Instalación (con evacuación de humos hacia el exterior) ¡ATENCIÓN! Asegúrese de observar las advertencias incluidas en el manual de uso referentes a la utilización del aparato en modo extracción de humos hacia el exterior. Fijación a la pared 1.
- Page 50 Utilización del aparato Fijación debajo de un mueble 1. Taladre 4 orificios de 6 mm de diámetro en la parte inferior del módulo alto de cocina fijado a la pared. 2. Instale la campana extractora fijándola a la parte inferior del módulo en cuestión utilizando los 4 tornillos suministrados.
- Page 51 Utilización del aparato Instalación sin abertura hacia el exterior Función del aire de circulación Para transformar la campana versión evacuación en versión reciclaje, solicite filtros de carbón activo a su vendedor. Instale el filtro de carbón activo (casette) : • Erfique que el diámetro del filtro de carbón activo se corresponde con el de la salida de evacuación. •...
- Page 52 Utilización del aparato OBSERVACIONES: La instalación de un filtro de carbón disminuye la potencia de aspiración de la campana. Se recomienda encender la campana extractora unos minutos antes de cocinar. Además, también es aconsejable dejarlo funcionar unos 15 minutos una vez finalizada la cocción para eliminar por completo los olores y posibilitar el transporte de aire utilizado.
- Page 53 Utilización del aparato Mandos y utilización Pulsadores de tipo mecánico Botón de activación/desactivación de la iluminación En el lado izquierdo de la campana extractora. Botón de selección de la velocidad En el lado derecho de la campana extractora. «=»: Velocidad rápida «-»: Velocidad lenta «O»: Apagado...
-
Page 54: Mantenimiento
Información práctica Mantenimiento Apague el aparato y desenchúfelo de la toma de corriente antes de proceder a limpiarlo. Limpieza periódica Utilice un paño suave ligeramente humedecido con agua jabonosa templada o detergente doméstico. No utilice estropajos metálicos ni productos o utensilios abrasivos o químicos ni tampoco cepillos de cerdas duras para limpiar el aparato. - Page 55 Información práctica Sustitución de la bombilla • Utilice lámpara de tipo (o use un tipo alternativo de lámpara) DBR-2-H-120 (código ILCOS D según norma IEC 61231). - Módulos LED, autobalastrada - Máx. potencia: 2 W - Rango de voltaje: AC 220-240V - Dimensiones: 120 mm...
-
Page 56: Resolución De Problemas
Información práctica Resolución de problemas Problemas Causas Soluciones • Las aspas del ventilador • Apague el aparato y La luz del aparato se están trabadas. solicite exclusivamente su enciende pero el ventilador reparación a un técnico no funciona. • El motor está dañado. cualificado. - Page 57 Note/Notes/Notities/Notas...
- Page 58 Note/Notes/Notities/Notas...
- Page 59 Note/Notes/Notities/Notas...
Need help?
Do you have a question about the BITH 60 X 756C and is the answer not in the manual?
Questions and answers