Table of Contents
Advertisement
Available languages
Available languages
Quick Links
THA 752 IX/I
English
Operating Instructions
HOB
Contents
Operating Instructions,1
Warnings,2
Assistance,3
Description of the appliance,4
Installation,5
Français
Mode d'emploi
TABLE DE CUISSON
Sommaire
Mode d'emploi,1
Avertissements,2
Assistance,3
Description de l'appareil,4
Advertisement
Table of Contents

Related Manuals for Indesit THA 752 IX/I


Summary of Contents for Indesit THA 752 IX/I
-
Page 1: Table Of Contents
THA 752 IX/I English Operating Instructions Contents Operating Instructions,1 Warnings,2 Assistance,3 Description of the appliance,4 Installation,5 Start-up and use,9 Precautions and tips,9 Maintenance and care,10 Troubleshooting,10 Français Mode d’emploi TABLE DE CUISSON Sommaire Mode d’emploi,1 Avertissements,2 Assistance,3 Description de l’appareil,4... - Page 2 Warnings Avertissements WARNING: The appliance and its accessible parts ATTENTION : Cet appareil ainsi que ses parties become hot during use. Care should be taken to accessibles deviennent très chauds pendant leur avoid touching heating elements. Children less than 8 fonctionnement.
- Page 3 Assistance Communicating: • the type of problem encountered. • appliance model (Mod.) • serial number (S/N) This information is found on the data plate located on the appliance and/or on the packaging. Assistance Indiquez-lui : • le type d’anomalie • le modèle de votre appareil (Mod.) •...
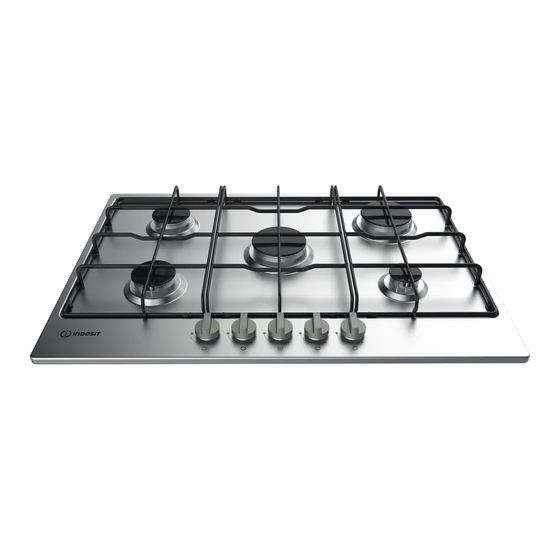
- Page 4 Description of the appliance Overall view 1. Support Grid for COOKWARE 2. GAS BURNERS 3. Control Knobs for GAS BURNERS 4. Ignition for GAS BURNERS 5. SAFETY DEVICES • GAS BURNERS differ in size and power. Use the diameter of the cookware to choose the most appropriate burner to cook with.
- Page 5 Installation Fitting the appliance The following precautions must be taken when installing the hob: • Kitchen cabinets adjacent to the appliance and taller than the top of the ! Before operating your new appliance please read this instruction booklet hob must be at least 200 mm from the edge of the hob. carefully.
- Page 6 ! The cable must not be bent or compressed. Ventilation To ensure adequate ventilation, the back panel of the cabinet must be ! The cable must be checked regularly and replaced by authorised technicians removed. It is advisable to install the oven so that it rests on two strips of wood, or on a completely flat surface with an opening of at least 45 x 560 only (see Assistance).
- Page 7 • Setting the burners to minimum 1. Turn the tap to the low flame position; 2. Remove the knob and adjust the adjustment screw, which is positioned in or next to the tap pin, until the flame is small but steady. 3.
- Page 8 G20 20 mbar 2R - 2S -1A 10.30 981 l/h 9.52 G30 28-30 mbar 2R - 2S -1A 10.30 749 g/h 30.94 G31 37 mbar 2R - 2S -1A 10.30 736 g/h 23.80 ELECTRIC SUPPLY: 220-240V~ 50/60Hz 0,6W THA 752 IX/I...
-
Page 9: Start-Up And Use,9
Start-up and use Precautions and tips ! The position of the corresponding gas burner is shown on every knob. ! This appliance has been designed and manufactured in compliance with international safety standards. The following warnings are provided for safety Gas burners reasons and must be read carefully. -
Page 10: Maintenance And Care,10
Troubleshooting on the product reminds you of your obligation, that when you dispose of the appliance it must be separately collected. Consumers should contact their local authority or retailer for information It may happen that the appliance does not function properly or at all. Before concerning the correct disposal of their old appliance. -
Page 11: Installation,11
Installation ou une aération plus efficace, en augmentant la puissance d’aspiration mécanique si déjà prédisposée. • Les gaz de pétrole liquéfiés, plus lourds que l’air, se déposent et ! Conservez ce mode d’emploi pour pouvoir le consulter à tout moment. stagnent vers le bas. - Page 12 ! L’installateur est responsable du bon raccordement électrique de l’appareil et du respect des normes de sécurité. Avant de procéder au branchement, assurez-vous que : • la prise est bien munie d’une terre conforme à la loi; • la prise est bien apte à supporter la puissance maximale de l’appareil, Top 30-50 mm Top 20 mm indiquée sur la plaquette signalétique;...
- Page 13 Adaptation aux différents types de gaz Pour adapter la table à un type de gaz autre que celui pour lequel elle a été prévue (indiqué sur l’étiquette fixée sous la table ou sur l’emballage), il faut changer les injecteurs des brûleurs en procédant comme suit : 1.
- Page 14 G20 20 mbar 2R - 2S -1A 10.30 981 l/h 9.52 G30 28-30 mbar 2R - 2S -1A 10.30 749 g/h 30.94 G31 37 mbar 2R - 2S -1A 10.30 736 g/h 23.80 ALIMENTATION ELECTRIQUE : 220-240V~ 50/60Hz 0,6W THA 752 IX/I...
-
Page 15: Mise En Marche Et Utilisation,15
Mise en marche et utilisation Précautions et conseils ! Cet appareil a été conçu et fabriqué conformément aux normes ! La position du brûleur gaz ou correspondante est indiquée sur chaque internationales de sécurité. Ces conseils sont fournis pour des raisons de manette. -
Page 16: Nettoyage Et Entretien,16
• Rincez et séchez. • Réinstallez les brûleurs et les chapeaux des brûleurs dans leurs logements respectifs. • Au moment de réinstaller les grilles, assurez-vous que celles-ci sont alignées par rapport au brûleur. Indesit Company S.p.A. Viale Aristide Merloni,47 60044 Fabriano (AN) www.indesit.com...
Need help?
Do you have a question about the THA 752 IX/I and is the answer not in the manual?
Questions and answers