Tascam US-428 Owner's Manual
Universal serial bus digital audio workstation controller
Hide thumbs
Also See for US-428:
- Settings manual (5 pages) ,
- Supplementary manual (2 pages) ,
- Setup manual (1 page)

Related Manuals for Tascam US-428


Summary of Contents for Tascam US-428
- Page 1 TASCAM TEAC Professional Division Version 3.0 Edition Universal Serial Bus Digital Audio Workstation Controller OWNER’S MANUAL...
- Page 2 Important Safety Precautions CAUTION: TO REDUCE THE RISK OF ELECTRIC SHOCK, DO NOT REMOVE COVER (OR BACK). NO USER-SERVICEABLE PARTS INSIDE. REFER SERVICING TO QUALIFIED SERVICE PERSONNEL. The exclamation point within an equilateral triangle is intended to alert the user to the presence of important operating and maintenance (servicing) instructions in the literature accompanying the appliance.
-
Page 3: Safety Instructions
Declaration of Conformity Model Number : US-428 Trade Name : TASCAM Responsible Party: TEAC AMERICA, INC Address... -
Page 4: Table Of Contents
4.2 Hooking up MIDI ... 21 4.3 Using the Input Monitoring ... 22 4.4 Monitor vs. Master Level ... 22 5. The US-428 Control Panel ... 23 5.1 Main Page... 23 5.2 Buffer Size Adjustment ... 24 5.3 The Chromatic Tuner... 25... - Page 5 9. Technical Support ... 67 9.1 Troubleshooting ... 67 9.1 Troubleshooting FAQs ... 68 9.2 Tech Support Contacts ... 69 9.3 Software Downloads... 69 9.4 Programming the US-428 ... 69 Appendix A - MIDI Implementation Chart... 70 Appendix B – Control Protocol... 71 Appendix US-428 Specifications ...
-
Page 6: Introduction
Portastudio – if you’ve ever used a tape recorder, you know how to use the US-428. Because the US-428 is USB based, it’s the ideal companion to any desktop- or laptop-based digital recording setup. -
Page 7: What's In The Package
DAWs to virtual synths, video editing programs and more. In many cases, communication with a particular application accomplished using the application’s ability to redirect or “map” the US-428 control surface messages application. By making the programming specifications publicly available both in this... -
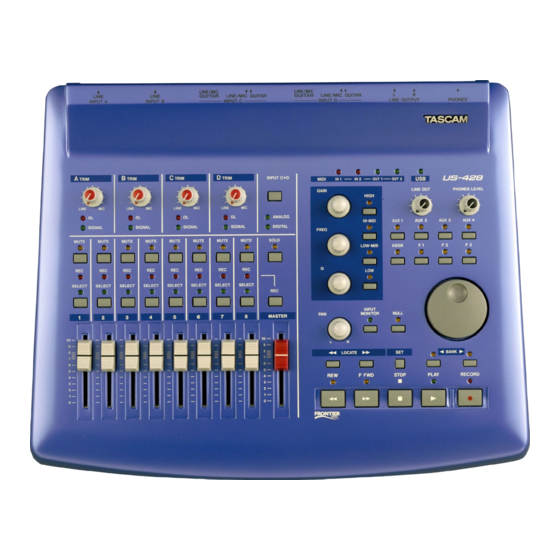
Page 8: Controls And Indicators
2. Controls and Indicators 2.1 Front Panel 1 INPUT C/D Select and LEDs 2 INPUT Trim Pots 3 OVERLOAD LED 4 SIGNAL LED 5 Channel MUTE and SOLO switches and LEDs 6 REC and SELECT LEDs 7 REC and SELECT switches 8 CHANNEL faders 9 MASTER fader 10 MIDI and USB Status LEDs... -
Page 9: Rear Panel
2.2 Rear Panel 22 PHONES jack 23 OUTPUT L/R jacks 24 INPUT C and D 25 LINE/MIC / GUITAR switch 26 INPUT A and B 27 POWER switch 28 POWER jack 29 USB jack 30 MIDI Out 1 and 2 31 MIDI In 1 and 2 32 Digital In and Out 33 MIC INPUT A and B... -
Page 10: Front Panel Descriptions
2.3 Front Panel Descriptions 1. INPUT C+D button toggles inputs C and D between the unbalanced analog inputs (1/4”) and the digital S/PDIF inputs. ANALOG LED indicates analog signal input to inputs C and D. DIGITAL LED indicates digital signal input (via S/PDIF) to inputs C and D. - Page 11 16. Fader NULL when pressed, disengages physical faders from the application. Used to match US-428’s faders with those of the software application’s internal mixer. When using FADER NULL, the selected channel’s REC and SEL LED’s indicate the US-428’s fader position relative to the associated channel in Cubasis’...
-
Page 12: Rear Panel Descriptions
19. REW transport rewind. FFWD transport fast forward. STOP transport stop. PLAY transport play. RECORD transport record. 20. PAN controls L-R panning on selected track. 21. LOCATE << and >> moves transport to L and R locate points. holding SET and pressing << and >> buttons sets L or R locate points, either on the fly or while stopped. -
Page 13: Installation
NOTE: The US-428 is not supported under Windows 95. We also do not recommend Windows98 First Edition, due to its limited USB implementation. A fast EIDE hard disk is required for throughput of multiple audio tracks. -
Page 14: Installation
USB port. Any Macintosh computer with one or more USB ports running Mac O/S 8.6 or later (the US-428 has not been tested with Mac O/S X as of this writing. Please check the website for updates). -
Page 15: Windows
3.2.1 Windows The US-428 v3 drivers are available on the CD as executable installers. You’ll find two executable installer files on the disk, labeled as “US428_Win9x_Install_3_05.exe” (for Windows Second Edition Millennium Edition) and “US428_Win2k_Install_3_05.exe” (for Windows 2000 and Windows XP). -
Page 16: Macintosh
US- installer, instructions. Connect computer, and connect power to the unit. When the US-428 is connected and powered up, the Mac will find the drivers itself. 3.3 Setting Up OMS (MacOS Only) Cubasis, ProTools and several other applications rely on OMS for MIDI implementation. -
Page 17: Tuning Your Pc
Performer, which utilizes FreeMIDI. The v3 drivers support OMS and FreeMIDI independently.) To set up OMS to work with the US-428: First, run the OMS installer. If you do not have the current version of OMS, it may be freely downloaded at www.opcode.com. - Page 18 Special Note: For even more detail on optimizing your PC for audio, please refer PC_Optimization.pdf included on the US-428 CD-ROM. with also available on the TASCAM website. will markedly improve capable can handle. Note certainly cheaper); getting...
-
Page 19: Notes On Usb Interfacing
Another well-documented advantage of USB is the ability to “hot-plug” devices (that is, plug them in and out without powering the computer down). While this applies to the US-428 as well, we recommend against plugging unplugging, or powering the unit on or off, while running your audio application. -
Page 20: Hooking Up Audio And Midi To The
S/PDIF input, you may prefer to monitor via the US-428’s S/PDIF output. Illustration 4.01 - Connecting audio to the US-428 To record audio from the US-428 into your computer, simply connect a device to the appropriate input. Microphones should be plugged into the INPUT A or B XLR inputs. -
Page 21: Hooking Up Midi
MIDI I/O. Simply connect the MIDI out of your keyboard or other device to a MIDI in jack on the US-428, and vice versa. If you’ve got a MIDI sync box, you can dedicate one of the two MIDI I/O’s to sending and receiving... -
Page 22: Using The Input Monitoring
When monitoring audio playback from the application via the US-428, the level is controlled by that track’s software gain control (which, in turn, is controlled by the US- 428’s channel FADERs), the MASTER FADER, and the LINE OUT or PHONES OUT level controls. -
Page 23: The Us-428 Control Panel
Red - digital in not ready to record, o Green - digital in ready to record The Input Monitor area is a viewable Native” and controllable version of the US-428 INPUT MONITOR mixer. Here you can Fader always sends US-428 itself... -
Page 24: Buffer Size Adjustment
US-428 input as it will appear on the LINE OUTPUT, DIGITAL OUT, and PHONES connectors. Three controls (level, pan and mute) are available for each input A, B, C and D. Note that... -
Page 25: The Chromatic Tuner
5.3 The Chromatic Tuner Open the US-428’s control panel and select the “Tuner” tab. In the “Input” section, select the US-428 input channel that you want to tune (A, B, C, or D). Play a note and adjust the trim knob for that input until the signal is strong, but not clipping. -
Page 26: Interfacing With Your Audio Software
US-428 with the Cubasis VST audio software included package. Details on using the US-428 with a number of other applications may be found in section eight of this manual. -
Page 27: Vst Remote
6.1.3 VST Remote Cubasis, program automatically recognize the US-428 as a remote controller unit. In most other applications, you will need to select the US-428 program’s control. To do this in Cubase (full versions), for example, select the VST Remote option from the Audio menu, and choose the US-428 option (See illustration 6.03). -
Page 28: Transport Controls And Locate Points
(or if so, that they are enabled at the desired locate points). Press the RECORD button on the US-428. Cubasis will issue a one or two bar countoff (depending on what’s set in Cubasis’ Metronome preferences menu), then commence recording. -
Page 29: Mute/Solo
EQ GAIN control. To open a selected channel’s EQ panel via the US-428, press one of the EQ selection buttons SELECT key on any channel, and the EQ/Aux Send panel for the selected channel will open. -
Page 30: Aux Buttons
6.7 Aux Buttons The AUX buttons 1 through 4 select the corresponding SEND software. When an AUX LED is illuminated, the selected AUX level is controlled via the DATAWHEEL. To open a channel’s Aux Send panel in Cubasis, press one of the AUX SEND buttons, and then the SELECT key on any channel;... -
Page 31: Asio2 Direct Monitoring
When changing to a different bank of faders, you may find that the fader on the US-428 is now out of position with the associated channel’s fader in Cubasis. Pressing the FADER NULL button will disengage the US-428’s... -
Page 32: A Sample Recording Session In Cubasis
NOTE: This chapter is intended as a quick start guide toward recording and mixing with Steinberg Cubasis and the US-428. It is in no way meant to be a comprehensive guide to Cubasis. For full details on the Cubasis application, please refer to the Steinberg Cubasis manual on the US-428 CD. -
Page 33: Recording Your Tracks
XLR or 1/4” inputs, or a digital source via the S/PDIF input. 7.2 Recording Your Tracks In Cubasis, choose the input(s) you wish to enable on the US-428. In the Audio menu, select Input, and click on the input pair (or pairs, in Cubase VST) you’ll be using on the US-428. -
Page 34: Overdubbing
US-428’s fader. The PAN control on the US-428 will pan the selected channel from Left to Right on the stereo buss. To open the EQ panel, select the desired channel and then press ASGN and select any of the four bands of EQ on the US-428’s EQ... - Page 35 Once your tracks are recorded, mixing can be automated on Cubasis’ internal mixer. By selecting Write on the mixer panel in Cubasis, your fader moves, EQ and FX settings and changes, panning, etc., can all be recorded into Cubasis’ automated mixer settings. To play back the automated mix, select Read on the mixer panel.
-
Page 36: Other Applications And Operational Modes
32 channel MIDI interface with virtually all Windows and MacOS compatible applications. Even those applications which do not support the US-428 as a controller can still use the US-428 as an audio MIDI interface. Since the US-428’s release, TASCAM been... -
Page 37: Cubase Vst - Windows
VST Score and VST/32) support a four band fully parametric EQ on each channel. Of course, it’s supported on the US-428 - each of the four bands of VST are controlled by the four associated EQ band selector buttons. -
Page 38: Cubase Vst - Macos
/ MIDI S PTIONS menu, open the I YSTEM NPUT menu and enable all inputs shown for the US-428 (MIDI 1, MIDI 2 and US-428 ONTROL Under the Options / Remote Setup menu, select S , and in the resulting ETUP... - Page 39 From the O PTIONS UDIO menu, select the ASIO device tab and choose one of the US 428’s ASIO drivers (16 or 24 bit) as the device. Note: these parameters save with the song and are not globally remembered. You will need to save the song as DEF.ALL if you want the OMS MIDI setup to load automatically.
-
Page 40: Nuendo - Windows And Macos
, MIDI or AUDIO ULTIPLE Once you’ve created Audio tracks, you can open the VST Mixer (D , or press F1 on the US-428 or F3 IXER on your computer keyboard). should have control of Nuendo’s faders, mutes, transports functions, as well as EQ and Aux sends. -
Page 41: Protools - Windows And Macos
Version 2.00 and later of the US-428 driver includes software to let the US-428 act like a JL Cooper CS-10™ attached to Pro Tools. This is different than the normal CS-10 emulation mode since Pro Tools uses it in some special ways. - Page 42 This way, you won't hear Pro Tools’ high latency monitor output. Push the "INPUT MONITOR" key on the US-428. Now the first 4 channel strips control the input monitor level of the 4 inputs. Adjust the mute, level, and pan WITH settings for the 4 inputs.
- Page 43 Or you can hold down the REW or FFWD keys to move the time line continuously. "P HROUGH In using the US-428 with Pro Tools, the physical faders positions at times will not match their on-screen counterparts.
- Page 44 Plug-Ins Guide.pdf" that came with Pro Tools. CRUBBING AND HUTTLING The data wheel on the US-428 can be use to scrub and shuttle audio in Pro Tools, and to create selections of data for editing. Here's a brief example of how to use these features to select some audio.
- Page 45 Press BANK> to do the same to trim the end point. Now press F2 or STOP to exit scrub mode. You can switch between scrub and shuttle modes at any time, and can leave scrub or shuttle mode by pressing the button with the lit up LED or STOP.
-
Page 46: Setting Up Soundmanager Support
Moving volume slider to the right or clicking on it will send a system beep out the US-428 outputs. When you click “Input” on the left, the available input devices appear on the right. Click on “US-428” to select it as the Sound Manager input device. - Page 47 “Volume” in this control panel is only used to enable or mute the US-428 output. Under “Sound In” you can select the “US-428” instead of the Mac’s Built-in sources, but it doesn’t let you select between the US-428’s A:B and C:D...
-
Page 48: Digital Performer (Macos)
8.5 Digital Performer (MacOS) The US-428 is supported in Digital Performer v2.7 and later. Before setting up the US-428 to work with Digital Performer, please install the US-428 MacOS v3 drivers, and set up either OMS or FreeMIDI. (Refer to the chapters on setting up both the drivers and OMS. - Page 49 SET + LOCATE>> Set Memory End to current time Channel Controls: The US-428 has 8 channel strips and a master fader. The master fader controls the volume for any and all tracks that contain master faders. Regular channel strip faders never affect a master fader track.
- Page 50 Pressing the N button places the US-428 into Null mode and lights the N . In this mode, ULL LED the fader strips’ red R and green S ’ display whether the fader is too...
- Page 51 Insert Parameter Controls Pressing S + F1 lights the F1 indicating that insert parameter control mode is active. In this mode you can control parameters for insert B, C, D or E for the leftmost selected track. The topmost insert slot (A) is reserved for the P EQ 4- insert and direct...
- Page 52 Two notes related to using the US-428 automation dialog box: UTOMATION wish disable Automation Enable type (e.g., Pan), you must do it for both Audio and MIDI. The Enable Automation Types under Track Automation Configuration should be set to All. It is not possible to enable/disable automation on a track- by-track basis.
-
Page 53: Cakewalk And Sonar
Documentation is also included. 8.7 eMagic Logic eMagic have supplied an environment for the US-428, which is included on the They have also been supplying regular updates to this environment, so we suggest you check the TASCAM and eMagic websites for current info. -
Page 54: Propellerheads Reason
The screenshots used here are from a PC, but the Mac versions are essentially identical. Mac Only Note: To use the US-428 for Reason’s audio output, make sure you have copied your current US-428 ASIO drivers into the “ASIO Driver” folder where the Reason program is located. - Page 55 “Edit MIDI Remote Mapping” under the Options menu is also checked. Illustration 8.07 – Reason (MIDI Remote Page) To map a US-428 control to a particular Reason control, first use your mouse to click on the control. The “MIDI Remote”...
- Page 56 The first time you do this in a session, you will need to check the “Learn from MIDI’ box. Now simply move the US-428 control you want to use (fader, knob, button) and Reason will automatically identify it and map it to the Reason control the you previously selected.
-
Page 57: Native Instruments B4
B4 program, rapidly Keyboard and Control views. Keyboard View: Here you can access drawbars, pedal, and Leslie speed. There are three banks, accessible with the BANK L and BANK R buttons on the US-428. MIDI Input filtering switch between rockers,... - Page 58 Bank 1: Faders 1-8 + master DRAWBARS 1-9 ON THE UPPER MANUAL Mute 1 VIB LOW ON/OFF Mute 2 VIB UP ON/OFF Mute 3 ROTATOR SPEED FAST/SLOW Mute 4 PERC ON/OFF Mute 5 DRIVE ON/OFF Mute 6 ROTATOR ON/OFF Mute 7 VELOCITY ON/OFF Data Wheel = EXPRESSION...
-
Page 59: Syntrillium Cool Edit
8.10 Syntrillium Cool Edit As this manual is being completed, the current version of Cool Edit is 1.2a. While there is no controller surface support for the US-428 in this version, Syntrillium confirmed that version 2.0 update will contain full support for the US-428. -
Page 60: Four Control Banks Mode
US-428 to work with software applications requiring the mapping of a large number of messages. The ability of the US-428 to work in this mode will enable users to create their own templates for use with virtual synths and other applications. Banks... - Page 61 Nomenclature used in this document Some button presses result in the US- 428 sending a MIDI Note On message to the application via the US-428 Control Port, while other actions may send a MIDI Controller message. The note or controller number sent depends, in most cases, on the currently active bank.
- Page 62 When REC LED is on: SELECT 1 button sends MIDI note (24 + 32*B) SELECT 2 button sends MIDI note (25 + 32*B) SELECT 3 button sends MIDI note (26 + 32*B) SELECT 4 button sends MIDI note (27 + 32*B) SELECT 5 button sends MIDI note (28 + 32*B) SELECT 6 button sends...
- Page 63 PAN and EQ knobs, including the coarse and fine increment modes as modified by the SET button. Global Controls Some of the US-428 controls have the same behavior in all four banks. These include the MASTER fader, LOCATE buttons, and transport buttons. All of...
- Page 64 (AUX1) is selected. In "Four Controller Banks (Pots)" mode, all rotary controls in all four banks are set to the physical fader positions. The channel faders in the other three banks are set to 0 value. Illustration 8.02 – US-428 Four Controller Layers...
-
Page 65: Keystroke Emulation
8.11.2 Keystroke Emulation As we’ve mentioned throughout this manual, the US-428 is a very versatile device, capable of controlling a wide variety of software applications. The list of applications that have been tested by TASCAM and approved for use with the US-428 can be found on the US-428 News area of the TASCAM web site. - Page 66 The US-428 Users’ Page As we’ve said, your best and most current source of information on the US- 428 is the TASCAM website. Linked to the US-428 Downloads page, you’ll find driver updates, compatibility information, troubleshooting documents, and our Online Users’...
-
Page 67: Technical Support
9. Technical Support 9.1 Troubleshooting When installing the US-428 for the first time, if you experience any unusual behavior, here are some things to check: Audio Drivers In C ONTROL ANEL YSTEM (Win98SE/ME) or C ANAGER ANEL YSTEM ARDWARE (Win2000), find the Audio ANAGER control panel. -
Page 68: Troubleshooting Faqs
TASCAM website for the current version. Q. I don’t see the US-428 in Cubasis’ Audio Control Panel. A. Check to see if the US-428 is installed correctly within your OS. In... -
Page 69: Tech Support Contacts
US-428 ASIO driver (16 or 24 bit) is selected. Q. I can hear audio, but I see no response to the US-428 on screen. A. Make sure you’ve got the US-428 selected in the VST Remote menu. Make sure you’re looking at the correct BANK of faders on screen. -
Page 70: Appendix A - Midi Implementation Chart
Appendix A - MIDI Implementation Chart Function Basic Channel Default Changed Mode Default Messages Altered Note Number True Voice Velocity Note ON Note OFF After Touch Keys Channels Pitch Bender Control Change Program Change True # System Exclusive System Common :Song Pos :Song Sel :Tune... -
Page 71: Appendix B - Control Protocol
USB-based product. While the audio and MIDI I/O follow established which are easily interfaced with host applications, full integration of the control surface aspects of the US-428 requires a set of messages to be defined which permits two-way communication of control information between the host application and US-428. - Page 72 Transport/Locate command set The US-428 contains a set of standard transport switches: REW, FFWD, STOP, PLAY, and REC. In addition, dedicated status LED's are used to communicate the current transport state to the user. The LED's indicate REW, FFWD, PLAY, and REC. (Note that there is no LED to indicate STOP.) Additionally, there are three locate switches, which can be used to set and locate to...
- Page 73 Per-channel Control command set The US-428 includes a set of 8 channel-strip controls and LED's. Each channel-strip includes the following controls: a. linear fader for gain control b. Mute/Solo switch and LED c. Record-enable LED d. Select switch and LED Three modifier switches affect the channel strip indicators: a.
- Page 74 6. DUMP_FADER_POS: F0 4E<UNIT>12 10 <STRIP #> <STATE>F7 Bank-Switching Command Set The US-428 has two switches that allow the user to select the bank of application channels that is addressed by the eight channel-strips. For example, an application with 32 virtual tracks would define 4 banks of eight channel strips each.
- Page 75 This prevents "wrapping" and discontinuous changes in the values of the parameters being sent. A pan encoder knob is also defined; its operation is similar to the EQ encoders. US-428 To Host Commands: 1. SELECT_EQ_HI a. Button-down: BF 2C 7F b.
- Page 76 A data wheel is provided for general-purpose parameter modification. In addition to the aux-send level setting described above, the data could be used for scrubbing, locating, or any other purpose the application programmer desires. US-428 to Host Commands: 1. AUX_SWITCH a. Button-down: BF 3x 7F b.
-
Page 77: Appendix C - Us-428 Technical Specifications
Appendix C - US-428 Technical Specifications General Frequency Response 20 Hz - 20KHz, /0.5 dB / -0.3 dB LINE A/B to LINE OUT LINE TRIM max, -28dBu input LINE OUT Level -10dB position Noise Level Better than -82dBu Din Audio... - Page 78 Connector: 5P DIN Format: Standard MIDI Format Connector: USB Down stream connector Format: USB ADC / DAC A/D Converter 24Bit, 64 times oversampling Delay: 30 samples D/A Converter 24Bit, 128 times oversampling Delay: 30 samples Audio Performance MIC Input (A,B XLR Analog Input to Digital Output) Nominal Level (TRIM max.) -65.2dBu +1dB / -1dB...
Need help?
Do you have a question about the US-428 and is the answer not in the manual?
Questions and answers