Advertisement
Product Introduction
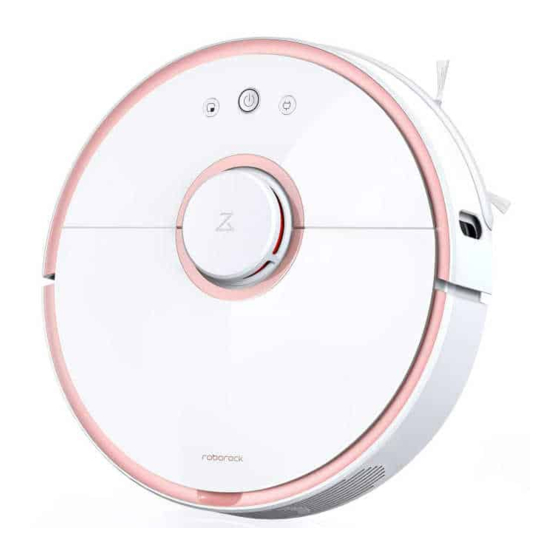
Main Unit

- Cleaning On/Off
Short press to start cleaning Press and hold to turn on or off
- Circular indicator light
White: power ≥20%
Red: power Slow blinking: charging or launching
Red flash: fault status
- Spot cleaning
Short press to start regional cleaning - Recharge
Short press to start recharging
Note: Press any button to stop the robotic vacuum during cleaning, recharging, or spot cleaning
Reset WIFI
Press the spot cleaning button and the recharge button at the same time for 3 seconds - Open lid
- LDS cover bumper sensor
- Bumper
- LDS Lase distance meter
- Cliff sesnsor
- Wall Sensor
- Omni-directional wheel
- Charging contact pieces
- Side brush
- Main wheel
- Main brush
- Buckle of main brush cover
Dust Bin

- WIFI indicator light
Slow blinking: Waiting to connect
Fast blinking: Connecting
Stable light: Wi-Fi is connected - System Reset button
- Speaker
- Air vent
- Cleaning tool of main brush
Accessories

Installation
- Plug the dock charger into the interface of the moistureproof mat, and make sure it's firmly installed.

This moistureproof mat can keep the floor dry - Keep the dock charger on a level surface, flat against a wall, plug into power outlet.

Note:


- Ensure to leave enough space to the dock charger (0.5 meters on both sides, more than 1.5 meters in the front).
- It will cause unexpected power outages and/or dock charger displacement if the power cable is dragged by main unit accidentally due to disorganized placed.
- The dock charger indicator is on after it's plugged into power outlet, the indicator is off when main unit is being charged.
- Turn on and charge the machine
Press and hold the button![]() to turn on the main unit, wait until the indicator light is on for a while, then place the main unit on the dock
to turn on the main unit, wait until the indicator light is on for a while, then place the main unit on the dock
The machine is equipped with a built-in high performance lithium-ion rechargeable battery pack. To maintain battery performance, please keep the machine charged for normal use.

- The color of the circular light indicator refers to the quantity of electricity
- White: power
![]() 20%
20% - Red: power < 20%
- White: power
- The color of the circular light indicator refers to the quantity of electricity
- Connect your mobile phone client (this can be skipped)

 20%
20%The product is compatible with Mi Home intelligent platform and could be controlled by Mi Home app. It supports the MIUI system and can be interconnected with other Mi Home intelligent products
Quick Setup
- Download App
Search "Mi Home" in App store/Google play or scan the QR code below to download and install the Mi Home app.
![www.apple.com]()
![play.google.com]()
![]()
- Add Device
Go to "My Device" page of Mi Home app and tap "+" on the top right corner of the page to add a device. You could find newly added device on "My Device" list - Reset WIFI
If anything is wrong with WIFI connection, you could try to reset WIFI to default.
Open upper cover to check the WIFI indicator status next to reset button. Press and hold the![]() key and
key and![]() key until you hear the voice "Reset WIFI ". The resetting is completed when the WIFI indicator starts to flash slowly and the cleaner will enter a pending connection state.
key until you hear the voice "Reset WIFI ". The resetting is completed when the WIFI indicator starts to flash slowly and the cleaner will enter a pending connection state. ![]()
WIFI indicator light- Slow blinking: Waiting to connect
- Fast blinking: Connecting
- Stable light: WIFI is connected
Note: If the mobile phone fails to connect to the cleaner, please refer to the "Instruction"-"Reset WIFI"operation


 key and
- Install the mopping module
- Install the mopping cloth: Wet the mopping cloth and wring it. until it doesn't drip.
Insert it into the bottom along the slot of the water tank and stick it firmly.

Note: Do not use the mopping module when no one is at home - Fill the water tank: Open the tank lid, fill it with water, and put back the tank lid.

- Install the module: Push in the module along the bottom of the main unit and follow the alignment mark on the moppih module. A click sound means it is installed properly.

Note: In order to achieve a better mopping effect, it is recommended to use the main unit to clean the floor three times before install the mopping module.
- Install the mopping cloth: Wet the mopping cloth and wring it. until it doesn't drip.


- Start cleaning
When the circular indicator light on the main unit changes from slow blinking to stable, it means charging has completed. Briefly press button![]() or start cleaning through the mobile phone client.
or start cleaning through the mobile phone client. - Remove the mopping module
When the main unit is back on the dock charger after cleaning, press the buckles on both sides by hand, drag and remove the mopping module.

Note:- Please use moistureproof mat if you put the dock charger on wood floor
- Remove tank when charging or not in use

Operating Instruction
Main brush *Clean it every week as recommended
- Turn over the machine, press the buckle and take off the cover.
- Take out the main brush in an upwards movement and clean the bearing of the main brush.
- Use th matching cleaning toll of the main brush to cut off the hairs entangled on the main brush.
- Install the main brush, press tight the cover and fix the buckle.
Note: It is recommended to replace the main brush every 6-12 months so as to ensure it cleans effectively.

Daily Maintenance
Instruction for using the cleaning tool of the main brush

Pour the water into the dust bin, close the dust bin cover, shake the dust bin left and right, pour out the dirty water, repeat this step several times, until the filter clean.

Note:
- Wash the filter by water only, detergents are not allowed to use.
- Please do not use finger or brush to clean the filter to avoid any possible damage.
- Please dry out the filter at least for 24 hours after washing.
Change of filter

Please remove the filter and replace it as shown in the picture.
Water tank filter element component
*It is recommended to replace it every 1-3 months
- Use your finger to remove the two filter element component from the gap.
- Fit the new filter element and make sure it is in the right place.
Note: It is recommended to replace the filter element component every 1-3 months so as to ensure effective cleaning

Main Unit Sensor
Wipe the sensors of the main unit with a soft, dry cloth, including:
- The four cliff sensors at the bottom of the main unit.
- The wall sensor on the right side of the main unit.
- The charging contact pieces at the bottom of the main unit.

Omni-directional Wheel
*It is recommended to clean it every month
- Turn over the machine and take out the omni-directional wheel by pulling upwards.
- Clean the hair and dirt off the wheel and the axle.
- Install the wheel and press it tight.
Note: You may rinse it with tap water and install it after it gets dry

Dock Charger
*It is recommended to clean it every month.
Wipe the battery connectors of the dock charger with a soft, dry cloth.
Restore Factory Settings
If the machine does not function properly after resetting, please hold the button![]() when the machine is on, and press the reset button at the same time, until you hear the voice prompt "start restoring the initial version", then the main unit has been restored to the factory settings.
when the machine is on, and press the reset button at the same time, until you hear the voice prompt "start restoring the initial version", then the main unit has been restored to the factory settings.
Holiday Energy Saving Function
When the cleaner is on the charging dock, hold and press "Recharge" for 10 seconds until you hear a "Ding-dong" sound, and Holiday mode will be activated.
In this mode, the LED indicator will dim, functions that has nothing to do with charging such as cleaning, recharging and remote control via WIFI will be disabled, and the cleaner will enter low power consumption mode to maintain optimal battery performance.
After Holiday mode is activated, you can disable it by holding and pressing "Recharge" for 10 seconds until the LED indicator brightens.
Main Unit
| Item | Parameters |
| Size | 353 350 96.5mm |
| Battery | Lithium-ion battery 14.4V/5200mAh |
| Weight | 3.5kg |
| Wireless | Smart connect |
| Rated Voltage | 14.4VDC |
| Rated Power | 58W |
Dock Charger
| Item | Parameters |
| Size | 151 130 98mm |
| Rated Power | 42W |
| Rated Input | 100-240VAC |
| Rated Output | 20VDC 1.8A |
| Rated Frequency | 50-60Hz |
Robotic Vacuum Cleaner
Beijing Roborock Technology Co.,Ltd.
Product Model: S5 *****(* can be 0 to 9,A to Z, a to z, "-", "_", "\", "/" or blank, for marketing purpose.)
Address: Floor 6,Suite 6016,6017, 6018, Building C, Kangjian Baosheng Plaza,
No. 8 Heiquan Road, Haidian District, Beijing, P.R. CHINA
For more product information, please visit our website: www.roborock.com For after-sales support, please email our after-sales service team:
US/Non-Europe Support: support@roborock.com
Europe Support: support@roborock-eu.com

Documents / Resources
References
Download manual
Here you can download full pdf version of manual, it may contain additional safety instructions, warranty information, FCC rules, etc.
Advertisement


Need help?
Do you have a question about the S5 and is the answer not in the manual?
Questions and answers