Roborock S6 MaxV - Robot Vacuum Cleaner Manual
- User manual ,
- Manual (37 pages) ,
- User manual (40 pages)
Advertisement
- 1 Product Overview
- 2 Installation
-
3
Instructions for use
- 3.1 On/Off
- 3.2 Start Cleaning
- 3.3 Pause
- 3.4 Sleep
- 3.5 Charging
- 3.6 Error
- 3.7 Reset WiFi
- 3.8 Spot Cleaning
- 3.9 Selective Room Cleaning
- 3.10 Scheduled Cleaning
- 3.11 Zone Cleaning
- 3.12 Pin n Go
- 3.13 Cleaning Mode
- 3.14 DND Mode
- 3.15 No-go Zones/Virtual Barriers/ No-Mop Zone
- 3.16 Refilling the water tank or cleaning the mop cloth
- 3.17 More app functions
- 4 Routine maintenance
- 5 Basic parameters
- 6 Troubleshooting
- 7 FAQs
- 8 Documents / Resources
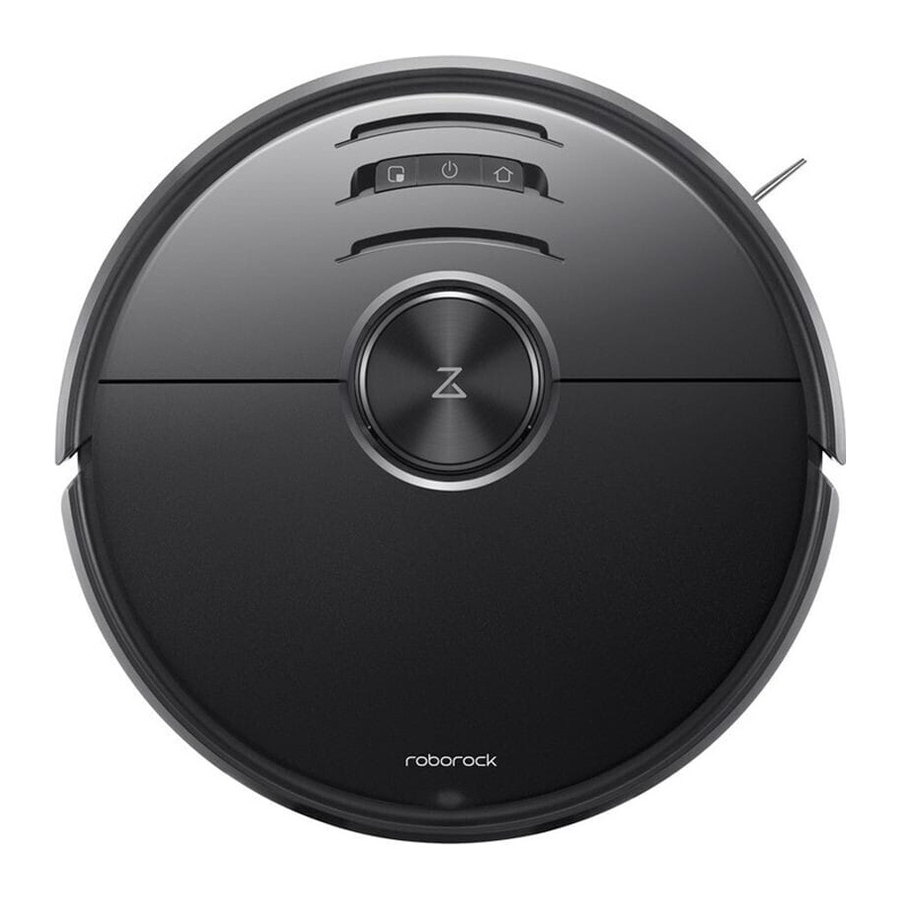
Product Overview
Main Unit

 Spot Clean
Press to start spot cleaning
 Clean/Power
- Press to start cleaning
- Press and hold to turn the robot on or off
Power indicator
- White: Battery level
![]() 20%.
20%. - Red: Battery level < 20%
- Flashing slowly: Charging or starting up
- Flashing red: Error
 20%.
20%. Dock
Dock
Press to return to Dock
Note:
Press any button to stop the robot during cleaning, returning to the Dock, or spot cleaning
 Reset WiFi
Press and hold both Spot Clean and Dock for 3 seconds

WiFi indicator
- Off: WiFi disabled
- Flashing slowly: Waiting for connection
- Flashing quickly: Connecting
- Steady: WiFi connected
Dustbin

Accessories

Device and Sensors

Mopping Module

Charging Dock

Installation
Important Information
- Tidy cables and loose items from the ground and move any unstable, fragile, precious, or dangerous items to prevent personal injury or property damage due to items becoming tangled in, struck by, or knocked over by the robot.

- If using this robot in a raised area, always use a secure physical barrier to prevent accidental falls that may result in personal injury or property damage.


Note:
When using the robot for the first time, follow it throughout its whole cleaning route and watch for major obstacles. The robot will be able to clean by itself in future uses.
Using the Device
- Place the charging dock
Keep the Charging Dock on a level surface, flat against a wall. Connect the power cable to the Charging Dock and place any exposed cable into the cable slot. To ensure a better user experience of the mobile app, place the Charging Dock in an area with good WiFi coverage.
Note:
- Allow at least 0.5m (1.6ft) of clearance on each side, and more than 1.5m (4.9ft) in front of the Charging Dock.

- If the power cable hangs vertical to the ground, it may be caught by the robot, causing the Charging Dock to be disconnected.
- The Charging Dock indicator is on when the Charging Dock is electrified, and off when the robot is charging.
- Do not place the Charging Dock in places that are directly exposed to sunlight, and do not block the Location Beacon. Otherwise the robot may not be able to automatically return to the Charging Dock.
- Use double-sided tape to stick the Charging Dock down.

- Secure the charging dock with the adhesive tape.
Wipe the floor of the area where the charging dock will be placed with a dry cloth, then stick the enclosed double-sided tape to the floor. Place the dock onto the double-sided tape to secure it in place.


Note:
- Use of the double-sided tape to secure the charging dock is optional.
- When necessary, remove the double-sided adhesive tape slowly to reduce residue glue.
- Attach the Moisture-Proof Mat
After fixing the Charging Dock in place, use a dry cloth to clean the area where the Moisture-Proof Mat will be located. Peel off the outer layer of the double-sided tape attached to the bottom of the Moisture-Proof Mat, and stick the mat to the ground as shown.
![]()

Note:
- Always place the Moisture-Proof Mat on wooden floors.
- Peel the double-sided tape slowly to minimize residual adhesive.
- The Moisture-Proof mat attaches better to smooth surfaces.
- Powering On and Charging
Press and hold the![]() button to power on the robot. Wait until the power light is steady, and then place the robot on the Charging Dock to charge. The robot is equipped with a built-in high performance lithiumion rechargeable battery pack. To maintain battery performance, keep the robot charged during normal use.
button to power on the robot. Wait until the power light is steady, and then place the robot on the Charging Dock to charge. The robot is equipped with a built-in high performance lithiumion rechargeable battery pack. To maintain battery performance, keep the robot charged during normal use.

The color of the power indicator indicates the battery level.
 button to power on the robot. Wait until the power light is steady, and then place the robot on the Charging Dock to charge. The robot is equipped with a built-in high performance lithiumion rechargeable battery pack. To maintain battery performance, keep the robot charged during normal use.
- White: 20%;
- Red: < 20%
Note:
The robot may not be turned on when the battery is low. In this case, connect the robot to the Charging Dock.
Connect to the app
- Download the mobile phone app for more smart features. (Optional)
The robot supports the Roborock or Xiaomi home app. Choose the one that best meets your needs.- Download the app
- Search for "Roborock" in the App Store or Google Play or scan the QR code to download and install the app.
- Download the app


- Search for "Xiaomi home" in the App Store or Google Play or scan the QR code to download and install the app.

- Reset WiFi
- Open the upper cover and find the WiFi indicator.
- Press and hold the
![]() and
and ![]() buttons until you hear the "Resetting WiFi" voice alert. Reset is complete when the WiFi indicator flashes slowly. The robot will then wait for a connection/
buttons until you hear the "Resetting WiFi" voice alert. Reset is complete when the WiFi indicator flashes slowly. The robot will then wait for a connection/
Note:
If the mobile phone fails to connect to the robot, reset the robot WiFi and add it again when it is waiting for a connection.

WiFi indicator
- Off: WiFi disabled
- Flashing slowly: Waiting for connection
- Flashing quickly: Connecting
- Steady: WiFi connected
 and
and  buttons until you hear the "Resetting WiFi" voice alert. Reset is complete when the WiFi indicator flashes slowly. The robot will then wait for a connection/
- Add device
On the homepage of the app, tap "+" in the top right corner and add the device according to the in-app guide. After a device has been added, it can be found from the list on the home screen.
Note:
- The actual process may vary due to ongoing app updates.
- Follow instructions provided in-app. Only 2.4GHz WiFi is supported.
- Mopping the floor
Note:
To prevent excessive dirt buildup on the mop, floors should be vacuumed at least three times before the first mopping session- Remove the water tank
Press the water tank latch and slide the tank backwards.
![]()
- Fill the water tank
Open the water tank, fill it with water, and close it tightly.
![]()
Note:- To prevent corrosion or damage, do not use cleaning fluid or disinfectant in the water tank
- Do not use hot water as this may cause the tank to deform.
- Remove the water tank


- Reinstall the water tank
Slide the water tank into the robot until you hear it lock with a click.
![]()
- Install the mop cloth
Dampen the mop cloth and wring it until it stops dripping. Insert it into the bottom along the slot of the water tank and stick it firmly in place.
![]()
Note:
Use virtual barriers and no-mop zones to prevent the robot mopping carpeted floors. - Install the Mop Cloth Bracket
Slide the bracket along the back of the water tank. A click indicates that it is locked in place.
Note:
The map cloth should be cleaned after 60 minutes of mopping to ensure water flow and cleaning quality.


- Adjust the water flow
Use the mobile app to adjust water flow as required.
![]()
- Start cleaning.
Charging is complete when the power indicator light changes from breathing to a steady white light. Press the![]() button to start cleaning.
button to start cleaning. - Remove the Mop Cloth Bracket
When the robot returns to the Charging Dock after cleaning, press the latches on both sides, and slide the Mop Cloth Bracket backwards to remove it.
![]()
Note:


- After mopping, remove the Mop Cloth Bracket, pour out residual water from the water tank, and clean the mop cloth to avoid mold and odor.
- Remove the Mop Cloth Bracket when not mopping.
- Remove the Mop Cloth Bracket from the water tank
Press the two side latches inwards and slide the Mop Cloth Bracket backwards as shown to remove it from the water tank.
![]()

Instructions for use
On/Off
Press and hold the  button to power on the robot. The power indicator will turn on and the robot will enter standby mode. When the robot is idle, press and hold the button to turn off the robot and complete the cleaning cycle.
Note:
The robot cannot be turned off when it is being charged.
Start Cleaning
Press the button to start cleaning. The robot will plan its cleaning route according to its scan of the room. It splits a room into zones, first draws out zone edges, then fills the zone in a zigzag pattern. In so doing, the robot cleans all zones one by one, efficiently cleaning the house.

Note:
- Cleaning cannot start if the battery level is too low. Allow the robot to charge before restarting cleanup.
- Before cleaning, tidy cables (including the power cable of the Charging Dock) from the floor. Loose cables may be dragged by the robot, resulting in the disconnection of electrical appliances or damage of cables and property.
- If cleaning is completed in less than 10 minutes, the area will be cleaned twice.
- If the battery runs low during the cleaning cycle, the robot automatically returns to the Charging Dock.
After charging, the robot will resume where it left off.
Pause
When the robot is running, press any button to pause it. Then press the button to continue cleaning or the  button to return it to the Charging Dock and stop the cleaning cycle.
Note:
Placing a paused robot on the Charging Dock manually will end the current cleanup.
Sleep
If the robot is paused for over 10 minutes, it will go to sleep, and the power indicator will flash every few seconds. Press any button to wake the robot up.
Note:
- The robot will not go to sleep when it is on the Charging Dock.
- The robot will automatically shut down if left in sleep mode for more than 12 hours.
Charging
Auto: After cleaning, the robot will automatically return to the Charging Dock to recharge.
Manual: In Pause mode, press the button to send the robot back to the Charging Dock.
The power indicator will breathe as the robot charges.
Note:
If the robot cannot find the Charging Dock, it will return to the most recent startng location. Place the robot on the Charging Dock manually to recharge.
Error
If an error occurs while the robot is cleaning, the power indicator flashes red and a voice alert will sound. See Troubleshooting for solutions.
Note:
- The robot will go to sleep automatically if left in an Error state for over 10 minutes.
- Placing the robot on the Charging Dock in an error state will stop the current cleanup.
Reset WiFi
If the mobile phone fails to connect to the robot because the router configuration has changed, the password has been forgotten, or for any other reason, open the upper cover and find the WiFi indicator. Press and hold the  and buttons until you hear the "Resetting WiFi" voice alert. Reset is completed when thye WiFi indicator starts flash slowly, showing that the robot is waiting for a connection.
Note:
If the robot waits more than 1 hour for a connection, WiFi will be automatically disabled. If you need to reconnect, reset the WiFi before proceeding.
Spot Cleaning
When the robot is in standby or pause mode, press the button to start spot cleaning. In this mode, the robot cleans an 1.5m x 1.5m square area centered on the robot. After spot cleaning, the robot will automatically return to the starting point and stop cleaning.

Note:
Starting spot cleaning in Pause mode will stop the current cleaning cycle.
Selective Room Cleaning

Select one or multiple rooms for cleaning in the app.
Note:
- A full map must have been created, and Map Saving mode switched on before this function can be used.
- The robot may enter unselected areas during cleaning. Clear obstacles from the ground around the selected rooms as the robot may enter unselected areas.
Scheduled Cleaning
Use the app to set start times for scheduled cleanings. The robot will return to the Charging Dock after each cleaning cycle.
Zone Cleaning
Draw specific zones in the app for targeted cleaning as required.
Note:
The robot may enter unselected areas during cleaning. Clear obstacles from the ground around the selected zones as the robot may enter unselected areas.
Pin n Go
Place a target on the map in the app and the robot will navigate to the desired spot.
Cleaning Mode
Select Quiet, Balanced, Turbo, or MAX mode in the app. Balanced mode is selected by default.
DND Mode
During the DND period, the robot stops cleaning and playing voice prompts, and the power indicator dims. DND mode is enabled in factory settings. The default DND period is from 22:00 to 08:00. You can use the app to disable the DND mode or modify the DND period.
No-go Zones/Virtual Barriers/ No-Mop Zone
Use the app to set no-go zones/virtual barriers/No-Mop Zone. The robot will not enter no-go zones and areas sealed off by virtual barriers while cleaning. No-mop zones only activate when the Mop Cloth Bracket is installed.

Note:
- "Map saving mode" must be turned on in the app to use virtual no-go zones and barriers.
- This function can be used only to set cleaning zones. Do not use it to prevent the robot from entering hazardous areas.
- Moving the robot or changing the home environment may cause the map to become inaccurate and erase virtual barrier and no-go zone settings.
Refilling the water tank or cleaning the mop cloth
To add water or clean the mop cloth, press any button to stop the robot and remove the mopping module. After adding water or cleaning the mop cloth, reinstall the mopping module and press the button to continue.
More app functions
| Real-time map updates | Carpet Boost | Robot location |
| Change cleaning mode | Part replacement schedule | Map management |
| View cleaning history | View robot status | DND mode |
| Change robot voice | Volume adjustment | Firmware update |
Note:
Functions and details of the Xiaomi Home app may vary slightly due to the continuous app development and upgrades.
Routine maintenance
Main brush
*Clean weekly

- Turn over the robot, press the latch, and remove the main brush cover.
- Pull out the main brush. Remove and clean the main brush bearing.
- Rotate the main brush cap in the indicated unlock direction to remove the cap.
- Use the main brush cleaning tool to remove any entangled hair on the brush or bearing.
- Rotate the main brush cover and main brush bearing in the indicated lock direction to reinstall them.
- Reinstall the main brush, press on the main brush cover, and lock it.
Note:
Replace the main brush every 6 to 12 months for optimal cleaning performance.
Using the main brush cleaning tool

Use the tool blade to cut away entangled hair on the brush and to clean the bristles.
Note:
If there is a large amount of hair, or if hair is tightly entangled, remove it carefully to avoid damage.
Dustbin and filter
*Clean weekly
- Open the top cover, squeeze the Dustbin latches and take out the Dustbin.
![]()
- Open the Dustbin lid as indicated by the arrow and pour out the dirt.
![]()


Washable filter
*Clean every two weeks
- Open the Dustbin lid as indicated by the arrow and pour out the contents.
![]()
- Fill the Dustbin with clean water and close the cover. Gently shake the Dustbin, then pour out the dirty water.
![]()
Note:
To prevent blockage, only use fresh water without cleaning liquid. - Remove the filter and clean it with water

Note:
Do not touch the filter with hands, brushes, or sharp objects to avoid damage. - Rinse repeatedly and tao the filter frame to remove as much dirst as possible.
![]()
- Leave the filter to dry before reinstalling it.
Note:


- Dry the filter thoroughly before use. (Dry fro at least 24 hours)
- Use an alternate filter if necessary.
Battery
The robot is equipped with a built-in high-performance lithium-ion battery pack. To maintain battery performance, keep the robot charged during normal use.
Note:
If the robot will not be used for an extended period, turn it off and charge it at least every three months to avoid battery damage caused by overdischarge.
Charging Dock
*Clean monthly
Use a soft dry cloth to clean the Charging Contacts of the Charging Dock.
Side brush
*Clean monthly
- Turn over the robot and unscrew the Side Brush screw.
![]()
- Remove and clean the Side Brush.
- Reinstall the brush and tighten the screw.

Note:
Replace the side brush every 3 to 6 months for optimal cleaning performance.
Water tank
*Clean as required
- Open the water tank.
- Rinse the water inlet filter.
- Fill the tank with water, shake it, then pour out the water.
Mop cloth
*Clean after use
- Remove the mop cloth from the Mop Cloth Bracket.
![]()
- Clean the mop cloth and air-dry it.

Note:
- A dirty mop cloth will affect mopping performance. Clean the mop cloth before use.
- Replace the mop cloth every 3 to 6 months for optimal cleaning performance.
Omni-Directional Wheel
*Clean as required
- Turn over the robot.
- Use a tool, such as small screwdriver to pry out the axle and take out the wheel.
![]()
- Rinse the axle and the wheel with water to remove any hair and dirt.
- Air-dry, reinstall, and press the wheel and axle back in place.

Note:
The Omni-Directional Wheel bracket cannot be removed.
Reset the System
If the robot does not respond when a button is pressed or cannot be turned off, reset the system. Press the Reset button, and the robot will reset automatically.
Note:
After resetting the system, scheduled cleanup, WiFi, and others will be restored to factory settings.
Restore Factory Settings
If the robot does not function properly after a system reset, switch it on, then press and hold both the  and Reset buttons until you hear the "Start restoring initial version" voice alert. The robot will then be restored to factory settings.
Firmware Upgrade
Use the mobile phone app to upgrade the robot firmware. Connect the robot to the Charging Dock and ensure that the battery level is above 20% before upgrading. The power indicator will flash white quickly during a firmware update.
Unit sensors
*Clean monthly

Use a soft dry cloth to wipe and clean all sensors, including:
- ReactiveAI Cameras
- Six cliff sensors at the bottom of the robot
- Wall sensor on the right side of the robot
- Charging contacts at the bottom of the robot
Basic parameters
| Robot | |
| Name | Parameters |
| Model | roborock S6 MaxV |
| Appearance and Dimensions | 353×350×96.5mm |
| Battery | 14.4V/5200mAh lithium battery |
| Weight | Approx. 3.7kg |
| Wireless Connection | WiFi Smart Connect |
| Rated Voltage | 14.4VDC |
| Rated Power | 66W |
| Charging Time | <6h |
| Charging Dock | |
| Name | Parameters |
| Model | CDZ11RR or CDZ12RR |
| Appearance and Dimensions | 151×130×98mm |
| Rated Power | 28W |
| Rated Input | 100-240VAC |
| Rated Output | 20VDC 1.2A |
| Rated Frequency | 50-60Hz |
| Charging Battery | 14.4V/5200mAh lithium battery |
Note:
The serial number is on a sticker on the underside of the robot.
Troubleshooting
If an error occurs while the robot is cleaning, the power indicator will flash red and a voice alert will sound. Refer to the following table for troubleshooting.
| Error | Solution |
| Error 1: Rotate the laser head to check that it turns freely. | The LDS unit is jammed. Remove any items blocking it then move the robot to a new location and restart. |
| Error 2: Clean and lightly tap the bumper. | The bumper is stuck. Tap the bumper repeatedly to dislodge any jammed items. If nothing falls out, move the robot to a new location and restart. |
| Error 3: Move the robot to a new location and restart. | A wheel is suspended. Move the robot to a new location and restart. |
| Error 4: Wipe the cliff sensors, move the robot away from raised edges, and restart. | The robot is suspended. Move it to a new location and restart. If the problem persists, clean the cliff sensors. This error may also be caused by a dirty cliff sensor. Try wiping all sensors clean. |
| Error 5: Remove the main brush and clean the brush and bearing. | The main brush may be tangled up. Remove and clean it. |
| Error 6: Remove and clean the side brush. | The side brush may be tangled up. Remove and clean it. |
| Error 7: Look for anything stuck in the main wheels then move the robot to a new location and restart. | The main wheels may be jammed. Remove and clean them. |
| Error 8: Clear away any obstacles around the robot. | The robot may be stuck. Clear any obstacles around it. |
| Error 9: Install the dustbin and filter. | Reinstall the dustbin and filter and check that they are installed properly. If the problem persists, try replacing the filter. |
| Error 10: The filter is either wet or blocked. | The filter is not completely dry. Dry the filter for at least 24 hours. The filter may also require cleaning. If the problem persists, replace the filter. |
| Error 11: High-intensity magnetic field detected. Move the robot away from the magnetic tape and restart. | The robot is too close to a magnetic tape and cannot start. Move it to a new location and restart. |
| Error 12: The battery is too low. Recharge before use. | Low battery. Recharge before use. |
| Error 13: Charging error. Clean the charging contact area. | Use a dry cloth to clean the charging contacts on the robot and on the charging dock. |
| Error 14: Battery error. | The battery temperature is either too high or too low. Wait until it returns to normal. |
| Error 15: Clean wall sensor. | The wall sensor is blocked by dust. Wipe clean the sensor. |
| Error 16: Robot is tilted. Place it on flat ground and restart. | The robot is tilted. Move it to flat ground and restart. |
| Error 17: Side brush module error. Reset the system. | The side brush module is experiencing a fault. Reset the system. |
| Error 18: Vacuum fan error. Reset the system. | The vacuum fan is experiencing a fault. Reset the system. |
| Error 21: Vertical bumper pressed. Release it and retry. | The vertical bumper has been pressed. Relocate the robot and retry. |
| Error 22: Dock locator dirty. Clean and retry. | The dock locator signal is blocked by dust. Clean it and retry. |
| Error 23: Dock location beacon lost. Clean and retry. | The dock location beacn is blocked by dirt. Clean it and retry. |
| Error 24: No-go zone or barrier tape detected. Move the robot away and retry. | Move the robot away from the virtual no-go zone or barrier tape and retry. |
| Internal Error. | Malfunction due to an internal error. Reset the system. |
Note: A system reset may not resolve all problems. If the problem persists after using the recommendations in the table above, please email our after-sales service team:
US/Non-Europe Support: support@roborock.com
Europe Support: support@roborock-eu.com
FAQs
| Problem | Solution |
| Unable to power on | The battery level is low. Put the robot on the Charging Dock and charge it before use. The battery temperature is too low or too high. Only use the robot within the range of 4-40°C (39-104°F). |
| Unable to charge | If the Charging Dock is not receiving power, check that both ends of the power cable are properly connected. If contact is poor, clean the contact areas of the Charging Dock and the robot. Confirm that the Charging Dock indicator is on. |
| Slow charging speed | The robot is charged in an environment at a high or low temperature. To maintain the battery life cycle, the robot automatically reduces the charging speed. The charging contacts may be dirty. Clean them with a dry cloth. |
| Unable to return to dock | There are too many obstacles near the Charging Dock. Move it to an open area. The robot is too far from the Charging Dock. Place it closer and retry. |
| Abnormal behavior | Restart the robot. |
| Noise during cleaning | The main brush, side brush, or main wheels may jammed. Turn off the robot and clean them. If the Omni-Directional Wheel is jammed, use a screwdriver to remove it for cleaning. |
| Poor cleaning performance and/or leaking dust | The Dustbin is full and needs emptying. The Filter is blocked and needs cleaning. The main brush is dirty. Clean it and retry. |
| Unable to connect to WiFi | WiFi is disabled. Reset the WiFi and try again. WiFi signal is poor. Move the robot to an area with good WiFi reception. Abnormal WiFi connection. Reset the WiFi, download the latest mobile app and retry. The current device is not supported. You can find supported models in the app. Unable to connect to WiFi. There may be an error with your router settings. Contact Roborock customer service for help with troubleshooting. |
| Scheduled cleaning is not working | The battery level is too low. Scheduled cleaning can only begin when the battery level is above 20%. |
| Is power always being drawn when the robot is on the Charging Dock? | The robot will draw power while it is docked to maintain battery performance, but power consumption is extremely low. |
| Does the robot need to be charged for at least 16 hours the first three times it is used? | No. The robot can be used any time after it has been fully charged once. |
| No or little water during mopping | Check whether there is water in the water tank and use the mobile app to set the water flow or check the manual for full instructions on how to correctly install the mop cloth and Mop Cloth Bracket. |
| Cleaning does not resume after recharging | Make sure that the robot is not in DND mode. DND mode will prevent cleanup. When cleaning a space requiring a top-up charge, if the robot was placed manually on the Charging Dock before it is recharged automatically, it will not be able to continue cleanup. |
| The robot cannot return to the Charging Dock after spot cleaning or when it has been moved manually. | the Charging Dock is too far away, it may not be able to return for recharging and must be placed on the Charging Dock manually. |
| The robot has begun to miss certain spots | The wall sensor or cliff sensors may be dirty. Clean them with a soft dry cloth. |
| The water tank is too full | The filter may be blocked and need cleaning. |
| Unable to recognize and avoid objects | The ReactiveAI Cameras lens may be dirty or obscured. Use a soft cloth to wipe it and keep the lens clean and free from obstructions. Current AI algorithms cannot recognize dirt but it will keep learning daily. |
Documents / Resources
References
Download manual
Here you can download full pdf version of manual, it may contain additional safety instructions, warranty information, FCC rules, etc.
Advertisement


Need help?
Do you have a question about the S6 MaxV and is the answer not in the manual?
Questions and answers