
Related Manuals for Kett PQ-520


Summary of Contents for Kett PQ-520
- Page 1 Single Kernel Grain Moisture Tester PQ-520 (type PQ-5205-1) Operating Instructions...
- Page 2 Read the precautions described in these operating instructions. Do not use this product when broken When this product is broken or malfunctioning, contact the Kett service center. Understand the warning symbols In order to prevent accidents due to improper use, the following warning symbols are provided in the instructions and on the product.
-
Page 3: Table Of Contents
Table of Contents 1. Functions and Features ........................2 2. Specifications ............................3 3. Names of Parts............................4 4. Preparing for Measurement........................ 6 4-1. Connecting the Power Cord ....................6 4-2. Start-up of Main Unit ......................... 6 4-3. Selecting the Measurement Sample ..................7 4-4. -
Page 4: Functions And Features
1. Functions and Features • Functions This grain moisture tester continuously measures the moisture of a sample one kernel at a time, thus making it possible to accurately determine the moisture distribution of the sample and preventing uneven moisture caused by inadequate drying. •... -
Page 5: Specifications
2. Specifications Measurement Method : Electrical resistance Measurement Target : Short milled rice, Short brown rice, Short Paddy, Barley, Wheat, Naked barley, Long milled rice, Long brown rice, Long paddy, Jasmine milled rice, Jasmine paddy, Long sticky milled rice, Long sticky paddy, Long parboiled rice Measurement Ranges : Short milled rice …... -
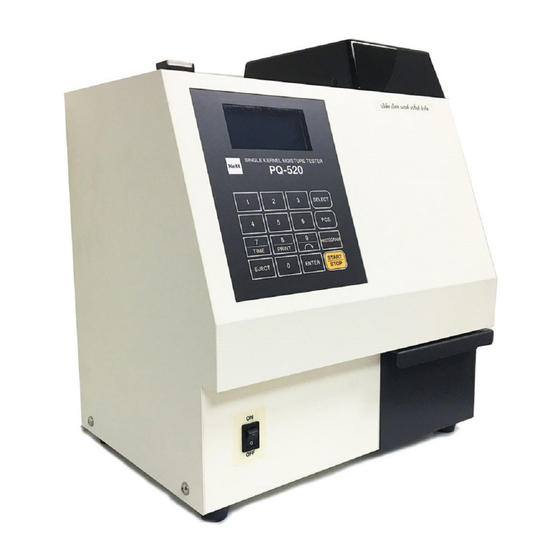
Page 6: Names Of Parts
3. Names of Parts Main Unit [Front] Sample Input Port Start/Stop Switch Operation Panel Discharge Tray Power Supply Switch [Back] USB Port Printer Connection Connector Electrical Power Inlet Fuseholder Printer Connection Electrical Power Supply Outlet (AC 100V) Main Unit Side Door... - Page 7 [Internal Feed Unit Configuration] Hopper Feed Screw Drum Transparent Panel Rotating Arm Discharge Port Accessories A or B Scoop Tweezers Power Cord A Power Cord B Power Plug Conversion Adapter Printer VZ-330 It is attached for Power cord A (100V-120V) (200V-240V) (w/ Printer Connector (for 100V-120V uses) only.
-
Page 8: Preparing For Measurement
4. Preparing for Measurement After opening the box, please open the side door of the main unit and remove the lock fitting used for shipment (rubber ring). Main Unit Side Door Lock Fitting for Shipment → 4-1. Connecting the Power Cord [Caution] Power supply voltage may be different when using this product in other countries. -
Page 9: Selecting The Measurement Sample
4-3. Select the Product Selection of Measurement Sample Example : Product No. 1 to Product No. 10 Press the key. Be sure that Product No. "1" is blinking. Selection of jasmine Rice Press the key. "1" is blinking. Press the key. -
Page 10: Measurement
5. Measurement 5-1. Starting Measurement Before Measurement When the "start/stop" switch at the upper left of the main unit or the key is pressed, the display changes as indicated on the right. Measurement *Note 1: Measurement is not possible without proper placement of the main PANEL unit internal transparent panel. - Page 11 When the start/stop switch at the upper left of the main unit or key is pressed, the next measurement may be made. * Note 1: Even if the printer is still printing, as long as the motor has stopped, the next measurement may start. * Note 2: To stop a test in the middle of a measurement, please press the "start/stop"...
-
Page 12: Measurement Precautions
6. Measurement Precautions 6-1. Cleaning the Internal Feed Unit Allowing the sample to remain in the internal feed unit results in damage and reduced measurement efficiency. Please clean the internals as needed and as described below. N o t e Open the side door of the main unit and check whether samples remain in the feed unit ( samples remain on the screw). -
Page 13: Temperature Correction
Screw Cover Rotate the mounting screw and remove the screw cover to the front. Mounting Screw Since the internal feed unit is visible, clean out trash or the remaining sample. (This operation is easily performed using the accessory tweezers). Screw (Sample remains here) After cleaning has ended, assemble by following steps (4), (3), and (1). -
Page 14: Printing
7. Printing By connecting an optional printer (VZ-330) to this unit, it is possible to print out the results of measurement. Types of printing will be explained here. Please refer to the separate publication "Printer VZ-330 Operating Manual" for detailed operation of the printer. It is also possible to use optional data logging software (PDL-01) and to send the results of measurement from the USB port to a personal computer. -
Page 15: Sample Print-Out
7-3. Sample Print-out Print Mode 1 Print Mode 2 Kernel count scale of the histogram Print Mode 3 Kernel count scale of the histogram Total Moisture Data... -
Page 16: Setting The Time
8. Setting the Time When the time has been set, the measurement year, month, and day are correctly printed because of the internal clock. Although the clock is set at the time of shipment, the clock may be reset by the following method: Pre-Measurement The time may be set when in the pre-measurement state (display of the set... -
Page 17: Error Messages
9. Error Messages An error number and error message are displayed when problems occur with the main unit. Display Cause Solution There is a problem with the Repair is needed. electrical circuit. The temperature sensor temperature is less than or equal to 20°C. - Page 18 Problem Solution Please check the electrical power cord. The power does not come on. Please replace the fuse. Is the moisture of the measured sample too low? Measurement efficiency is poor. Please clean the unit internals. There is the possibility that the measured sample has The moisture value is high or low.
- Page 19 Product After-sale Service Responsibility for Damage Our company bears no responsibility whatsoever concerning damage to the customer (i.e. all tangible or intangible losses, such as loss of profit, physical loss, business stoppage, information loss, etc.) due to the use or non-use of this product (including the contained software and data).
- Page 20 Warning ● Reprinting of part or the whole of the contents of this document is strictly forbidden. ● Contents of this document may be revised without prior notification. ● The visual appearance, screen, etc. of the products and accessory items mentioned in this document may differ from those of the actual products and accessory items, although operation and function will not be affected. ● Although the contents of this document were drafted with great care, if you notice unclear points, errors, omissions, etc., please contact our company. ● Regardless of the above warnings, responsibility is not assumed concerning effects resulting from use of this document. 060110...
Need help?
Do you have a question about the PQ-520 and is the answer not in the manual?
Questions and answers