Table of Contents
Advertisement
Quick Links
Advertisement
Table of Contents

Related Manuals for Warmup tempo ELT-01-XX-01


Summary of Contents for Warmup tempo ELT-01-XX-01
- Page 1 User Guide...
-
Page 2: Table Of Contents
Pack Contents Contents Safety Information ....................3 Step 1 - Installation ....................3 Step 2 - Wiring Connections ................. 4 Wiring Connections - Loads over 16 amps ........... 5 Step 3 - Thermostat Mounting ................6 Welcome to the tempo thermostat ..............7 Programming ...................... -
Page 3: Safety Information
Safety Information The thermostat must be installed by a qualified electrician. It requires a permanent 230 V AC supply from a 30mA RCD or RCBO protected circuit in accordance with the current edition of the BS7671 Wiring Regulations. The supply to the thermostat must come from a ≤16A MCB, RCBO, or Fuse to protect it and the heater from overloading. -
Page 4: Step 2 - Wiring Connections
Step 2 - Wiring Connections WARNING! The thermostat must be installed by a qualified electrician in accordance with the current edition of the BS7671 Wiring Regulations. NOTE: For loads above 10 A, the conductor wire gauge should be at least 2.5mm²... -
Page 5: Wiring Connections - Loads Over 16 Amps
Step 2 - Wiring Connections - Loads over 16 amps Warmup thermostats are rated for a maximum of 16 amps (3680 W). A contactor must be used to switch loads exceeding 16 amps. Please see wiring diagram below. ≤16A ≤16A... -
Page 6: Step 3 - Thermostat Mounting
Step 3 - Thermostat Mounting tempo element series exclusively from Insert fixing screws through Locate your CR2032 3-Volt lithium mounting holes of the power battery on the reverse of the module and tighten. front housing. Remove the plastic strip from under the battery. The battery should always be installed with positive side “+”... -
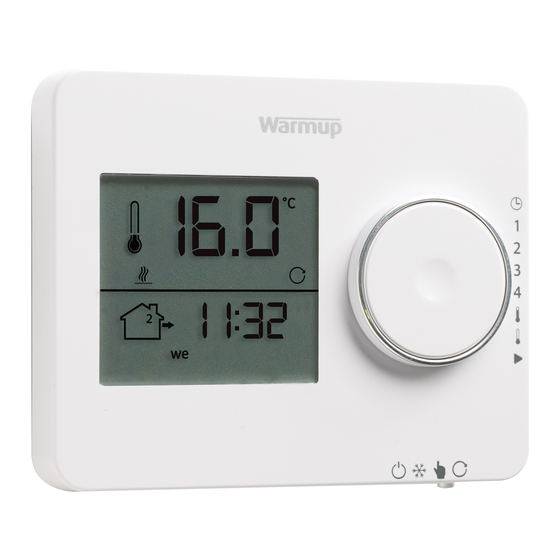
Page 7: Welcome To The Tempo Thermostat
Welcome to the tempo thermostat The Tempo has been designed with simplicity in mind and is highly intuitive in its programming. The sliders and simple rotary control make the setting of the thermostat quick and easy. Rotary control Rotate left/right to change increment Rotary button Program slider Mode slider... - Page 8 Display icons Current floor/Air temperature Clock Will also temporarily show set temperature Celsius/Fahrenheit Period 1 - Heating ON Program mode Period 2 - Setback Manual mode Period 3 - Heating ON Frost protect Period 4 - Setback Standby Day of the week Regulator mode Floor sensor error Displays when overheat...
-
Page 9: Programming
Programming How to set into Manual Mode Setting into manual mode allows you to set a fixed target temperature for the thermostat to achieve. The thermostat will continue to maintain this temperature until another operating mode or temperature is selected. •... - Page 10 How to set a program • Move the program slider to “1”. • Press the rotary button to program “Period 1 - Heating ON” • Turn the rotary control to set the for Sat-Sun. start time for “Period 1 - Heating ON”...
- Page 11 How to set a program • Move the program slider to the • Move the program slider to the comfort temperature icon “ ”. setback temperature icon “ ”. • Turn the rotary control to set the • Turn the rotary control to set the desired comfort temperature.
-
Page 12: Installer Settings
10 minute cycle. Set Floor Sensor Type (NTC10K / NTC12K) Current Warmup thermostats use NTC10K sensor probes. Some older Warmup thermostats used NTC12K sensor probes. Adaptive Learning (ON/OFF) Adaptive learning calculates the optimum heating start time in... - Page 13 Installer settings # Setting configured Default Display 6 Fil Pilote (France only) The thermostat can obey the 6 standard commands of fil pilote (pilot wire) Set an overheat limit 30°C to protect your floor Overheat temperature is measured by Floor Sensor and can be set between 25 - 40°C.
-
Page 14: Troubleshooting
Troubleshooting Display is blank (Electrician Required) Electrician required to verify power is going to the thermostat and that it is correctly wired. The thermostat is Ensure that the program slider is in the run position ” ” not controlling the (lowest point) and that the mode slider control (bottom) is in temperature the manual “... -
Page 15: Technical Specifications
Technical Specifications Model ELT-01-XX-01 Operating Voltage 100-240V +/- 15%; 50/60Hz Protection Class Class II Max. Load 16 A (3680 W) Rated impulse voltage 4000 V Battery Replaceable Coin Cell CR2032 Automatic action 100,000 cycles Disconnection means Type 1B Pollution degree Max. -
Page 16: Warranty
This warranty does not cover removal or reinstallation costs, and shall not apply if it is shown by Warmup that the defect or malfunction was caused by damage which occurred while the product was in the possession of the end user. - Page 17 Warmup plc www.warmup.co.uk uk@warmup.com T: 0345 345 2288 F: 0345 345 2299 Warmup plc 704 Tudor Estate Abbey Road London NW10 7UW Warmup GmbH Ottostraße 3 27793 Wildeshausen Warmup - OM - Tempo_ELT-01 - V1.8 2023-02-13_EN...
Need help?
Do you have a question about the tempo ELT-01-XX-01 and is the answer not in the manual?
Questions and answers