Table of Contents
Advertisement
Available languages
Available languages
Quick Links
Advertisement
Chapters
Table of Contents

Related Manuals for Hoover H-HOOD 500 HPY6CBK5BGWIFI


Summary of Contents for Hoover H-HOOD 500 HPY6CBK5BGWIFI
- Page 1 ENGLISH INSTALLATION AND USER'S MANUAL DEUTSCH EINBAU- UND BEDIENUNGSANLEITUNG NEDERLANDS HANDLEIDING VOOR INSTALLATIE EN GEBRUIK FRANÇAIS MANUEL D'INSTALLATION ET D'UTILISATION ČEŠTINA NÁVOD K INSTALACI A POUŽITÍ SLOVENČINA INŠTALAČNÁ A POUŽÍVATEĽSKÁ PRÍRUČKA...
-
Page 3: Table Of Contents
CONTENT INTRODUCTION................3 SAFETYPRECAUTION............3-4 PREPARE FOR INSTALLATION..........5 SPECIFICATIONS...............6 INSTALLATION...............6-9 OPERATION................10 MAINTENANCE.................12 TROUBLESHOOTING...............13 ENVIRONMENTALPROTECTION..........14... -
Page 4: Introduction
Hereby, Candy Hoover Group Srl declares that the radio equipment is in compliance with Directive 2014/53/EU and with the relevant Statutory Requirements (for the UKCA market). - Page 5 fumes from appliances burning gas or other fuels; Regulations concerning the discharge of air have to be fulfilled. This appliance can be used by children aged from 8 years and above and persons with reduced physical, sensory or mental capabilities or lack of experience and knowledge if they have been given supervision or instruction concerning use of the appliance in a safe way and understand the hazards involved.
-
Page 6: Prepare For Installation
Prepare for installation: a. If you have an outlet to the outside, your cooker hood can be connected as below picture by means of an extraction duct (enamel, aluminum, flexible pipe or inflammable material with an interior diameter of 150mm) b. -
Page 7: Specifications
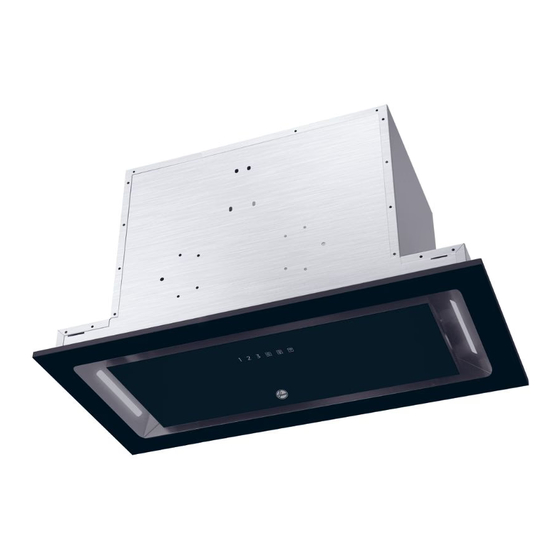
Specifications Model Product dimension(W,D,H mm) HPY6CBK5BGWIFI 520mm x 295mm x 308mm Installation –The typical installation method for your range hood is into a purpose built overhead/wall cabinet. – Using a jigsaw, create the required cut-out for your range hood, as per the following: ... - Page 8 1. Insert the range hood to the cabinet Remove 8 screws of 4 hanging plates on the range hood, push the 4 hanging plates on the top side of cabinet edge.
- Page 9 Screw 4 hanging plates onto the range hood using 8 screws( previously removed on step 2). Note: Make sure the screws MUST be securely tightened.
- Page 10 Activated carbon filter can be used to trap odors. In order to install the activated carbon filter, the grease filter should be detached first. Press the lock and pull it downward. Plug the activated carbon filter into the unit and turn it in clockwise direction. Repeat the same on the other side.
-
Page 11: Operation
DESCRIPTION OF COMPONENTS OPERATION STANDBY MODE. After plug in, all lighting, system in STANDBY MODE. Low Speed button It’s used for Ventilation on the kitchen. It is suitable for simmering and cooking which do not make much steam. Medium Speed button Airflow speed is ideally for ventilation in standard cooking operation. - Page 12 First of all, you should download hOn APP and install to your portable device. Then enroll your hood. NOTE ENROLLMENT HOOVER HOOD The image of the hood has the only purpose of presenting it. May not be perfectly representative. 1- Press the WiFi button until the icon starts blinking When the pairing is...
-
Page 13: Maintenance
MAINTENANCE Before cleaning switch the unit off and pull out the plug. I. Regular Cleaning Use a soft cloth moistened with hand-warm mildly soapy water or household cleaning detergent. Never use metal pads, chemical, abrasive material or stiff brush to clean the unit. II. -
Page 14: Troubleshooting
TROUBLESHOOTING Fault Cause Solution The fan blade is jammed. Light on, but fan Switch of the unit and repair by does not work qualified service personnel only. The motor is damaged. light bulb burn. Replace the bulb with correct rating. Both light and fan do not work Power cord looses. -
Page 15: Environmentalprotection
ENVIRONMENTAL PROTECTION Waste electrical products should not be disposed of with household waste. Please recycle where facilities exist. Check with your Local Authority or retailer for recycling advice. This appliance is marked according to the European directive 2012/19/EU on Waste Electrical and Electronic Equipment (WEEE). By ensuring this product is disposed of correctly, you will help prevent potential negative consequences for the environment and human health, which could otherwise be caused by inappropriate waste handling of this product. - Page 17 INHALT EINLEITUNG ................3 SICHERHEITSVORKEHRUNGEN ........3-4 VORBEREITUNG DER MONTAGE ........5 SPEZIFIKATION ..............6 INSTALLATION ..............6-9 BETRIEB ................10 WARTUNG ................12 FEHLERBEHEBUNG ............13 UMWELTSCHUTZ ..............14...
-
Page 18: Einleitung
Bauweise gefertigt. Ausgestattet mit einem großen, starken Elektromotor und einem Zentrifugalgebläse bietet sie starke Saugleistung, geräuscharmen Betrieb, einen austauschbaren Fettfilter sowie die einfache Montage. Hiermit erklärt die Candy Hoover Group Srl, dass die Funkausstattung der Richtlinie 2014/53/EU und den einschlägigen gesetzlichen Anforderungen (für den UKCA-Markt) entspricht. - Page 19 ⚫ Halten Sie die vor Ort geltenden Abluftvorschriften ein. ⚫ Dieses Gerät kann von Kindern ab 8 Jahren und Personen mit eingeschränkten körperlichen, sensorischen oder geistigen Fähigkeiten oder mangelnder Erfahrung und mangelndem Wissen benutzt werden, wenn diese in die sichere Bedienung des Geräts eingewiesen wurden oder beaufsichtigt werden und die damit verbundenen Gefahren verstanden haben.
-
Page 20: Vorbereitung Der Montage
Vorbereitung der Montage: Wenn eine Maueröffnung nach draußen vorhanden ist, kann die Abzugshaube wie unten gezeigt über einen Abluftkanal (Emaille, Aluminium, flexibles Rohr aus unbrennbarem Material mit einem Innendurchmesser von 150 mm) an diese angeschlossen werden Schalten Sie vor der Installation das Gerät aus und ziehen Sie den Netzstecker. Die Abzugshaube sollte für eine optimale Leistung 65~75 cm über der Kochfläche aufgehängt werden. -
Page 21: Installation
Technische Daten Modell Produktabmessungen (B,T,H, in mm) HPY6CBK5BGWIFI 520 mm x 295 mm x 308 mm Installation Die typische Installationsmethode für Ihre Dunstabzugshaube ist der Einbau in einen speziell angefertigten Hänge- oder Wandschrank. Fertigen Sie mit einer Stichsäge den gewünschten Ausschnitt für Ihre Dunstabzugshaube an, wie im Folgenden dargestellt: ⚫... - Page 22 1. Setzen Sie die Dunstabzugshaube in den Schrank ein. Dunstabzugshaube Schrank 2. Entfernen Sie die 8 Schrauben der 4 Aufhängeelemente an der Dunstabzugshaube und schieben Sie die 4 Aufhängeelemente auf die Oberseite der Schrankkante. Dunstabzugshaube 2. Schieben Sie die Aufhängeelemente auf die Oberseite der Schrankkante.
- Page 23 3. Schrauben Sie die 4 Aufhängeelemente mithilfe der 8 (zuvor in Schritt 2 entfernten) Schrauben an die Dunstabzugshaube. Hinweis: Stellen Sie sicher, dass die Schrauben vollständig angezogen sind. Dunstabzugshaube Ziehen Sie die Schrauben am Aufhängeelement fest. Schrank...
- Page 24 Aktivkohlefilter schließen unangenehme Gerüche ein. Bevor der Aktivkohlefilter installiert wird, muss zuerst der Fettfilter abgenommen werden. Drücken Sie auf die Sperre und ziehen Sie sie nach unten. Stecken Sie den Aktivkohlefilter in das Gerät ein und drehen Sie ihn im Uhrzeigersinn.
-
Page 25: Betrieb
BESCHREIBUNG DER KOMPONENTEN BETRIEB STANDBY-MODUS. Nach der Verbindung mit der Stromquelle ist das Gerät im STANDBY-MODUS. Taste „Niedrige Geschwindigkeit“ Für die Belüftung der Küche. Geeignet für das Sieden und Garen mit geringer Dunstentwicklung. Taste „Mittlere Geschwindigkeit“ Die ideale Luftstromgeschwindigkeit für normales Kochen/Garen. Taste „Hohe Geschwindigkeit“... - Page 26 Laden Sie zunächst die hOn-APP herunter und installieren Sie sie auf Ihrem Handy oder Tablet. Registrieren Sie anschließend Ihre Dunstabzugshaube. HINWEIS REGISTRIERUNG DER HOOVER-DUNSTABZUGSHAUBE Die Abbildung der Dunstabzugshaube dient nur zu Illustrationszwecken. Sie weicht möglicherweise vom gekauften Produkt ab. 1 – Drücken Sie die WLAN-Taste, bis das Symbol zu blinken beginnt. Wenn das...
-
Page 27: Wartung
WARTUNG Vor der Reinigung muss das Gerät ausgeschaltet und der Stecker gezogen werden. I. Regelmäßige Reinigung Verwenden Sie ein weiches Tuch, angefeuchtet mit handwarmem, milden Seifenwasser oder einem Haushaltsreiniger. Das Gerät niemals mit Metallpads, Chemikalien, Scheuermitteln oder einer harten Bürste reinigen. II. -
Page 28: Fehlerbehebung
FEHLERBEHEBUNG Lösung Fehler Ursache Das Gerät ausschalten; die Gebläseschaufel Licht an, aber Reparatur muss qualifiziertem blockiert. Gebläse läuft Kundendienstpersonal vorbehalten nicht. Der Motor ist beschädigt. sein. Beide Lichter Gegen eine Leuchte mit identischer Leuchte durchgebrannt. an, aber Leistung austauschen. Gebläse läuft Stromkabel lose. -
Page 29: Umweltschutz
UMWELTSCHUTZ Elektrische Produkte dürfen nicht im Hausmüll entsorgt werden. Bitte führen Sie diese ggf. dem Recycling-Kreislauf zu. Informieren Sie sich bei der örtlichen Behörde oder beim Händler, wie Ihr Gerät entsorgt werden muss. Dieses Elektrohaushaltsgerät ist entsprechend der EU-Richtlinie 2012/19/CE über Elektro- und Elektronik-Altgeräte (WEEE) gekennzeichnet. - Page 31 INHOUD INLEIDING ................3 VEILIGHEIDSMAATREGELEN ..........3-4 VOORBEREIDINGEN VOOR INSTALLATIE ......5 SPECIFICATIES ..............6 INSTALLATIE ............... 6-9 BEDIENING ................10 ONDERHOUD ..............12 PROBLEMEN OPLOSSEN ........... 13 MILIEUBESCHERMING ............14...
-
Page 32: Inleiding
Dit garandeert een sterke zuigkracht, een geluidsarme werking, een vetfilter dat niet kleverig wordt en een gemakkelijke installatie. Candy Hoover Group Srl verklaart hierbij dat de radioapparatuur voldoet aan Richtlijn 2014/53/EU en aan de desbetreffende wettelijke voorschriften (voor de UKCA [‘UK Conformity Assessed’]-markt). - Page 33 ⚫ De voorschriften betreffende de afvoer van lucht dienen te worden gerespecteerd. ⚫ Dit apparaat mag worden gebruikt door kinderen vanaf 8 jaar en door personen met verminderde lichamelijke, zintuiglijke of geestelijke vermogens of met een gebrek aan kennis en ervaring, mits zij onder toezicht worden gehouden of instructies hebben gekregen om het apparaat veilig te kunnen gebruiken en de gevaren begrijpen die ermee gepaard gaan.
-
Page 34: Voorbereidingen Voor Installatie
Voorbereidingen voor installatie: Als u een afvoer naar buiten hebt, kunt u uw afzuigkap aansluiten met behulp van een afzuigkanaal (email, aluminium, flexibele buis of onbrandbaar materiaal met een binnendiameter van 150 mm), zoals weergegeven in onderstaande afbeelding. Zet voorafgaand aan de installatie het apparaat uit en neem de stekker uit het stopcontact. -
Page 35: Specificaties
Specificaties Model Productafmetingen (B, D, H mm) HPY6CBK5BGWIFI 520 mm x 295 mm x 308 mm Installatie De typische installatiemethode voor uw afzuigkap is in een speciaal gebouwde kast erboven/aan de muur. Met behulp van een steekzaag maakt u de vereiste uitsparing voor uw afzuigkap, als volgt: ⚫... - Page 36 1. Plaats de afzuigkap in de kast afzuigkap kast 2. Verwijder 8 schroeven van 4 ophangplaten in de afzuigkap, druk de 4 hangplaten op de bovenkant van de kastrand. afzuigkap 2. Duw de ophangplaten op de bovenkant van de kastrand kast 1.
- Page 37 3. Schroef 4 ophangplaten op de afzuigkap met 8 schroeven (eerder verwijderd in stap 2). Opmerking: De schroeven MOETEN goed vastzitten afzuigkap draai de schroeven op de ophangplaat vast kast...
- Page 38 Actiefkoolfilters worden gebruikt voor het opvangen van geurtjes. Om het actiefkoolfilter te installeren, moet eerst het vetfilter worden losgemaakt. Druk op de blokkering en trek het filter omlaag. Bevestig het actiefkoolfilter in het apparaat en draai het rechtsom. Doe hetzelfde aan de andere kant.
-
Page 39: Bediening
BESCHRIJVING VAN DE ONDERDELEN BEDIENING STAND-BYMODUS. Nadat de spanning is aangesloten gaat alle verlichting en het systeem in STAND-BYMODUS. Knop lage snelheid Deze wordt gebruikt om de keuken te ventileren. Deze stand is geschikt voor sudderende gerechten en voor gerechten waarbij niet veel stoom vrijkomt. - Page 40 Allereerst moet u hOn-app downloaden en op uw draagbare toestel installeren. Registreer vervolgens uw afzuigkap. OPMERKING REGISTRATIE HOOVER-AFZUIGKAP De afbeelding van de afzuigkap is uitsluitend ter illustratie. Het kan zijn dat het niet een perfecte weerspiegeling van uw apparaat is.
-
Page 41: Onderhoud
ONDERHOUD Alvorens het apparaat te reinigen, zet u het uit en haalt u de stekker uit het stopcontact. I. Normale reiniging Gebruik een zachte doek die in een handwarm mild sopje of een schoonmaakproduct voor het huishouden is bevochtigd. Gebruik nooit metalen voorwerpen, chemische, schurende materialen of harde borstels om het apparaat te reinigen. -
Page 42: Problemen Oplossen
PROBLEMEN OPLOSSEN Fout Oorzaak Oplossing Verlichting Het waaierblad van de Schakel het apparaat uit en laat het brandt, maar ventilator zit vast. uitsluitend door gekwalificeerd de ventilator onderhoudspersoneel repareren. De motor is beschadigd. werkt niet Vervang het lampje door een ander De verlichting De lamp is doorgebrand. -
Page 43: Milieubescherming
MILIEUBESCHERMING Afgedankte elektrische producten mogen niet samen met huishoudelijk afval worden verwijderd. Gelieve het voor recycling in te leveren op een inzamelpunt. Raadpleeg uw plaatselijke overheid of detaillist voor advies over recycling. Dit apparaat is gemarkeerd conform de Europese Richtlijn 2012/19/EU betreffende afgedankte elektrische en elektronische apparatuur (AEEA). - Page 45 SOMMAIRE INTRODUCTION ..............3 CONSIGNES DE SÉCURITÉ ..........3-4 PRÉPARATION À L'INSTALLATION ........5 CARACTÉRISTIQUES............6 INSTALLATION ..............6-9 FONCTIONNEMENT ............10 ENTRETIEN ................12 DÉPANNAGE ................ 13 PROTECTION DE L'ENVIRONNEMENT ......14...
-
Page 46: Introduction
à graisses anti-adhésif et elle est facile à installer. Par la présente, Candy Hoover Group Srl déclare que l'équipement radio est conforme à la directive 2014/53/UE et aux exigences réglementaires applicables (pour le marché... - Page 47 ⚫ Cet appareil peut être utilisé par les enfants de plus de 8 ans et les personnes ayant des capacités physiques, sensorielles ou mentales réduites ou un manque d’expérience et de connaissances, s’ils ont été supervisés ou si on leur a appris à...
-
Page 48: Préparation À L'installation
Préparation à l'installation : Si vous avez une sortie vers l’extérieur, votre hotte aspirante peut être raccordée comme sur l’image ci-dessous au moyen d'un conduit d’extraction (émail, aluminium, tuyau flexible ou matériau ininflammable avec un diamètre intérieur de 150 mm) Avant l’installation, éteignez l’unité... -
Page 49: Caractéristiques
Caractéristiques Modèle Dimensions de l'appareil (L, P, H mm) HPY6CBK5BGWIFI 520 mm x 295 mm x 308 mm Installation La méthode d'installation classique de votre hotte consiste à la placer à l'intérieur d'un meuble suspendu/mural. Avec une scie sauteuse, découpez l'espace nécessaire pour encastrer votre hotte, ayant ces dimensions : ⚫... - Page 50 1. Enfilez la hotte dans le meuble. hotte meuble 2. Retirez les 8 vis des 4 plaques suspendues de la hotte, poussez le 4 plaques suspendues dans le haut du bord du meuble. hotte 2. Poussez les plaques suspendues dans le haut du bord du meuble meuble 1.
- Page 51 3. Vissez les 4 plaques suspendues sur la hotte à l'aide de 8 vis (retirées précédemment à l'étape 2). Remarque : veillez à ce que les vis SOIENT solidement serrées. hotte serrez les vis sur la plaque suspendue meuble...
- Page 52 Le filtre à charbon actif peut être utilisé pour capturer les odeurs. Pour installer le filtre à charbon actif, vous devez d’abord détacher le filtre à graisse. Appuyez sur le verrou et tirez-le vers le bas. Enfilez le filtre à charbon actif dans l'appareil et faites-tourner en sens horaire. Répétez la même opération de l'autre côté.
-
Page 53: Fonctionnement
DESCRIPTION DES COMPOSANTS FONCTIONNEMENT MODE ATTENTE. Une fois branché, le système s'éclaire et se met en MODE ATTENTE. Touche faible vitesse Elle sert à aérer la cuisine. Elle peut être utilisée pour faire mijoter ou cuisiner en créant peu de vapeur. Touche moyenne vitesse La vitesse de l'air est parfaite pour aérer la cuisine en condition normale de cuisson. - Page 54 Tout d’abord vous devez télécharger l’application hOn et l’installer sur votre dispositif portable. Ensuite, effectuez l’enregistrement de votre hotte. REMARQUE ENREGISTREMENT DE LA HOTTE HOOVER L'image de la hotte a pour seul but de la présenter. Elle pourrait ne pas être parfaitement représentative.
-
Page 55: Entretien
ENTRETIEN Avant le nettoyage éteignez l’unité et débranchez la fiche. I. Nettoyage ordinaire Utilisez un chiffon doux imbibé d'eau tiède légèrement savonneuse ou avec un détersif à usage domestique. N'utilisez jamais d'éponge abrasive, de poudre à récurer ni de brosse rigide pour nettoyer l'appareil. II. -
Page 56: Dépannage
DÉPANNAGE Problème Cause Solution La lumière La pale du ventilateur est s'éclaire mais Éteignez l'appareil et faites-le coincée. le ventilateur réparer uniquement par un Le moteur est ne fonctionne technicien qualifié. endommagé. l'ampoule de la lampe est Remplacez l'ampoule par une La lumière et le grillée. -
Page 57: Protection De L'environnement
PROTECTION DE L’ENVIRONNEMENT Les produits électriques usés ne doivent pas être éliminés avec les ordures ménagères. Recyclez s'il y a un centre de tri sélectif. Adressez-vous aux autorités locales ou au revendeur pour connaître la méthode de recyclage. Cet appareil est marqué conformément à la Directive Européenne 2012/19/UE relative aux déchets d'équipements électriques et électroniques (DEEE). - Page 59 OBSAH ÚVOD .................... 3 BEZPEČNOSTNÍ PRAVIDLA ............. 3-4 PŘÍPRAVA INSTALACE ............... 5 TECHNICKÉ ÚDAJE ..............6 INSTALACE ................6-9 PROVOZ ..................10 ÚDRŽBA ..................12 ŘEŠENÍ PROBLÉMŮ ..............13 OCHRANA ŽIVOTNÍHO PROSTŘEDÍ ........14...
-
Page 60: Úvod
Tento spotřebič se snadno instaluje. Společnost Candy Hoover Group Srl tímto prohlašuje, že rádiové zařízení je v souladu se směrnicí 2014/53/EU a s příslušnými zákonnými požadavky (pro trh ve Velké... - Page 61 Musí být dodržovány předpisy pro odvod vzduchu. ⚫ Tento spotřebič mohou používat děti starší osmi let a osoby ⚫ s omezenými fyzickými, smyslovými nebo duševními schopnostmi nebo osoby nezkušené a neznalé za předpokladu, že mají zajištěný dohled nebo byly poučeny o bezpečném používání spotřebiče a chápou související...
-
Page 62: Příprava Instalace
Příprava instalace: a. Pokud máte výstup vzduchu ven, lze odsavač par připojit k odvodnímu potrubí (smaltovanému, hliníkovému, ohebnému potrubí nebo potrubí z nehořlavého materiálu s vnitřním průměrem 150 mm) b. Před instalací jednotku vypněte a vytáhněte ze zásuvky. c. Odsavač par by měl být umístěn ve vzdálenosti 65~75 cm nad varnou plochou, aby se dosáhlo nejlepšího účinku. -
Page 63: Technické Údaje
Technické údaje Rozměry produktu (Š, H, V mm) Model 520 mm × 295 mm × 308 mm HPY6CBK5BGWIFI Instalace Typická instalace pro váš typ odsavače par je do zavěšené skříně nebo skříně na zdi, která je pro něj určená. Pomocí pilky vytvořte požadovaný otvor pro váš odsavač par podle následujících pokynů: HPY6CBK5BGWIFI: 485 ×... - Page 64 1. Vložte odsavač par do skříně. odsavač skříň 2. Odšroubujte 8 šroubů 4 závěsných desek, zatlačte 4 závěsné desky k horní straně hrany skříně. odsavač 2. Zatlačte závěsné desky k horní straně hrany skříně. 1. Odšroubujte 8 šroubů závěsných desek skříň...
- Page 65 3. Našroubujte 4 závěsné desky odsavače par pomocí 8 šroubů (vyšroubovaných v kroku 2). Poznámka: Všechny šrouby MUSÍ být řádně utažené. odsavač utáhněte šrouby závěsné desky skříň...
- Page 66 Filtr s aktivním uhlím lze používat k zachytávání pachů. Pokud chcete instalovat uhlíkový filtr, musíte nejprve odmontovat tukový filtr. Zatlačte pojistku a zatáhněte ji dolů. Vložte uhlíkový filtr do jednotky a otočte jej doprava. To samé proveďte na druhé straně. ZAVŘÍT POZNÁMKA: o Ujistěte se, že je filtr správně...
-
Page 67: Provoz
POPIS SOUČÁSTÍ PROVOZ POHOTOVOSTNÍ REŽIM. Po zapojení vše svítí, systém je v POHOTOVOSTNÍM REŽIMU. Tlačítko nízkých otáček Používá se k větrání kuchyně. Je vhodné pro vaření, při kterém nevzniká mnoho páry. Tlačítko středních otáček Rychlost odsávání je ideální pro běžné vaření. Tlačítko vysokých otáček Pokud vzniká... - Page 68 Stáhnout aplikaci hOn Ze všeho nejdříve byste si měli stáhnout aplikaci hOn a nainstalovat ji do svého mobilního zařízení. Poté svůj odsavač par zaregistrujte. POZNÁMKA REGISTRACE ODSAVAČE PAR Obrázek odsavače par je pouze ilustrativní. Nemusí jej úplně vystihovat. 1- Stiskněte tlačítko WiFi, dokud nezačne blikat. Po dokončení párování se ikona WiFi rozsvítí.
-
Page 69: Údržba
ÚDRŽBA Nejprve vypněte spotřebič a vytáhněte zástrčku ze zásuvky. I. Pravidelné čištění Použijte měkký hadr namočený do vody s rozpuštěným mýdlem nebo kuchyňským mycím prostředkem. Při čištění jednotky nikdy nepoužívejte drátěnky, chemikálie, drsné materiály nebo hrubé kartáče. II. Čištění tukového filtru jednou za měsíc DŮLEŽITÉ: Čištění... -
Page 70: Řešení Problémů
ŘEŠENÍ PROBLÉMŮ Závada Příčina Řešení Zaseknutá lopatka Světlo svítí, Vypněte jednotku a požádejte o opravu ventilátoru. ale ventilátor kvalifikovaného servisního technika. nefunguje Poškozený elektromotor. Vyměňte žárovku za novou se stejnými Nefunguje ani Spálená žárovka. parametry. světlo ani ventilátor Uvolněný kabel napájení. Zapojte jednotku znovu do zásuvky. -
Page 71: Ochrana Životního Prostředí
OCHRANA ŽIVOTNÍHO PROSTŘEDÍ Elektrické spotřebiče nelze likvidovat jako domovní odpad. Recyklujte je v příslušném sběrném místě. Doporučení k recyklaci získáte od místního úřadu nebo prodejce. Tento spotřebič je označen podle evropské směrnice 2012/19/EU o odpadních elektrických a elektronických zařízeních (OEEZ). Zajištěním správné... - Page 73 OBSAH ÚVOD .................... 3 BEZPEČNOSTNÉ OPATRENIA ..........3-4 PRÍPRAVA NA INŠTALÁCIU ............5 ŠPECIFIKÁCIE ................6 INŠTALÁCIA ................6-9 PREVÁDZKA ................10 ÚDRŽBA ..................12 RIEŠENIE PROBLÉMOV ............13 OCHRANA ŽIVOTNÉHO PROSTREDIA ........14...
-
Page 74: Úvod
Je vybavený veľkokapacitným elektromotorom a odstredivým ventilátorom, poskytuje silný sací výkon, prevádzku s nízkym hlukom, nelepivým filtrom tukov a jednoduchou inštaláciou. Spoločnosť Candy Hoover Group Srl vyhlasuje, že rádiové zariadenie spĺňa požiadavky smernice 2014/53/EÚ a príslušné zákonné požiadavky (pre trh UKCA). - Page 75 Je potrebné zaistiť plnenie nariadení týkajúcich sa odvádzania ⚫ vzduchu. Deti staršie ako 8 rokov a osoby s obmedzenými fyzickými, ⚫ zmyslovými alebo duševnými schopnosťami alebo nedostatkom skúseností či vedomostí môžu tento spotrebič používať pod dohľadom, resp. po poučení a oboznámení sa s bezpečným spôsobom používania a porozumení...
-
Page 76: Príprava Na Inštaláciu
Príprava na inštaláciu: a. Ak máte vyvedený výstup do exteriéru, kuchynský odsávač môžete pripojiť podľa nasledujúceho obrázka pomocou odsávacieho vedenia (nehorľavá smaltovaná hliníková flexibilná rúra s vnútorným priemerom 150 mm) b. Pred inštaláciou vypnite zariadenie a odpojte ho od elektrickej zásuvky. c. -
Page 77: Špecifikácie
Špecifikácie Rozmery výrobku (Š x H x V mm) Model HPY6CBK5BGWIFI 520 mm x 295 mm x 308 mm Inštalácia Typický spôsob inštalácie digestora je zabudovanie do účelovej skrinky v linke/na stene. Pomocou priamočiarej píly vyrežte požadovaný otvor pre odsávač pár s rozmermi: ⚫... - Page 78 1. Odsávač pár vložte do skrinky odsávač pár skrinka 2. Odstráňte 8 skrutiek zo 4 závesných dosiek na odsávači pár a 4 závesné dosky zatlačte na hornú stranu okraja skrinky. odsávač pár 2. Závesné dosky zatlačte na hornú stranu okraja skrinky 1.
- Page 79 3. 4 závesné dosky naskrutkujte na odsávač pár pomocou 8 skrutiek (ktoré ste odstránili v kroku 2). Poznámka: Skrutky MUSIA byť bezpečne utiahnuté. odsávač pár utiahnite skrutky na závesnej doske skrinka...
- Page 80 Filter s aktívnym uhlím je možné použiť na zachytenie zápachu. Ak chcete nainštalovať filter s aktívnym uhlím, najskôr by mal byť odinštalovaný filter tuku. Stlačte zámok a potiahnite ho smerom nadol. Zapojte filter s aktívnym uhlím do jednotky a otočte ho v smere hodinových ručičiek.
-
Page 81: Prevádzka
OPIS OVLÁDACÍCH PRVKOV PREVÁDZKA POHOTOVOSTNÝ REŽIM. Po zapojení do zásuvky svietia všetky svetlá, systém je v POHOTOVOSTNOM REŽIME. Tlačidlo nízkej rýchlosti Používa sa na ventiláciu v kuchyni. Je vhodný pri miernom dusení a varení, pri ktorom sa nevytvára veľa pary. Tlačidlo strednej rýchlosti Rýchlosť... - Page 82 V prvom rade by ste si mali stiahnuť APLIKÁCIU hOn a nainštalovať ju do svojho prenosného zariadenia. Potom zaregistrujte odsávač. POZNÁMKA REGISTRÁCIA ODSÁVAČA HOOVER Obrázok odsávača slúži iba na ilustráciu. Nemusí zodpovedať skutočnosti. 1- Podržte stlačené tlačidlo WiFi, kým ikona nezačne blikať Po dokončení...
-
Page 83: Údržba
ÚDRŽBA Pred čistením vypnite spotrebič a vytiahnite zástrčku zo zásuvky. I. Pravidelné čistenie Používajte mäkkú handričku navlhčenú v miernej teplej mydlovej vode alebo v čistiacom prostriedku na čistenie domácností. Nikdy nepoužívajte na čistenie jednotky kovové podložky, chemické, brúsne materiály a ani tuhé... -
Page 84: Riešenie Problémov
RIEŠENIE PROBLÉMOV Príčina Riešenie Porucha Lopatka ventilátora je Svetlo svieti, Vypnite spotrebič a opravu zverte len zaseknutá. ale ventilátor kvalifikovanému servisnému personálu. nefunguje Motor je poškodený. Vymeňte ju za rovnaký typ Žiarovka je vypálená. Svetlo s menovitými údajmi. a ventilátor Znova zapojte napájací... -
Page 85: Ochrana Životného Prostredia
OCHRANA ŽIVOTNÉHO PROSTREDIA Odpad z elektrických produktov by sa nemal likvidovať spolu s bežným komunálnym odpadom. Prosím, recyklujte spotrebiče na určených miestach. Poradenstvo v súvislosti s recykláciou vám poskytnú miestne úrady alebo váš predajca. Tento spotrebič je označený podľa európskej smernice 2012/19/ES o odpade z elektrických a elektronických zariadení...
Need help?
Do you have a question about the H-HOOD 500 HPY6CBK5BGWIFI and is the answer not in the manual?
Questions and answers