Table of Contents
Advertisement
Quick Links
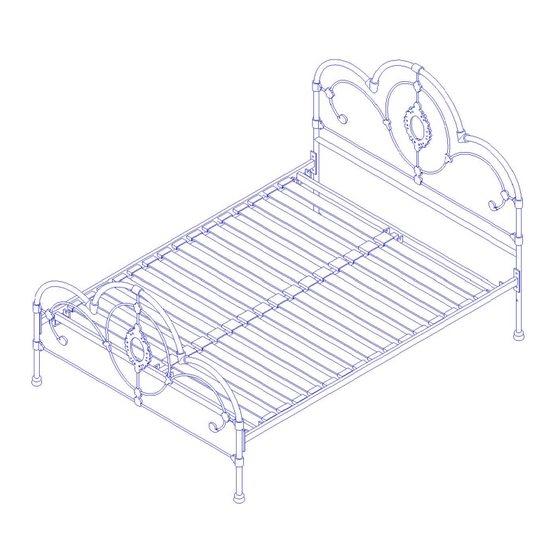
Scalloped Bed - Full
Assembly Instructions
TOOLS REQUIRED BUT NOT INCLUDED: N/A
WARNINGS:
Do not throw away packing materials and carton until after assembly.
Assemble all parts on a clean smooth surface
CARE INSTRUCTIONS:
Avoid direct exposure to sunlight. Do not place over heat or Air conditioning
vents. Adjust levelers so that the furniture sits flat on uneven floors.
Blot spills do not rub, with a clean white
cloth. Do not use harsh chemicals.
Before cleaning any part test a small spot in a hidden
area. You may need to re-tighten all bolts after initial use.
PARTS INCLUDED:
(A) Center Rail 1x
(E) Slat 2x
(I) Center Plastic Cap 15x
© 2017 UO, Inc. All rights reserved, including all applicable copyright, design and patent rights. Any
Rev 1 05.19.23
(B) Headboard 1x
(F) Crossing Rail 2x
EXCLUSIVE AND CONFIDENTIAL PROPERTY OF URBAN OUTFITTERS, INC.
unauthorized reproduction, adaptation, distribution or other infringement will be
URBAN OUTFITTERS
(C) Leg 2x
(G) End Plastic Cap 30x
(D) Footboard 1x
(H) Slat 30x
Page 1 of 6
Advertisement
Table of Contents

Related Manuals for URBAN OUTFITTERS Scalloped


Summary of Contents for URBAN OUTFITTERS Scalloped
- Page 1 (G) End Plastic Cap 30x (I) Center Plastic Cap 15x EXCLUSIVE AND CONFIDENTIAL PROPERTY OF URBAN OUTFITTERS, INC. © 2017 UO, Inc. All rights reserved, including all applicable copyright, design and patent rights. Any unauthorized reproduction, adaptation, distribution or other infringement will be Rev 1 05.19.23...
- Page 2 (R) Hex key 1x (S) Wrench 1x M6 x 10mm EXCLUSIVE AND CONFIDENTIAL PROPERTY OF URBAN OUTFITTERS, INC. © 2017 UO, Inc. All rights reserved, including all applicable copyright, design and patent rights. Any unauthorized reproduction, adaptation, distribution or other infringement will be Page 2 of 6 Rev 1 05.19.23...
- Page 3 Attach Side Rails (E) to Headboard (B) with Bolts (J) and Flat Washers (O&N) as shown in the drawing below. Tighten with supplied Hex Key (Q). EXCLUSIVE AND CONFIDENTIAL PROPERTY OF URBAN OUTFITTERS, INC. © 2017 UO, Inc. All rights reserved, including all applicable copyright, design and patent rights. Any unauthorized reproduction, adaptation, distribution or other infringement will be Rev 1 05.19.23...
- Page 4 Flat Washers (M) and Nuts (P) as shown in the drawing below. Tighten with supplied Hex Key (R) and Wrench (S). EXCLUSIVE AND CONFIDENTIAL PROPERTY OF URBAN OUTFITTERS, INC. © 2017 UO, Inc. All rights reserved, including all applicable copyright, design and patent rights. Any unauthorized reproduction, adaptation, distribution or other infringement will be Rev 1 05.19.23...
- Page 5 Insert Slats (H) into End Plastic Caps and Center Plastic Cap (G&I) as shown in the drawing below. EXCLUSIVE AND CONFIDENTIAL PROPERTY OF URBAN OUTFITTERS, INC. © 2017 UO, Inc. All rights reserved, including all applicable copyright, design and patent rights. Any...
- Page 6 Firmly press Plastic Caps (G&I) into Side Rails (E) and Center Rail (A) as shown in the drawing below. Assembly complete EXCLUSIVE AND CONFIDENTIAL PROPERTY OF URBAN OUTFITTERS, INC. © 2017 UO, Inc. All rights reserved, including all applicable copyright, design and patent rights. Any...
Need help?
Do you have a question about the Scalloped and is the answer not in the manual?
Questions and answers