
Related Manuals for Gaggenau AH 360-120


Summary of Contents for Gaggenau AH 360-120
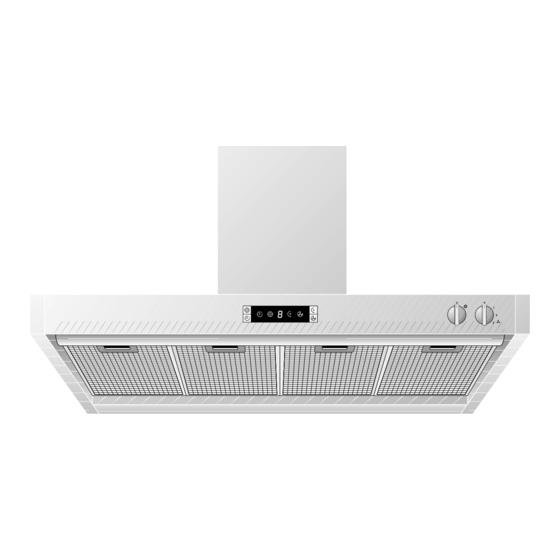
- Page 1 All manuals and user guides at all-guides.com Operating and assembly instructions AH 360-120 Extractor hood...
-
Page 2: Table Of Contents
All manuals and user guides at all-guides.com AH 360-120 Preface 1. Important notes Page 3-4 1.1 For your safety Page 3 1.2 Operating for the first time Page 4 1.3 About use Page 4 2. Structure and operating principle Page 5-6 2.1 Structure of the appliance... -
Page 3: Preface
All manuals and user guides at all-guides.com Preface With your new extractor hood, working in the kitchen will be even more fun. The appliance offers you a number of advantages: – effective extraction thanks to the so-called “Coanda effect” – low operating noise To ensure that you will be able to use this appli- ance in all its diversity, read through the operating and assembly instructions conscientiously before... -
Page 4: Important Notes
All manuals and user guides at all-guides.com 1. Important notes 1.1 For your safety Damaged appliances must not be operated. Isolate the appliance from the mains during every maintenance operation. To do this, remove the Connecting cables must not come into contact with mains plug or actuate the corresponding fuse. -
Page 5: Operating For The First Time
If the problem has nothing to do with the power supply, please contact your specialist Conscientiously read through the operating and dealer or your local Gaggenau after-sales service. assembly instructions before operating the appliance for the first time. -
Page 6: Structure And Operating Principle
All manuals and user guides at all-guides.com 2. Structure and operating principle 2.1 Structure of the appliance 1 Display 2 Glass plates 3 Air duct 4 Control panel Fig. 2 5 Grease filter key 6 Ventilation level display 7 “Coanda level” key 8 “Light”... -
Page 7: Operating Principle
All manuals and user guides at all-guides.com 2.3 Operating principle This extractor hood swiftly and silently extracts all odours produced while cooking. You can set different intensity levels depending on the intensity of odours. The fan in the extractor hood sucks in the kitchen vapours and passes them through the grease filter to outdoors. -
Page 8: Operation
All manuals and user guides at all-guides.com 3. Operation 3.1 Switching on and off Switching on – Turn the “Ventilation level” control knob to the ventilation level you require (Fig. 6). – The set level is displayed. After a power failure, the extactor will not go on again automatically. -
Page 9: Special Functions
All manuals and user guides at all-guides.com 3.2 Special functions Intensive level You should select the intensive level when browning and frying in an open pan. Switching on: (Fig. 9) – Turn the control knob to a ventilation level (1-3). –... -
Page 10: Cleaning And Care
All manuals and user guides at all-guides.com 4. Cleaning and care Caution! Over-greased filters are a fire risk! Pay attention to cleaning the grease filter on a regular basis. Cleaning the grease filters: (Grease filter saturation) symbol flashes on the display after an operating time of 30 hours. Flashing of this symbol signals to you that the grease filters have to be cleaned. - Page 11 All manuals and user guides at all-guides.com Cleaning the glass plates Apply commercially available window cleaning agent with a soft, moist cloth. To facilitate cleaning, you can detach the glass plates as follows: Detach the grease filters. In the extractor hood, you will find two openings on the upper side through which you can lift the glass plates singly with a blunt object (e.g.
-
Page 12: Maintenance
If the power supply is in proper working order, but the appliance is nevertheless not functioning, then please contact your specialist dealer or your responsible Gaggenau after-sales service. Specify the appliance type (see rating plate). Repairs must only be carried out by authorised specialists, thus ensuring the safety of the appliance. -
Page 13: Assembly Instructions
4 Pa (0.04 mbar). Note: The light function works without restriction. This can be achieved whenever the air needed for combustion is able to enter through openings that AH 360-120 FD xxxx xxxx cannot be sealed, for example in doors, windows,... - Page 14 All manuals and user guides at all-guides.com Flexible aluminium pipes, corrosion-protected Depending on the ceiling height, the following duct sheet metal pipes and exhaust air pipes whose units are at your disposal for exhaust air operation: material conforms to fire B1 in accordance with –...
- Page 15 All manuals and user guides at all-guides.com Proceed as follows: Important: Before marking the securing holes, make sure that no electricity or water lines or other lines are laid at the drilling points in the wall. Important: There are two handles on top of the hood.
- Page 16 All manuals and user guides at all-guides.com – Secure the hood to the wall using the 4 screws b (Fig. 18). – Establish the pipe connection. – Establish the electrical connection. – Extract the protective file from the chimney paneling. Note: Avoid damaging the sensitive stainless steel surfaces.
- Page 17 All manuals and user guides at all-guides.com GAGGENAU HAUSGERÄTE GMBH CARL-WERY-STR. 34 · D - 81739 MÜNCHEN Y (0 89) 45 90 - 03 FAX (0 89) 45 90 - 23 47 www.gaggenau.com...
Need help?
Do you have a question about the AH 360-120 and is the answer not in the manual?
Questions and answers