
Related Manuals for barbas 70-55 PF2


Summary of Contents for barbas 70-55 PF2
- Page 1 Installation and maintenance manual Gas Fire Panorama 70-55 PF2 Serial number: Production date:...
- Page 2 Barbas Bellfires BV. This document could contain technical inaccuracies or typographical errors. Barbas Bellfires BV reserves the right to revise this document from time to time in the contents thereof.
-
Page 3: Table Of Contents
Contents Contents About this document................6 How to work with this document....................6 Warnings and cautions used in this document................6 Related documentation........................6 Description....................7 Intended use..........................7 Installation options........................7 Overview of the appliance......................8 Overview of the burner bed and the pilot light................9 Overview of the ceramic log set....................10 Overview of the control elements....................13 2.6.1 Overview of the rear of the gas regulator block.............. - Page 4 6.2.5 Clean the anti-reflective glass..................62 6.2.6 Replace the ambient light bulb when broken..............62 Troubleshooting..................64 Technical specification................65 Barbas Gas Fire Panorama 70-55 PF2- GB, IE, ES, IT.............65 Diagram electricity and gas......................68 Dimensions of the restriction plate.....................68 Gas Fire Panorama 70-55...
- Page 5 Gas Fire Panorama 70-55 PF2 with 6 cm frame and convection casing........74 Gas Fire Panorama 70-55 PF2 with 10 cm frame..............75 Gas Fire Panorama 70-55 PF2 with 10 cm frame and convection casing.........76 Gas Fire Panorama 70-55 PF2 with 10 cm frame and adjustable legs........77 9.10 Operating unit..........................78 Warranty Terms..................
-
Page 6: About This Document
• Maintenance This document refers to the Gas Fire Panorama 70-55 PF2 as 'the appliance'. This document is an essential part of your appliance. Read it carefully before you do work on the appliance. Keep it in a safe place. -
Page 7: Description
Description Description Intended use The appliance is intended for use in a completely sealed or mechanically ventilated house without extra ventilation and/or fume extraction to heat the room wherein it is installed. Do not use it for other purposes. The appliance may only be used at a location that meets the requirements for the installation of the appliance. -
Page 8: Overview Of The Appliance
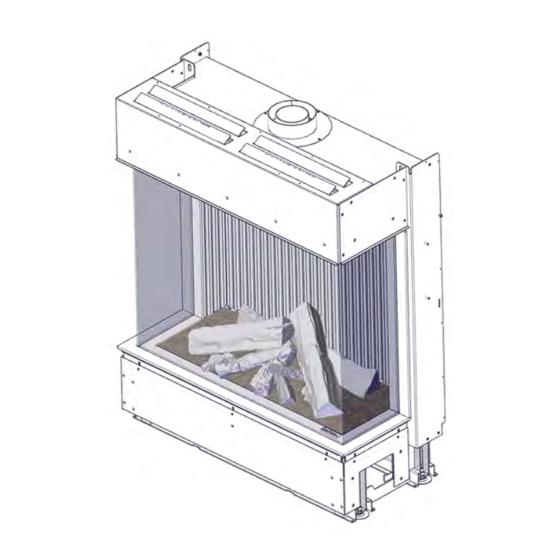
Outlet convection air (optional) Burner bed Overpressure hatch Pilot light burner Convection casing (optional) Decorative frame Overpressure relief openings Concentric flue connection Operating unit Inlet convection air (optional) Figure 1. Overview of Gas Fire Panorama 70-55 PF2 Gas Fire Panorama 70-55... -
Page 9: Overview Of The Burner Bed And The Pilot Light
Description Overview of the burner bed and the pilot light First main burner Pilot light burner Second main burner Thermocouple - to detect if the pilot Protection cover for pilot light light is on Ignition electrode - to ignite the pilot burner Figure 2. -
Page 10: Overview Of The Ceramic Log Set
Description Overview of the ceramic log set Figure 3. Overview of ceramic log set Gas Fire Panorama 70-55... - Page 11 Description Table 1: Ceramic log set parts No. Log No. Log Log with pilot opening Gas Fire Panorama 70-55...
- Page 12 Description No. Log No. Log Table 2: Fire glass No. 'Fire glass' Dark Amber No. 'Fire glass' Black Gas Fire Panorama 70-55...
-
Page 13: Overview Of The Control Elements
Description Overview of the control elements 2.6.1 Overview of the rear of the gas regulator block Inlet pressure tap Adjustment screw for minimum burner Outlet pressure tap pressure Gas supply connection Gs connection for the rear burner Gas connection front burner Thermocouple interrupter connection Gas connection for the pilot light Figure 4. -
Page 14: Overview Of The Front Of The Gas Regulator Block
Description 2.6.2 Overview of the front of the gas regulator block Adjustment screw for the pilot light Micro switch to detect the motor knob gas pressure end position Adjustment screw for maximum 8-wire cable connection burner pressure Motor knob of the internal main gas valve Figure 5. -
Page 15: Overview Of The Connections On The Gas Regulator Block
Description 2.6.3 Overview of the connections on the gas regulator block Pilot light pipe Gas valve of the rear burner Thermocouple Control cable of the gas valve of the Connector (nut-olive) Ø 4mm rear burner Thermocouple interrupter Olive Ø 8mm Connector of gas valve of the rear Nut Ø... -
Page 16: Overview Of The Receiver
Description 2.6.4 Overview of the receiver Reset button Piezo cable connection Connection for 6 VDC adapter Connection to the gas valve rear Not used burner (AUX) 8 wire cable connection Battery compartment cover Thermocouple voltage / current IN Connection for an optional wifi-box (red connection) (SI) Thermocouple voltage / current OUT... -
Page 17: Overview Of The Fan/Light Module
Description 2.6.5 Overview of the fan/light module Connection for the ambient lights connection for the power supply Connection for a convection fan Connection for the receiver Figure 8. Fan/light module Gas Fire Panorama 70-55... -
Page 18: Examples Of A Typical Installation
Description Examples of a typical installation Example of a typical installation with a wall outlet for the concentric flue, your installation can be different. Operating unit Ventilation air outlet opening Ventilation air inlet opening Concentric flue system Figure 9. Typical installation of an appliance without convection set Gas Fire Panorama 70-55... - Page 19 Description Example of a typical installation with the convection set and a wall outlet for the concentric flue, your installation can be different. Convection / ventilation air inlet Convection air outlet opening opening Concentric flue system Ventilation air outlet opening Operating unit Connection for connection set (4x) Figure 10.
-
Page 20: Safety
Safety Safety Safety devices on the appliance Name Description Thermo-electric pilot light shut off Prevents unforseen discharge of gas from the main burner. Overpressure door (= glass front) and If an overpressure occurs in the appliance, the glass overpressure hatch front door and the hatch opens for a short duration. -
Page 21: Safety Instructions With Regard To The Environment
Safety Caution: • Only use the items that are supplied or described in the preparation manual and other related documentation. • Do not use masking tape on the appliance. Masking tape can damage the finish of the appliance. • Do not insulate the appliance. If necessary, only install strips of white, loose insulation wool that is heat resistant up to at least 1000 °C. -
Page 22: Clearances
Clearances Clearances Warning: Follow the instructions in this chapter. Failure to follow these instruction can create a fire hazard. Warning: Do not put the appliance directly against a flammable or non- flammable wall. All clearances to flammable and non-flammable materials mentioned in this chapter must be obeyed. -
Page 23: Clearance To Flammable Floor (Under The Appliance)
Clearances Non-flammable spacer Flammable wall Non-flammable insulation plate Figure 11. Clearances to flammable wall - Top view Table 4: dimensions and minimum clearances to a flammable wall Description Insulation plate 25 Insulation plate 35 Air gap 25 mm 25 mm Thickness plate 25 mm 35 mm... -
Page 24: Clearances To Non-Flammable Walls
Clearances Alternative without a false ceiling: Make an open space of minimum 50 cm height between the chimney enclosure top side (complete width and depth of the enclosure) and the flammable ceiling Figure 12 shows the minimum thickness of the insulation plates and the minimum clearances to a flammable ceiling Make sure the total area of the convection air outlet opening is minimum 300 cm Chimney enclosure... -
Page 25: Clearances To A Non-Flammable Ceiling
Clearances Figure 13 and table 6 show the minimum thickness of the insulation plates and the minimum clearances to non-flammable materials and walls. Attention: Make sure there is a 3 mm clearance between the appliance and the surrounding construction, to allow for expansion of the appliance during use. - Page 26 Clearances Figure 14 shows the minimum thickness of the insulation plates and the minimum clearances to a non-flammable ceiling Make sure the total area of the convection air outlet opening is minimum 300 cm Chimney enclosure Insulation plate (false ceiling) Convection air outlet opening Insulation plates Non-Flammable ceiling...
-
Page 27: Clearances In Front Of The Appliance
Clearances Clearances in front of the appliance Non-flammable hearth (floor stone), Appliance minimum thickness 12 mm Figure 15. Minimum distances in front of the appliance Minimum 30 cm Minimum 100 cm (1 meter) radius from the center point of the appliance. Mantel clearances Caution: All insulation plates in this chapter must be made of non-flammable material. - Page 28 Clearances insulation plate Insulation plate back panel Flammable mantel piece Non-flammable false ceiling Ceiling Insulation plate side panel Non-flammable spacer Insulation plate front panel Figure 16. Mantel piece clearances Minimum 5 cm from top of glass Flammable ceiling: minimum 60 cm from glass Non flammable ceiling: minimum 50 cm from glass Mantel piece depth maximum 30 cm Flammable ceiling: minimum 10 cm...
- Page 29 Clearances Appliance Flammable mantel piece Top of front glass pane insulation plate Figure 17. Top mantel piece clearances Height of mantel piece / Depth of mantel piece 5 cm 15 cm 30 cm Gas Fire Panorama 70-55...
-
Page 30: Clearances For Concentric Flue System
Clearances Rear of the side glass pane Insulation plate Flammable mantel piece Figure 18. Side mantel piece clearances Width of mantel piece / Depth of mantel piece 5 cm 10 cm 15 cm Clearances for concentric flue system Do not insulate the concentric flue pipe. Concentric flue pipe safety distances to flammable material: •... -
Page 31: Clearances For Tv Installation
Clearances Figure 19. Clearances concentric flue 4.10 Clearances for TV installation Caution: Prevent that the temperature around the TV and the TV cables becomes higher than normal. The clearances given in this chapter prevent a too high temperature when the TV installed above the appliance. Important: •... - Page 32 Clearances Non-flammable hearth Convection air outlet Convection air inlet Concentric flue Mantel piece Non-flammable material Steel studs Air gap and spacers TV wall mount bracket Cable duct Figure 20. TV installation - surface mounted Minimum 25 cm between mantel piece and top of glass pane Minimum thickness 2.5 cm Minimum 5 cm clearance between bottom of TV and top of mantel piece Minimum 2.5 cm horizontal clearance between front of TV and front of mantel piece...
- Page 33 Clearances Non-flammable hearth Convection air outlet Convection air inlet Concentric flue Steel studs Non-flammable material TV wall mount bracket Air gap and spacers Cable duct Figure 21. TV installation - flush mounted Minimum 30 cm Minimum 2.5 cm horizontal clearance between front of TV and front of the fireplace enclosure Minimum 5 cm clearance at all 4 sides of the TV Minimum 2.5 cm...
-
Page 34: Installation
Natural draught Jeremias TWIN-GAS system Natural draught Modinox PLA system Natural draught Barbas Opti-Vent system Forced draught • Do not use a combination of parts from different brands for the installation of the concentric flue system. • Do not insulate the concentric flue system. -
Page 35: Installation Procedure
Installation Installation procedure Note: The appliance is factory set to the correct nominal heat input. The pilot light is set to the correct level of gas consumption. • Do all the procedures in this section. Optional procedures are indicated with (optional). -
Page 36: Horizontally Align The Appliance
Installation 5.2.3 Horizontally align the appliance Aligning with adjustable feet Make sure the distance x is minimum 1 cm. Figure 23. Aligning with adjustable feet Adjust the adjustable feet. Use a 13 mm fork spanner. Make sure the appliance is installed horizontally. Use a spirit level. Aligning with adjustable height legs (optional) Attach the 4 adjustable height legs on the appliance and set to the required height. -
Page 37: Make The Gas Connection
Installation Attach the appliance to the rear wall Attach the appliance to the rear wall with 2 wedge bolts and the mounting brackets.. Make sure the appliance is horizontal. Use a sprit level. If necessary adjust the mounting brackets. Figure 25. Attachment to the rear wall 5.2.4 Make the gas connection Important: In some countries national regulations prescribe the installation of... -
Page 38: Do A Check On The Gas Connections
Installation Gas regulator block Light module Receiver Wifi-box (optional) Figure 26. Position of components in operating unit Warning: Make sure not to damage the gas lines and that compression fittings are not loose when the gas regulator block is moved. Make sure not to twist the flexible gas lines. -
Page 39: Connect The Concentric Flue System
Installation 5.2.7 Connect the concentric flue system Connect the concentric flue system to the appliance. Use the materials that are specified in the preparation manual. Do not use any other materials. Make sure that all mechanical connections of the concentric flue system are correctly connected. -
Page 40: Install The Flue Gas Restriction Plate
Installation 5.2.9 Install the flue gas restriction plate Safety conditions Caution: Install the correct restriction plate as specified in the preparation manual. An incorrect restriction plate can cause damage to the appliance. Procedure 6.2.1 Remove the glass panes. See chapter for instructions . -
Page 41: Build The Fireplace
Installation Use the 2 tension bars to attach the mantel iron to the rear wall. Make sure the tension bars are at an angle of 60º towards the appliance. Level the mantel iron with the tension sleeves. Use a level. Make sure the distance between mantel iron and underside of the glass is equal at all sides. -
Page 42: Fitting The Natural Stone Plateau
Installation Caution: • Remove the side panels and the front panel of the frame to prevent 6.2.1 damage of the frame during work. See chapter 6.2.1 • Remove the glass panes. See chapter • Make sure that the gas piping remains free of cement or other building material. -
Page 43: Extra: Tv Installation Above The Appliance
Installation • Natural stone plateau dimensions. • The vertical steel strip A must be remain removable, so that the glass can still be removed. B is the natural stone plateau. • Make sure that the distance C between the stone and glass is a minimum of 4 mm. 5.2.13 Extra: TV installation above the appliance Important:... - Page 44 Installation Appliance TV walll mount bracket Figure 30. TV installation above the appliance (front view) Appliance Steel studs Insulated cable duct Figure 31. TV installation above the appliance (rear view) Gas Fire Panorama 70-55...
-
Page 45: Prepare The Appliance For Use
Installation Prepare the appliance for use • Do all the procedures in this section. Optional procedures are indicated with (optional). 5.3.1 Do a check on the overpressure hatches Make sure that the overpressure hatches are loose. Push the overpressure hatches up and lower them back in position. - Page 46 Installation Put ceramic log no. 43 on the center burner. Figure 34. Put ceramic log no. 41 on the left back burner and ceramic log no. 42 on the right back burner. Figure 35. Attach both front burners on the gas supply line with the 2 screws. Figure 36.
-
Page 47: Do A Final Check On The Fireplace
Installation Do a check on the ignition of the burners Make sure the ceramic logs are in the correct position as described above. Make sure the plug is in the wall socket. Make sure the main gas valve is open. Start the appliance and do a check on the ignition of the pilot burner and main burners. -
Page 48: Maintenance
Do all procedures in this section minimum every year. Caution: • Use only original parts. Individual parts for replacement or accessories are available from your Barbas dealer. • Introduced modifications to the appliance are not permitted. 6.1.1 Clean the appliance... -
Page 49: Do A Check On The Appliance
Maintenance Do a check for damage on the inside of the appliance, including these parts: Main burners. Pilot burner. Combustion air intake. Overpressure hatches. Flue system. Use a flashlight if necessary. 6.2.4 10. Clean the glass. For standard glass, refer to chapter . - Page 50 Maintenance Remove the side panels and front panel. Gas Fire Panorama 70-55...
- Page 51 Maintenance Unlock the fastening levers on the top left and right of the glass panes. Gas Fire Panorama 70-55...
- Page 52 Maintenance Lift the front glass pane a little, and remove it in a slanted manner. Gas Fire Panorama 70-55...
- Page 53 Maintenance Loosen the screws left and right of the top side strips. Do not remove the screws and strips. Gas Fire Panorama 70-55...
- Page 54 Maintenance Remove the glass panes on the sides with the same procedure as the front glass. Gas Fire Panorama 70-55...
-
Page 55: Install The Glass Panes
Maintenance 6.2.2 Install the glass panes Caution: Use protective gloves. Caution: Make sure that the glass panes fit properly in the appliance and seals the inside of the appliance. If the glass does not fit properly there is a risk of flue gas leakage. - Page 56 Maintenance Install the glass panes on the sides, by lifting the glass a little in a slanted manner and place it in the strips (top and bottom) . Gas Fire Panorama 70-55...
- Page 57 Maintenance Tighten the screws left and right of the top side strips. Gas Fire Panorama 70-55...
- Page 58 Maintenance Install the front glass pane, by lifting the glass a little in a slanted manner and place it in the strips (top and bottom) . Gas Fire Panorama 70-55...
- Page 59 Maintenance Lock the fastening levers on the top left and right of the glass panes. Gas Fire Panorama 70-55...
- Page 60 Maintenance Install the front panel and side panels. Caution: • Make sure whether the front glass pane is placed exactly in the middle. • Make sure that there are no gaps between the glass panes. Otherwise, there is risk of flue gas leakage. Gas Fire Panorama 70-55...
-
Page 61: Disassembly Of Burners And Burner Bed
Maintenance 6.2.3 Disassembly of burners and burner bed Warning: Before the start of this procedure make sure the appliance is off and cooled down to room temperature. Figure 40. Position of ceramic wood logs and burners 6.2.1 Remove the glass panes. Refer to chapter Carefully remove the small decorative wood logs. -
Page 62: Clean The Anti-Reflective Glass
Maintenance Clean the glass with a soft cloth, a sponge or paper. Use glass cleaner or ceramic hob cleaner. Make sure that the glass is dry. Water droplets can leave a mark on the glass. 6.2.5 Clean the anti-reflective glass Warning: Before the start of this procedure make sure the appliance is off and cooled down to room temperature. - Page 63 • Turn the ambient light bulbs completely into the ceramic fitting! • Use only the Barbas ambient light bulb. Make sure that the ambient lighting operates correctly. To operate the lights with the remote control, refer to the user manual.
-
Page 64: Troubleshooting
Troubleshooting Troubleshooting Table 9: Troubleshooting Problem possible cause solution The main fire stops to burn The concentric flue system is Install the concentric flue sys- not installed according to the tem correctly. Refer to the specified instructions. preparation manual. An incorrect flue gas restriction Install the correct gas restric- plate is fitted. -
Page 65: Technical Specification
Technical specification Technical specification Barbas Gas Fire Panorama 70-55 PF2- GB, IE, ES, IT Table 10: Appliance classification Butane G30 Propane G31 Natural gas G20 Biopropane G31 Category of appliance butane G30/propane G31/ natural gas G20 biopropane G31 Country GB, IE, ES, IT... - Page 66 Technical specification Figure 42. Position of primary air inlets and gas injectors Table 12: Dimensions of primary air inlet / gas injectors Butane G30 Natural gas Propane G31 Biopropane G31 Ø5.0 mm 1x Ø8x15 mm + 2x Ø3.5 mm Primary air inlet first main burner Ø4.0 mm 1x Ø8x15 mm + 2x Ø3.5 mm Ø5.0 mm...
- Page 67 Technical specification Table 13: Miscellaneous appliance data Gas regulator block (remote control) Mertik GV 60 Main burner PF2 660 x 300 mm NG&P&B Pilot light burner SIT 0.145.019 Gas connection Rc 1/2" male Ø100 mm - Ø150 mm Concentric flue system connection Ø130 mm - Ø200 mm Batteries remote control receiver None...
-
Page 68: Diagram Electricity And Gas
Technical specification Diagram electricity and gas Main burners Pilot light burner Gas regulator block Pilot light pipe Gas valve of the second main burner Piezo cable Receiver Thermocouple Light module Thermocouple interrupter Ambient lighting 8-wire cable Gas pipe second main burner 5-wire cable Gas pipe first main burner 2-wire cable... -
Page 69: Dimensions
Dimensions Dimensions Gas Fire Panorama 70-55 PF2 Frameless * = Adjustable Gas Fire Panorama 70-55... -
Page 70: Gas Fire Panorama 70-55 Pf2 Frameless With Convection Casing
Dimensions Gas Fire Panorama 70-55 PF2 Frameless with convection casing With optional convection case * = Adjustable Gas Fire Panorama 70-55... -
Page 71: Gas Fire Panorama 70-55 Pf2 With 4 Cm Frame
Dimensions Gas Fire Panorama 70-55 PF2 with 4 cm frame Gas Fire Panorama 70-55... -
Page 72: Gas Fire Panorama 70-55 Pf2 With 4 Cm Frame And Convection Casing
Dimensions Gas Fire Panorama 70-55 PF2 with 4 cm frame and convection casing Gas Fire Panorama 70-55... -
Page 73: Gas Fire Panorama 70-55 Pf2 With 6 Cm Frame
Dimensions Gas Fire Panorama 70-55 PF2 with 6 cm frame Gas Fire Panorama 70-55... -
Page 74: Gas Fire Panorama 70-55 Pf2 With 6 Cm Frame And Convection Casing
Dimensions Gas Fire Panorama 70-55 PF2 with 6 cm frame and convection casing With optional convection case Gas Fire Panorama 70-55... -
Page 75: Gas Fire Panorama 70-55 Pf2 With 10 Cm Frame
Dimensions Gas Fire Panorama 70-55 PF2 with 10 cm frame Gas Fire Panorama 70-55... -
Page 76: Gas Fire Panorama 70-55 Pf2 With 10 Cm Frame And Convection Casing
Dimensions Gas Fire Panorama 70-55 PF2 with 10 cm frame and convection casing Gas Fire Panorama 70-55... -
Page 77: Gas Fire Panorama 70-55 Pf2 With 10 Cm Frame And Adjustable Legs
Dimensions Gas Fire Panorama 70-55 PF2 with 10 cm frame and adjustable legs Gas Fire Panorama 70-55... -
Page 78: Operating Unit
Dimensions 9.10 Operating unit Gas Fire Panorama 70-55... -
Page 79: Warranty Terms
Complaints will only be accepted if they are reported to the Barbas dealer, together with the serial number of the Barbas appliance which is stated on the front of the manual. In addition, the original receipt (invoice, receipt, cash receipt) showing the date of purchase must also be submitted. - Page 80 Article 5: Warranty period This warranty will only be granted during the warranty period. The body of the Barbas appliance is guaranteed for a period of 10 years against construction and/or material faults, starting from the moment of purchase. For other parts of the Barbas appliance, a similar warranty applies from the moment of purchase for a period of two years.
-
Page 81: Eu-Declaration Of Conformity
EU-Declaration of Conformity EU-Declaration of Conformity Gas Fire Panorama 70-55... - Page 82 EU-Declaration of Conformity Gas Fire Panorama 70-55...
- Page 83 EU-Declaration of Conformity Gas Fire Panorama 70-55...
- Page 84 Your Barbas dealer 002 - 25.06.2021 - 351029...
Need help?
Do you have a question about the 70-55 PF2 and is the answer not in the manual?
Questions and answers