Table of Contents
Advertisement
Quick Links
Advertisement
Table of Contents

Related Manuals for Ranger design P4-RA60-3


Summary of Contents for Ranger design P4-RA60-3
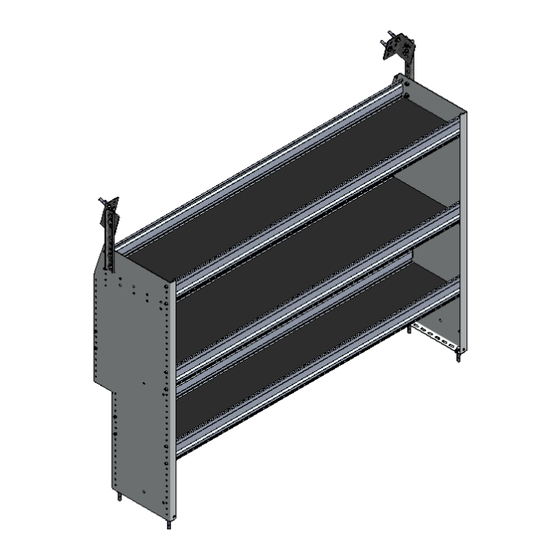
- Page 1 INSTALLATION GUIDE P4-RA60-3 Shelving aluminum Promaster City...
-
Page 2: Table Of Contents
QUICK START GUIDE Phase 1 - Assembly q 1.1 Setup............................... 3 - 4 q 1.2 Shelf Assembly..........................5 - 6 Phase 2 - Installation q 2.1 Vehicle Preparation......................... q 2.2 Attach Wall Brackets To The End Panels..................q 2.3 Mark Holes For Plus Nuts....................... q 2.4 Attach Plus Nut.......................... -
Page 3: Phase 1 - Assembly
60 - 13.875 × 60 Shelf Tray, Black Plywood, Usable 14" × 60" 94 - 4027 Assembly Fastener Kit 96 - 4027 Install Fastener Kit P4-RA60-3 Installation Guide | REV. A1 | Page 3 For technical support, contact us at 1-800-565-5321... - Page 4 ( QTY = G ap beTween floor and end panel Spacer 4× 4× 0.375" ID, × 1.0" OD × 0.25" LONG # 98-157 #94-132 5/16" Plusnut NYLON P4-RA60-3 Installation Guide | REV. A1 | Page 4 For technical support, contact us at 1-800-565-5321...
-
Page 5: Q 1.2 Shelf Assembly
ADJUSTABLE 10" × 60" 9 - 11/16" ADJUSTABLE TOOLS q Cordless Impact q 3/8" Driver Bit HARDWARE USED 24× #92-102 Screw #14 × 1" P4-RA60-3 Installation Guide | REV. A1 | Page 5 For technical support, contact us at 1-800-565-5321... - Page 6 Cordless Impact q 1/2" Socket HARDWARE USED 4× hand tighten the bolts #90-204 Hex Bolt 5/16" × 3/4" #98-116 Flat Washer #94-116 Serrated Nut P4-RA60-3 Installation Guide | REV. A1 | Page 6 For technical support, contact us at 1-800-565-5321...
-
Page 7: Phase 2 - Installation
NOTE: Do these on both sides of the van. TOOLS q Cordless Impact or Ratchet q Philips Screw Driver q 7/16" Socket P4-RA60-3 Installation Guide | REV. A1 | Page 7 For technical support, contact us at 1-800-565-5321... -
Page 8: Q 2.2 Attach Wall Brackets To The End Panels
1/2" Socket HARDWARE USED 4× hand tighten the bolts #90-204 Hex Bolt 5/16" × 3/4" #98-116 Flat Washer #94-116 Serrated Nut HORIZONTAL RIM BRACKET HEAD P4-RA60-3 Installation Guide | REV. A1 | Page 8 For technical support, contact us at 1-800-565-5321... -
Page 9: Q 2.3 Mark Holes For Plus Nuts
Mark 2 holes of each end panel on the vehicle floor. NOTE: If you are using Ranger floor, please go to page TOOLS q Marker MARK P4-RA60-3 Installation Guide | REV. A1 | Page 9 For technical support, contact us at 1-800-565-5321... -
Page 10: Q 2.4 Attach Plus Nut
1/2" Drill Bit w/ Drill Collar ( Set at 1/2" ) q Plus Nut Tool ( 5/16" ) HARDWARE USED 8× #94-132 Plus Nut DRILL COLLAR 1/2" ) seT aT P4-RA60-3 Installation Guide | REV. A1 | Page 10 For technical support, contact us at 1-800-565-5321... - Page 11 1/2" socket until the plusnut locks, then remove the bolt by turning the impact in reverse. FORWARD REVERSE P4-RA60-3 Installation Guide | REV. A1 | Page 11 For technical support, contact us at 1-800-565-5321...
-
Page 12: Q 2.5 Attach Shelf Unit To The Floor
( QTY = G ap beTween floor and end panel #94-132 5/16" Plusnut most vehicle use spacer when not over ribs W/ Spacer W/O Spacer P4-RA60-3 Installation Guide | REV. A1 | Page 12 For technical support, contact us at 1-800-565-5321... - Page 13 #92-102 Screw 1" HARDWARE USED 2× floor fastener kit #90-490 Carriage Bolt 5/16" × 1" #98-116 Lock Washer #98-122 Flat Washer #94-104 Hex Nut P4-RA60-3 Installation Guide | REV. A1 | Page 13 For technical support, contact us at 1-800-565-5321...
-
Page 14: Q 2.6 Attach Wall Brackets
Cordless Impact q 1/2" Socket HARDWARE USED 4× #90-212 Hex Bolt 5/16" × 1-1/4" #98-122 Lock Washer #98-116 Flat Washer #94-132 5/16" Plusnut P4-RA60-3 Installation Guide | REV. A1 | Page 14 For technical support, contact us at 1-800-565-5321... - Page 15 1/2" Socket FASTENERS USED 4× wall kits fastener kit #90-212 Hex Bolt 5/16" × 1-1/4" #98-122 Lock Washer #98-116 Flat Washer #94-150 Channel Nut P4-RA60-3 Installation Guide | REV. A1 | Page 15 For technical support, contact us at 1-800-565-5321...
- Page 16 “You have successfully installed your P4-RA60-3 Thank you for doing business with us.” cs@rangerdesign.com For any feedback or suggestions you may have, please contact: P4-RA60-3 Installation Guide | REV. A1 | Page 16 For technical support, contact us at 1-800-565-5321...
Need help?
Do you have a question about the P4-RA60-3 and is the answer not in the manual?
Questions and answers