Table of Contents
Advertisement
Quick Links
Advertisement
Table of Contents

Related Manuals for Sennheiser SK 5212-II


Summary of Contents for Sennheiser SK 5212-II
- Page 1 SK 5212-II Instruction manual...
-
Page 2: Table Of Contents
The SK 5212-II bodypack transmitter ....................3 Delivery includes ............................5 Product overview ............................6 Overview of the SK 5212-II bodypack transmitter ................ 6 Overview of the displays ........................7 Putting the bodypack transmitter into operation ................8 Inserting and changing the battery ....................8 Connecting the microphone ........................ -
Page 3: Important Safety Instructions
Do not place the product near any heat sources such as radiators, stoves, or other devices (including amplifiers) that produce heat. • Only use attachments/accessories specified by Sennheiser. • Refer all servicing to qualified service personnel. Servicing is required if the product has been damaged in any way, liquid has been spilled, objects have fallen inside, the product has been exposed to rain or moisture, does not operate properly or has been dropped. -
Page 4: The Sk 5212-Ii Bodypack Transmitter
The SK 5212-II bodypack transmitter The SK 5212-II bodypack transmitter The SK 5212-II is a professional bodypack transmitter that is easy to use and is easily adaptable to a wide variety of applications. The SK 5212-II bodypack transmitter has the following features: •... - Page 5 The SK 5212-II bodypack transmitter The frequency bank system The transmitter is available in five UHF frequency ranges with up to 184 MHz switching bandwidth: Range N-GB 606 – 790 MHz Range N-US 614.075 – 697.925 MHz Range N 614 – 798 MHz...
-
Page 6: Delivery Includes
EM 3731, EM 3732, EM 3732 COM • EM 3731-II, EM 3732-II, EM 3732 COM-II Delivery includes Delivery of the bodypack transmitter includes: 1 SK 5212-II bodypack transmitter 1 AA size battery, 1.5 V antennas for different frequency ranges 1 belt clip 1 instruction manual 1 frequency table 1 supplement “Legal requirements for the use of radiomicrophones”... -
Page 7: Product Overview
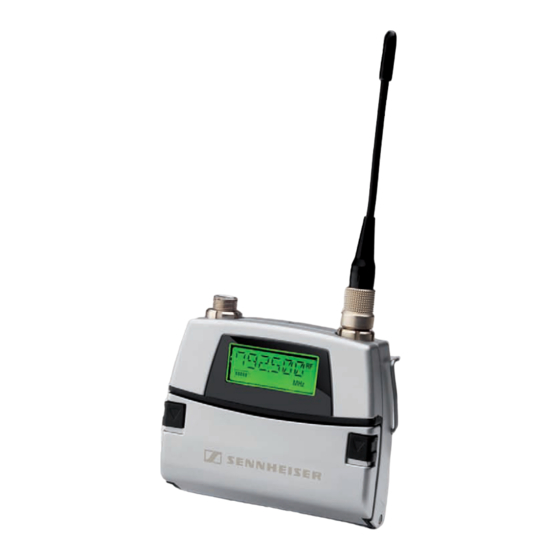
Product overview Product overview Overview of the SK 5212-II bodypack transmitter ³ ¶ Microphone input Battery compartment catches · º Red LED for operation and battery status Type plate indication ¾ Multi-function switch with three switch (ON/LOW BATT/PEAK) positions: »... -
Page 8: Overview Of The Displays
Product overview Overview of the displays Display backlighting When the lock mode is deactivated, the LC display remains backlit for approx. 20 seconds after pressing a button. Alphanumeric display “MHz” – appears when the transmission frequency is displayed Level display for audio signal “AF” “dB”... -
Page 9: Putting The Bodypack Transmitter Into Operation
² Close the battery compartment. ² Connecting the microphone The transmitter is designed for use with Sennheiser lavalier microphones and headmics. The ³ power supply of these microphones is via the microphone input of the transmitter. ³ Connect the microphone to the microphone input the transmitter. -
Page 10: Connecting The Antenna
Putting the bodypack transmitter into operation Connecting the antenna The transmitter is supplied with plug-on antennas: Choose the antenna that matches the frequency range used. » Connect the antenna to the antenna socket of the transmitter. Screw down the coupling ring. Only use antennas that match the frequency range of –... -
Page 11: Using The Bodypack Transmitter
Using the bodypack transmitter Using the bodypack transmitter Switching the transmitter on/off Open the battery compartment. · ¿ To switch the transmitter on: button µ. Briefly press the ON/OFF · The red LED lights up normally and the standard display is shown on the LC display panel ¿; after a short pause, “RF”... -
Page 12: Doing A Frequency Check
Using the bodypack transmitter Doing a frequency check The transmitter has a frequency check mode that prevents the transmitter transmitting on an unwanted frequency after switch-on. When switching on the transmitter, keep the ON/OFF ¿ µ button pressed. The RF signal is deactivated. The current frequency is displayed on the LC display panel ¿. - Page 13 Using the bodypack transmitter Deactivating the autolock function temporarily To make changes to the settings via the operating menu, you can temporarily deactivate the lock mode. µ Press the ON/OFF button or the multi-function switch ¿ ¾ (switch position SET). “LOCK”...
-
Page 14: Using Operating Menu
Using operating menu Using operating menu The buttons Button Mode Function of the button Switched off • Briefly pressing the button: Switches the transmitter on • Keeping the button pressed: Does a frequency check Display mode • Briefly pressing the button (with activated autolock function): Immediately activates the lock mode •... -
Page 15: Overview Of The Operating Menu
Using operating menu Overview of the operating menu Menu Function of the menu “CHAN” Selects a channel “TUNE” Sets transmission frequencies for the frequency bank “VAR” (variable bank) “NAME” Enters a name “ATTEN” Adjusts the microphone sensitivity “LOWCUT” Adjusts the bass roll-off frequency “VIEW”... -
Page 16: Working With The Operating Menu
Using operating menu Working with the operating menu The operating menu has three modes: • Display mode: In display mode, you can display the current menu settings one after the other – even when the lock mode is activated. • Selection mode: In selection mode, you can select the menu whose setting you want to change. - Page 17 Using operating menu After switch-on After switch-on, the standard display is shown on the LC display panel. Depending on the setting, the transmission frequency, the channel number or the name of the transmitter is displayed. Displaying the menu settings in display mode In display mode, and with the lock mode activated, you can display the current menu settings one after the other (see “Overview of the menus”...
- Page 18 Using operating menu Adjusting a setting ¾ Use the multi-function switch to adjust the setting of the selected menu. ¾ By briefly sliding the multi-function switch to the position (UP) or (DOWN), the display jumps either forwards or backwards to the next setting. In the “ATTEN”, “CHAN”, “TUNE”...
-
Page 19: Overview Of The Menus
Using operating menu Overview of the menus Deactivate the lock mode before adjusting the settings (see “Deactivating the autolock function µ temporarily” on page 12). Pressing the ON/OFF button will cancel your entry (ESC function) and return you to the display mode. Display mode Selection mode Setting mode... - Page 20 Using operating menu Display mode Selection mode Setting mode ATTEN IIIIIIII Adjusting the Current Adjust the Current modulation attenuation attenuation attenuation in 1-dB setting steps from –30 to +40 dB STORED Current attenuation LOWCUT FLAT Adjusting the Current low-cut Current low-cut FLAT, low-cut frequency frequency...
-
Page 21: Adjustment Tips For The Operating Menu
Adjustment tips for the operating menu Adjustment tips for the operating menu When setting frequencies on the bodypack transmitter, please observe the following: Make sure that the desired frequencies are listed in the enclosed frequency table and approved and legal in your country. If necessary, apply for an operating license. For an overview of the frequencies and transmission powers, refer to the enclosed supplement “Legal requirements for the use of radiomicrophones”. - Page 22 Adjustment tips for the operating menu The frequencies are tuneable in 5-kHz steps within a switching bandwidth of 184 MHz max. When operating a multi-channel system, make sure to only use intermodulation-free frequencies. There are two options for setting the frequencies: •...
-
Page 23: Entering A Name - "Name
Adjustment tips for the operating menu Entering a name – “NAME” Via the “NAME” menu, you can enter a freely selectable name for the transmitter. This name can be displayed on the standard display and can consist of up to six characters such as: •... -
Page 24: Adjusting The Bass Roll-Off Frequency - "Lowcut
Adjustment tips for the operating menu Adjusting the bass roll-off frequency – “LOWCUT” To reduce unwanted low-frequency noise such as wind and handling noise, you can activate a low-cut filter. The low-cut frequency is 120 Hz. If you do not want to reduce low-frequency signal portions, select the setting “FLAT”. Selecting the standard display –... -
Page 25: Activating/Deactivating The Automatic Lock Mode - "Lock
Adjustment tips for the operating menu Activating/deactivating the automatic lock mode – “LOCK” The transmitter has an autolock function (automatic lock mode) that can be activated or deactivated via the “LOCK” menu. When the autolock function is activated, the lock mode is automatically activated 10 seconds after pressing the last button. -
Page 26: Exiting The Operating Menu - "Exit
Cleaning the bodypack transmitter Exiting the operating menu – “EXIT” Via the “EXIT” menu, you can exit the operating menu and return to the standard display. µ When in the operating menu, briefly pressing the ON/OFF button will cancel your entry (ESC function) and return you to the standard display without saving any changes. -
Page 27: If A Problem Occurs
Receiver’s output level is set Reduce the line output level too high If a problem occurs that is not listed in the above table or if the problem cannot be solved with the proposed solutions, please contact your local Sennheiser partner for assistance. -
Page 28: Accessories
Accessories Accessories ………… MKE 1 clip-on microphone, omni-directional, available in different versions ………… MKE 2 Gold clip-on microphone, omni-directional, available in different versions ………… MKE Platinum clip-on microphone, omni-directional, available in different versions 003876 ME 102-ant clip-on microphone, omni-directional, anthracite 003838 ME 102-ni clip-on microphone, omni-directional, nickel 004227... -
Page 29: Specifications
110 dB(A) < 0.3% (at 1 kHz, nominal deviation) AF frequency response 60 to 20,000 Hz Noise reduction system Sennheiser HiDynplus™ Minimum input sensitivity at –40 dBu = 7.75 mV nominal deviation adjustable (flat, 120 Hz) Low-cut frequency (–3 dB) adjustable in steps of 1 dB from +30 dBu to –40 dBu... - Page 30 Specifications Power consumption PWR.LO: approx. 150 mA (10 mW) at 1.5 V (without LC display illumination) PWR.HI: approx. 220 mA (50 mW) at 1.5 V PWR.LoI: approx. 220 mA (10 mW) at 1.5 V Operating time PWR.LO: approx. 10 hrs PWR.HI: approx.
- Page 31 The transmitter’s audio sensitivity can be adjusted over a range of 70 dB (+40 dB to –30 dB) in steps of 1 dB. The diagram below shows the sensitivity range of the SK 5212-II in comparison to the earlier product generations SK 50 and SK 5012.
-
Page 32: Manufacturer Declarations
Manufacturer Declarations Manufacturer Declarations your Sennheiser partner. In compliance with • RoHS Directive (2002/95/EC) • Battery Directive (2006/66/EC) The supplied batteries or rechargeable batteries can be recycled. Please dispose of them as special waste or return them to your specialist dealer. In order to protect the environment, only dispose of exhausted batteries. - Page 33 Consult the dealer or an experienced radio/TV technician for help. This class B digital device complies with the Canadian ICES-003. Changes or modifications made to this equipment not expressly approved by Sennheiser electronic Corp. may void the FCC authorization to operate this equipment.
- Page 34 Sennheiser electronic GmbH & Co. KG Printed in Germany, Publ. 11/10, 542646/A01...
Need help?
Do you have a question about the SK 5212-II and is the answer not in the manual?
Questions and answers