Sennheiser SK 500 G3 Instruction Manual
Bodypack transmitter
Hide thumbs
Also See for SK 500 G3:
- User manual (26 pages) ,
- Specifications (3 pages) ,
- Instruction manual (42 pages)
Table of Contents

Related Manuals for Sennheiser SK 500 G3


Summary of Contents for Sennheiser SK 500 G3
- Page 1 SK 500 Instruction manual...
-
Page 3: Table Of Contents
Areas of application ............4 Delivery includes ............... 5 Product overview ..............6 Overview of the SK 500 G3 bodypack transmitter ..6 Overview of the displays ........... 7 Putting the bodypack transmitter into operation .... 8 Inserting the batteries/accupack ........8 Charging the accupack ............ -
Page 4: Important Safety Instructions
• Only attachments/accessories specified Sennheiser. • Refer all servicing to qualified service personnel. Servicing is required if the product has been damaged in any way, liquid has been spilled, objects have fallen inside, the product has been exposed to rain or mois- ture, does not operate properly or has been dropped. -
Page 5: The Sk 500 G3 Bodypack Transmitter
The SK 500 G3 bodypack transmitter This bodypack transmitter is part of the evolution wireless series generation 3 (ew G3). With this series, Sennheiser offers high-quality state-of-the-art RF transmission systems with a high level of operational reliability and ease of use. Transmitters and receivers permit wireless transmis- sion with studio-quality sound. -
Page 6: Areas Of Application
For an overview of the frequency presets, please refer to the supplied frequency information sheet. Updated versions of the frequency information sheet can be downloaded from the SK 500 G3 product page on our website at www.sennheiser.com. The frequency banks “U1” to “U6” allow you to freely select and store frequencies. -
Page 7: Delivery Includes
Delivery includes Delivery includes The packaging contains the following items: 1 SK 500 G3 bodypack transmitter 2 AA size batteries, 1.5 V 1 instruction manual 1 frequency information sheet 1 supplement “Framework requirements and restrictions on frequency usage” 1 BPP 1 bodypack pouch... -
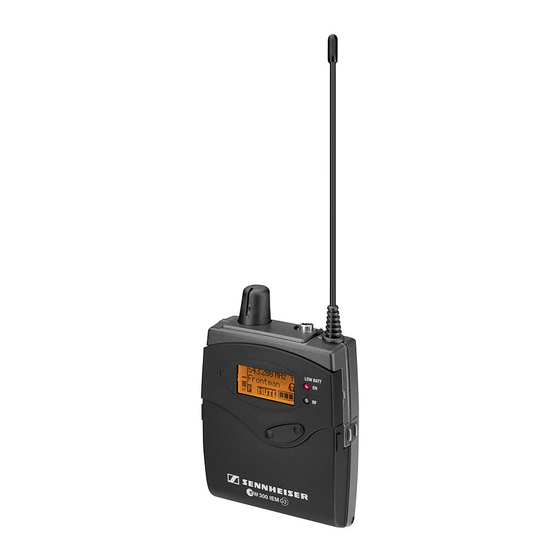
Page 8: Product Overview
Product overview Product overview Overview of the SK 500 G3 bodypack transmitter » ³ · ¿ ² ´ ² ¹ ¶ º ¸ ¾ µ ¸ ³ Microphone/instrument input (MIC/LINE), 3.5 mm jack socket, lockable · MUTE switch » Antenna ¿... -
Page 9: Overview Of The Displays
Product overview Overview of the displays After switch-on, the bodypack transmitter displays the standard display “Frequency/Name”. For further illustra- tions and examples of the different standard displays, refer to page 16. The display backlighting is automatically reduced after approx. 20 seconds. 542.625 ew500 G3 MUTE... -
Page 10: Putting The Bodypack Transmitter Into Operation
Putting the bodypack transmitter into operation Inserting the batteries/accupack For powering the bodypack transmitter, you can either use two 1.5 V AA size batteries or the rechargeable Sennheiser BA 2015 accupack (optional accessory). Open the battery compartment by pushing the two ¸... -
Page 11: Attaching And Positioning The Microphones
Putting the bodypack transmitter into operation Connect the 3.5 mm jack plug from the Sennheiser microphone or instrument cable to the MIC/LINE ³ socket (3.5 mm jack socket). ³ Lock the 3.5 mm jack plug by screwing down the coupling ring Via the operating menu, adjust the sensitivity of the microphone/line input (see page 21). - Page 12 Putting the bodypack transmitter into operation ME 4 Use the microphone clip to attach the microphone to clothing (e.g. tie, lapel). The ME 4 clip-on microphone has a cardioid pick-up pattern. Position the ME 4 so that its sound inlet is directed towards the sound source (e.g.
-
Page 13: Attaching The Bodypack Transmitter To Clothing
Putting the bodypack transmitter into operation Attaching the bodypack transmitter to clothing You can use the belt clip to attach the bodypack trans- mitter to clothing (e.g. belt, waistband). The belt clip is detachable so that you can also attach the bodypack transmitter with the antenna pointing down- wards. -
Page 14: Using The Bodypack Transmitter
Using the bodypack transmitter Using the bodypack transmitter To establish a transmission link, proceed as follows: 1. Switch the bodypack transmitter on (see next section). 2. Switch the receiver on (see the instruction manual of the receiver). The transmission link is established and the display backlighting of the receiver changes from red to orange. -
Page 15: Deactivating The Lock Mode Temporarily
Using the bodypack transmitter Press the button. The transmission frequency is displayed but the bodypack transmitter does not transmit an RF signal. The transmission icon is not displayed. When the pilot tone function is activated on both bodypack transmitter and receiver, and the display has been activated via the “Warnings”... -
Page 16: Muting The Audio Signal Or Deactivating The Rf Signal
Using the bodypack transmitter Press the button. The lock mode is temporarily deactivated. How you are using the bodypack transmitter determines how long the lock mode remains deactivated: When you are in the operating menu The lock mode remains deactivated until you exit the operating menu. - Page 17 Using the bodypack transmitter From the “Mute Mode” menu item, select the desired setting (see page 25). Exit the operating menu. MUTE · Slide the MUTE switch to the left, to the position MUTE. The bodypack transmitter reacts as indicated in the table.
-
Page 18: Selecting A Standard Display
Using the bodypack transmitter You can also deactivate the RF signal on switch-on. For more information, refer to the chapter “Switching the bodypack transmitter on/off” on page 13. Using the ON/OFF button, you can also activate/ deactivate the RF signal during operation. To do so, briefly press the ON/OFF button and... -
Page 19: Using The Operating Menu
Using the operating menu Using the operating menu A special feature of the Sennheiser ew G3 series is the consistent, intuitive menu structure of transmitters and receivers. As a result, adjustments to the settings can be made quickly – even in stressful situations, for example on stage or during a live show or presentation. -
Page 20: Overview Of The Operating Menu
Using the operating menu Overview of the operating menu Main menu “Menu” Sensitivity Extended menu Frequency Preset “Advanced Menu” Name Tune Auto Lock Mute Mode Advanced RF Power Exit Cable Emulation Pilot Tone LCD Contrast Reset Software Revision Exit Display Function of the menu item Main menu “Menu”... -
Page 21: Working With The Operating Menu
Using the operating menu Working with the operating menu If the lock mode is activated, you have to deactivate it in order to be able to work with the operating menu (see page 13). By way of example of the “Sensitivity” menu, this section describes how to use the operating menu. - Page 22 Using the operating menu Exiting a menu item Change to the “Exit” menu item. Menu Exit Confirm your selection. You return to the next higher menu level or you exit the operating menu and return to the current standard display. To directly return to the current standard display: Press the ON/OFF...
-
Page 23: Adjusting Settings Via The Operating Menu
Adjusting settings via the operating menu Adjusting settings via the operating menu Make use of the possibility to adjust settings via the operating menu of your receiver and to transfer these settings to the bodypack transmitter. For more information, refer to the instruction manual of the receiver. - Page 24 Adjusting settings via the operating menu The following figures are a guide to the best settings: Transmission situation Sensitivity setting −30 to −21 dB Loud music/vocals −21 to 0 dB Presentations Instrument input −30 to −24 dB Electric guitars with single coil pickups −45 to −30 dB Electric guitars with...
- Page 25 Adjusting settings via the operating menu Entering a name – “Name” Name Menu Name i c h a e l Name Michael L i c h a e l Call up “Name” Enter a character Enter a character; and confirm store the setting “Stored”...
-
Page 26: The Extended Menu "Advanced Menu
Adjusting settings via the operating menu The extended menu “Advanced Menu” Setting transmission frequencies and frequency banks – “Tune” When you have selected one of the system banks and then select the “Tune” menu, the bodypack transmitter automatically switches to channel 1 of the frequency bank “U1”. - Page 27 Adjusting settings via the operating menu Advanced Menu Tune Tune 542.625 MHz 542.625 MHz Tune B.Ch: U1. 1 B.Ch: U1. 1 542.625 MHz Call up “Tune” Set the frequency Set the frequency; (special function) bank and the channel store the setting “Stored”...
- Page 28 Adjusting settings via the operating menu Emulating guitar cables – “Cable Emulation” Advanced Menu Cable Emulation Cable Emulation High Cable Emulation Medium Medium Call up “Cable Select the desired Store the setting Emulation” setting “Stored” Via the “Cable Emulation” menu item, you can emulate 4 different guitar cable capacities.
- Page 29 Displaying the software revision – “Software Revision” You can display the current software revision of the bodypack transmitter. For information on software updates, visit the SK 500 G3 product page at www.sennheiser.com.
-
Page 30: Synchronizing The Bodypack Transmitter With A Receiver
For information on automatic synchronization of bodypack transmitters with receivers (multi-channel operation), refer to the instruction manual of your receiver. For more information on multi-channel operation, visit the SK 500 G3 product page at www.sennheiser.com. -
Page 31: Cleaning The Bodypack Transmitter
Cleaning the bodypack transmitter Cleaning the bodypack transmitter CAUTION! Liquids can damage the electronics of the bodypack transmitter! Liquids entering the housing of the device can cause a short-circuit and damage the electronics. Keep all liquids away from the bodypack transmitter. -
Page 32: Recommendations And Tips
Recommendations and tips Recommendations and tips ... for the ME 2 and ME 4 clip-on microphones • To reduce level variations to a minimum when the user turns his or her head away from the microphone, attach the microphone as centrally as possible. •... -
Page 33: If A Problem Occurs
If a problem occurs that is not listed in the above table or if the problem cannot be solved with the proposed solutions, please contact your local Sennheiser partner for assistance. To find a Sennheiser partner in your country, search at www.sennheiser.com under “Service & Support”. -
Page 34: Specifications
RF output power at 50 Ω, typ. 10 mW (low) switchable typ. 30 mW (standard) Pilot tone squelch can be switched off AF characteristics Compander system Sennheiser AF frequency response microphone: 80–18,000 Hz line: 25–18,000 Hz Signal-to-noise ratio ≥ 115 dBA (1 mV, peak deviation) ≤... -
Page 35: Connector Assignment
Specifications Current consumption: at nominal voltage typ. 180 mA (30 mW) with switched-off ≤ 25 μA transmitter Operating time typ. 8 hrs Dimensions approx. 82 x 64 x 24 mm Weight (incl. batteries) approx. 160 g In compliance with Europe EN 301489-1/-9 Radio EN 300422-1/-2... -
Page 36: Polar Diagrams And Frequency Response Curves Of The Microphones
Specifications Polar diagrams and frequency response curves of the microphones Polar diagram ME 3 Polar diagram ME 4 0° 0° 30° 30° 30° 30° 60° 60° 60° 60° 90° 90° 90° 90° 120 ° 120° 120° 120° 125 Hz 150° 150°... -
Page 37: Manufacturer Declarations
Manufacturer Declarations Manufacturer Declarations Warranty Sennheiser electronic GmbH & Co. KG gives a warranty of 24 months on this product. For the current warranty conditions, please visit our web site at www.sennheiser.com or contact your Sennheiser partner. In compliance with the following requirements •... - Page 38 This class B digital device complies with the Canadian ICES-003. Changes or modifications made to this equipment not expressly approved by Sennheiser electronic Corp. may void the FCC authorization to operate this equipment. Before putting the device into operation, please observe the...
- Page 40 Sennheiser electronic GmbH & Co. KG Printed in Germany Am Labor 1, 30900 Wedemark, Germany Publ. 05/13 www.sennheiser.com 549126/A01 Sennheiser electronic GmbH & Co. KG Am Labor 1, 30900 Wedemark, Germany www.sennheiser.com Publ. 05/13, 549127/A01...
Need help?
Do you have a question about the SK 500 G3 and is the answer not in the manual?
Questions and answers