
Related Manuals for Reolink FE-W


Summary of Contents for Reolink FE-W
- Page 1 Q S G 1 _ A _ E N Quick Start Guide Apply to: FE-W @ R e o l i n kTe c h h t t p s ://re o l i n k . c o m...
-
Page 2: Table Of Contents
Content What's in the Box What’s in the Box · · · · · · · · · · · · · · · · · · · · · · · · · · · · · · · · · · · · · · · · · · · · · · · · · · · · · · · · · · · · · · ·2 Camera Introduction ·... -
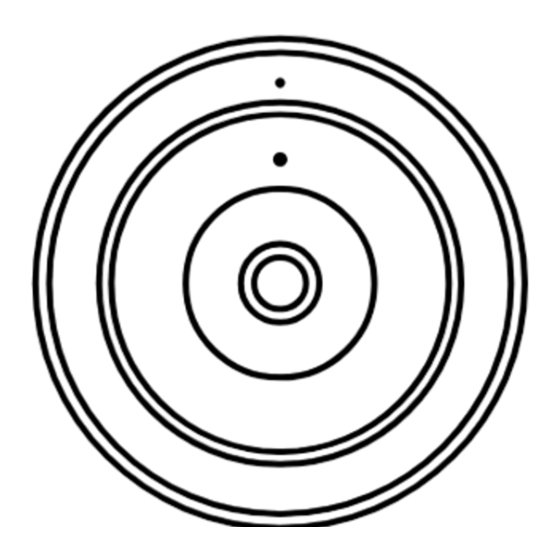
Page 3: Camera Introduction
Camera Introduction Built-in Mic Daylight Sensor Lens Micro SD Card Slot Devices Cloud Devices Cloud IR LEDs *Lift the rubber cover to access the microSD card slot. Ethernet Port Reset Button Power Port * Press and hold the reset button for 5s with a pin to You haven't added any device. -
Page 4: Set Up The Camera
App Store or Google Play Store. Step 4 Follow the onscreen instructions to finish the initial setup. NOTE: If the Reolink App is already existed, please check if it is the newest; if no, Set up the Camera on PC (Optional) please update it. -
Page 5: Mount The Camera
Mount the Camera Mount the Camera to the Wall Installation Tips • Do not face the camera towards any light sources. • Do not point the camera towards a glass window. Or, it may result in poor image quality because of the window glare by infrared LEDs, ambient lights or status lights. eSATA •... - Page 6 4. Attach the camera to the base and rotate the camera clockwise to lock it in 5. If you want to remove the camera from the mount base, press the release position. Make sure the orientation arrow on the camera and the lock on the base mechanism and rotate the camera counterclockwise.
-
Page 7: Troubleshooting
If the Infrared LEDs of your camera stop working, please try the following solutions: • Enable infrared lights on Device Settings page via Reolink App/Client. • Check if the Day/Night mode is enabled and set up auto infrared lights at night on Live View page via Reolink App/Client. -
Page 8: Specifications
• Make sure that your PC is working on a stable network. this device must accept any interference received, including interference that may cause undesired operation. If these won’t work, contact Reolink Support https://support.reolink.com/. Note: This equipment has been tested and found to comply with the limits for a Specifications Class B digital device, pursuant to Part 15 of the FCC Rules. - Page 9 • Connect the equipment into an outlet on a circuit different from that to which the conforme aux CNR d’Innovation, Sciences et Développement économique Canada receiver is connected. applicables aux appareils radio exempts de licence. L’ exploitation est autorisée aux •...
- Page 10 Simplified EU Declaration of Conformity Correct Disposal of This Product Reolink declares that this device is in compliance with the essential requirements This marking indicates that this product should not be disposed with other household and other relevant provisions of Directive 2014/53/EU and Directive 2014/30/EU.
- Page 11 Technical Support If you need any technical help, please visit our official support site and contact our support team before returning the products, https://support.reolink.com. English...
Need help?
Do you have a question about the FE-W and is the answer not in the manual?
Questions and answers