Reolink TrackMix WiFi Operational Instruction
Hide thumbs
Also See for TrackMix WiFi:
- Operational instruction (48 pages) ,
- User manual ,
- Manual (13 pages)
Table of Contents
Advertisement
Available languages
Available languages
Quick Links
Technical Support
If you need any technical help, please visit our official support site and
contact our support team before returning the products:
https://support.reolink.com.
Technische Unterstützung
Wenn Sie technische Hilfe benötigen, besuchen Sie bitte unsere
offizielle Support-Website und kontaktieren Sie unser Support-Team,
bevor Sie die Produkte zurückschicken, https://support.reolink.com.
Support technique
Si vous avez besoin d'aide, veuillez contacter Reolink avant de
retourner votre produit. La plupart des questions peuvent être
répondues via notre centre de support en ligne à l'adresse
https://support.reolink.com.
Assistenza Tecnica
Se avete bisogno di assistenza tecnica, visitate il nostro sito ufficiale di
Centro Assistenza e contattate il team di supporto prima di restituire i
prodotti, https://support.reolink.com.
Soporte técnico
Si necesita cualquier ayuda técnica, por favor, consulte nuestro sitio
oficial de soporte y póngase en contacto con nuestro equipo de
soporte antes de devolver el producto: https://support.reolink.com.
REOLINK INNOVATION LIMITED
FLAT/RM 705 7/F FA YUEN COMMERCIAL BUILDING 75-77 FA YUEN
STREET MONG KOK KL HONG KONG
Product Ident GmbH
EU REP
Hoferstasse 9B, 71636 Ludwigsburg, Germany
Email: prodsg@libelleconsulting.com
APEX CE SPECIALISTS LIMITED
UK REP
Addr.: 89 Princess Street, Manchester, M14HT, UK
Email: info@apex-ce.com
January 2023
QSG1_A
58.03.005.0090
Operational Instruction
Apply to: Reolink TrackMix WiFi
@ R e o l i n kTe c h
E N/D E /FR /I T/E S
h t t p s ://re o l i n k . c o m
Advertisement
Chapters
Table of Contents

Related Manuals for Reolink TrackMix WiFi


Summary of Contents for Reolink TrackMix WiFi
- Page 1 Support-Website und kontaktieren Sie unser Support-Team, bevor Sie die Produkte zurückschicken, https://support.reolink.com. Support technique Si vous avez besoin d’aide, veuillez contacter Reolink avant de retourner votre produit. La plupart des questions peuvent être répondues via notre centre de support en ligne à l’adresse https://support.reolink.com.
-
Page 2: Table Of Contents
Contents What's in the Box What's in the Box · · · · · · · · · · · · · · · · · · · · · · · · · · · · · · · · · · · · · · · · · · · · · · · · · · · 2 Camera Introduction ·... -
Page 3: Camera Introduction
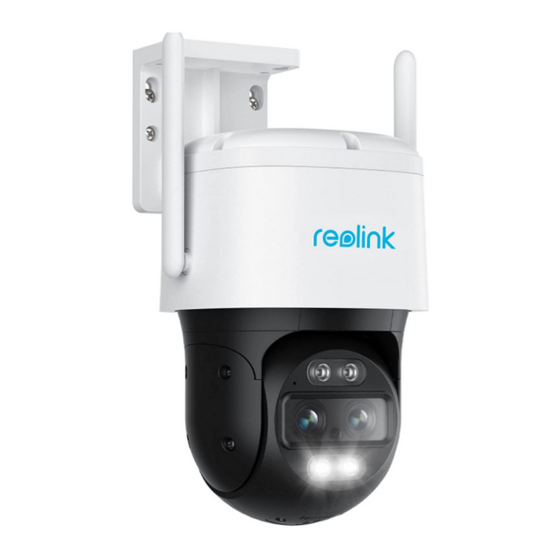
Camera Introduction Antenna Mount lnfrared Light Built-in Mic Lens Daylight Sensor Spotlight Waterproof Lid Speaker Network Cable SD Card Slot Power Port (Optional) Reset Button * Press for about 10 seconds to restore the device to factory settings. English English... -
Page 4: Connection Diagram
Set UP the Camera Before initial setup, follow the steps below to connect your camera. Download and launch the Reolink App or Client software, and follow the 1. Connect the camera to a LAN port on your router with an Ethernet onscreen instructions to finish initial setup. -
Page 5: Mount The Camera
2. Install the mount base with screws included in the package. 3. To adjust the camera direction, you may control the camera to pan and tilt via Reolink App or Client. NOTE: Use the drywall anchors included in the package if needed. -
Page 6: Troubleshooting
3. To adjust the camera direction, you may control the camera to if it works. pan and tilt via Reolink App or If the problem is not solved, please contact Reolink Support. Client. NOTE: Use the drywall anchors Picture is not clear included in the package if needed. -
Page 7: Specification
• Increase the separation between the equipment and receiver. • Connect the equipment into an outlet on a circuit different from that to For more specifications, visit https://reolink.com/. which the receiver is connected. • Consult the dealer or an experienced radio/TV technician for help. - Page 8 Reolink declares that the WiFi camera is in compliance with the essential requirements and other relevant provisions of Directive 2014/53/EU, the PoE camera is in compliance with Directive 2014/30/EU.
- Page 9 ISED Statements Radio Frequency Exposure Statement for IC This device contains licence-exempt transmitter(s)/re The device has been evaluated to meet general RF exposure ceiver(s) that comply with Innovation, Science and Economic requirements. The device can be used in mobile exposure conditions. Development Canada’s licence-exempt RSS(s).
- Page 10 Katalog Lieferumfang Lieferumfang · · · · · · · · · · · · · · · · · · · · · · · · · · · · · · · · · · · · · · · · · · · · · · · · · · · · · · 18 Über die Kamera ·...
-
Page 11: Über Die Kamera
Über die Kamera Antenne Halterung Infrarot-LED Einbau-Mikrofon Objektiv Tageslicht-Sensor Spotlight Wasserdichter Deckel Lautsprecher Netzwerkkabel MikroSD-Kartenslot Strom-Port (optional) Reset-Taste *Zurück auf Werkseinstellungen: die Reset-Taste etwa 10s drücken. Deutsch Deutsch... -
Page 12: Verbindungsdiagramm
Einrichten der Kamera Führen Sie vor der ersten Einrichtung die folgenden Schritte aus, um Ihre Laden Sie die Reolink App oder Client Software herunter, starten Sie Kamera anzuschließen. sie und folgen Sie den Anweisungen für die ersten Einrichtung auf dem 1. -
Page 13: Montage Der Kamera
• Installieren Sie die Kamera nicht an Orten, an denen Regen und Schnee 3. Um die Kamerarichtung anzupassen, können Sie die Kamera über direkt gegen das Objektiv schlagen können. Reolink App oder Client schwenken und neigen. HINWEIS: Verwenden Sie bei Bedarf die Trockenbauanker im Lieferumfang. -
Page 14: Fehlersuche
Sie die DC Adapter ein und sehen Sie, ob es funktioniert. Kamera über Reolink App oder Client schwenken und neigen. Bleibt es ungelöst, kontaktieren Sie bitte Reolink Support. HINWEIS: Verwenden Sie bei Bedarf die Trockenbauanker im Unscharfes Bild Lieferumfang. -
Page 15: Spezifikation
• Richten Sie die Empfangsantenne neu aus oder stellen Sie sie um. • Vergrößern Sie den Abstand zwischen dem Gerät und dem Empfänger. Weitere Spezifikationen finden Sie unter https://reolink.com/. • Schließen Sie das Gerät an eine Steckdose eines anderen Stromkreises an als den, an den der Empfänger angeschlossen ist. - Page 16 Dieses Produkt wird mit einer eingeschränkten 2-Jahres-Garantie gelief- eine unkontrollierte Umgebung festgelegt sind. Dieses Gerät muss mit ei- ert, die nur gültig ist, wenn es im offiziellen Reolink-Shop oder bei einem nem Mindestabstand 20cm von dem Radiator und Körper installiert und autorisierten Reolink-Händler gekauft wurde.
- Page 17 ISED-Erklärung Erklärung zur Hochfrequenzexposition für IC Dieses Gerät enthält lizenzbefreite(n) Sender/Empfänger, die Das Gerät wurde so bewertet, dass es die allgemeinen RF- den lizenzbefreiten RSS(s) von Innovation, Science and Economic Expositionsanforderungen erfüllt. Das Gerät kann unter mobilen Development Canada entsprechen. Der Betrieb unterliegt den folgenden Expositionsbedingungen verwendet werden.
- Page 18 Contenu Contenu de la boîte Contenu de la boîte · · · · · · · · · · · · · · · · · · · · · · · · · · · · · · · · · · · · · · · · · · · · · · · 34 Présentation de la caméra ·...
-
Page 19: Présentation De La Caméra
Présentation de la caméra Antenne Fixation Lumière infrarouge Micro intégré Lentilles Capteur de lumière du jour Spotlight Couvercle étanche Intervenants Câble de réseau Fente pour Port d’alimentation carte SD Bouton de réinitialisatin * Appuyez sur cette touche pendant environ 10 secondes pour rétablir les paramètres d’usine de l’appareil. -
Page 20: Schéma De Connexion
Schéma de connexion Régler la caméra Avant la configuration initiale, suivez les étapes ci-dessous pour Téléchargez et lancez le logiciel Reolink App ou Client, et suivez les connecter votre caméra. instructions à l’écran pour terminer la configuration initiale. 1.Connectez la caméra à un port LAN de votre routeur à l’aide d’un câble Ethernet. -
Page 21: Monter La Caméra
3.Pour ajuster la direction de la caméra, vous pouvez contrôler le peuvent frapper directement l’objectif. panoramique et l’inclinaison de la caméra via l’application ou le client Reolink. REMARQUE : Utilisez les chevilles pour cloisons sèches incluses dans l’emballage si nécessaire. -
Page 22: Dépannage
3.Pour ajuster la direction de la Si le problème n’est pas résolu, veuillez contacter le service d’assistance caméra, vous pouvez contrôler le de Reolink. panoramique et l’inclinaison de la caméra via l’application ou le client Reolink. L’image n’est pas claire REMARQUE : Utilisez les chevilles Si l’image de la caméra n’est pas claire, essayez les solutions suivantes :... -
Page 23: Spécifications
• Réorienter ou déplacer l’antenne de réception. • Augmenter la distance entre l’équipement et le récepteur. Pour plus de détails, consultez le site https://reolink.com/. • Branchez l’appareil sur une prise de courant située sur un circuit différent de celui sur lequel le récepteur est branché. - Page 24 Ce produit est assorti d’une garantie limitée de 2 ans qui n’est valable que s’il est acheté dans la boutique officielle de Reolink ou auprès d’un Cet appareil est conforme aux limites d’exposition aux radiations fixées revendeur agréé par Reolink. Pour en savoir plus : par la FCC pour un environnement non contrôlé.
- Page 25 Déclarations de l’ISED Déclaration d’exposition aux radiofréquences pour les IC Cet appareil contient un (des) émetteur(s)/récepteur(s) exempté(s) de L’appareil a été évalué pour répondre aux exigences générales en licence qui est (sont) conforme(s) au RSS de l’Innovation, des Sciences et matière d’exposition aux radiofréquences.
- Page 26 Contenuto Cosa c’è nella Scatola Cosa c’è nella Scatola · · · · · · · · · · · · · · · · · · · · · · · · · · · · · · · · · · · · · · · · · · · · · 50 Introduzione alla telecamera ·...
-
Page 27: Introduzione Alla Telecamera
Introduzione alla telecamera Antenna Supporto Luce infrarossa Microfono incorporato Obiettivo Sensore di luce diurna Faretto Coperchio impermeabile Altoparlante Cavo di rete Slot per scheda SD Porta di alimentazione (opzionale) Pulsante di reset * Premere per circa 10 secondi per ripristinare le impostazioni di fabbrica del dispositivo. -
Page 28: Connection Diagram
Configurazione della telecamera Before initial setup, follow the steps below to connect your camera. Scaricare e avviare il software Reolink App o Client e seguire le istruzioni 1. Connect the camera to a LAN port on your router with an Ethernet sullo schermo per completare la configurazione iniziale. -
Page 29: Montare La Telecamera
3.Per regolare la direzione della telecamera, è possibile controllarne la • Non installare la fotocamera in luoghi in cui pioggia e neve possano panoramica e l’inclinazione tramite l’app o il client Reolink. colpire direttamente l’obiettivo. NOTA: Se necessario, utilizzare i tasselli per cartongesso inclusi nella confezione. -
Page 30: Risoluzione Dei Problemi
è possibile funzionante e verificare se funziona. controllarne la panoramica e l’inclinazione tramite l’app o il Se il problema non viene risolto, contattare l’assistenza Reolink. client Reolink. NOTA: Se necessario, utilizzare L’immagine non è chiara i tasselli per cartongesso inclusi nella confezione. -
Page 31: Specifiche Tecniche
• Aumentare la distanza tra l’apparecchiatura e il ricevitore. • Collegare l’apparecchio a una presa di corrente su un circuito diverso Per ulteriori specifiche, visitare il sito https://reolink.com/. da quello a cui è collegato il ricevitore. • Consultare il rivenditore o un tecnico radiotelevisivo esperto. - Page 32 FCC Questo prodotto viene fornito con una garanzia limitata di 2 anni, valida solo se acquistato presso il negozio ufficiale Reolink o un Questa apparecchiatura è conforme ai limiti di esposizione alle radiazioni rivenditore autorizzato Reolink. Per saperne di più: FCC stabiliti per un ambiente non controllato.
- Page 33 Dichiarazioni ISED Dichiarazione di esposizione alle radiofrequenze per IC Questo dispositivo contiene trasmettitori/ricevitori esenti da licenza Il dispositivo è stato valutato per soddisfare i requisiti generali di che sono conformi agli RSS esenti da licenza di Innovation, Science and esposizione alle radiofrequenze. Il dispositivo può essere utilizzato in Economic Development Canada.
- Page 34 Índice Contenido de la caja Contenido de la caja · · · · · · · · · · · · · · · · · · · · · · · · · · · · · · · · · · · · · · · · · · · · · · 66 Presentación de la cámara ·...
-
Page 35: Presentación De La Cámara
Presentación de la cámara Antena Base Luz infrarroja Micrófono incorporado Objetivo Sensor de luz diurna Foco Tapa impermeable Altavoz Cable de red Ranura para tarjetas SD Puerto de alimentación (opcional) Botón de restablecimiento * Pulse durante unos 10 segundos para restaurar el dispositivo a los ajustes de fábrica. -
Page 36: Diagrama De Conexión
Diagrama de conexión Configurar la cámara Antes de la configuración inicial, siga los siguientes pasos para conectar Descargue e inicie el software App o Client Reolink, y siga las su cámara. instrucciones en pantalla para finalizar la configuración inicial. 1. Conecte la cámara a un puerto LAN de su rúter con un cable Ethernet. -
Page 37: Montar La Cámara
3. Para ajustar la dirección de la cámara, puede controlar el movimiento • No instale la cámara en lugares donde la lluvia y la nieve puedan horizontal y vertical a través de la App o Client Reolink. golpear directamente el objetivo. -
Page 38: Solución De Problemas
3. Para ajustar la dirección de Si el problema no se resuelve, póngase en contacto con el Soporte de la cámara, puede controlar el Reolink. movimiento horizontal y vertical a través de la App o Client Reolink. -
Page 39: Especificaciones
Humedad de funcionamiento: 10%~90 • Conecte el equipo a un tomacorriente de un circuito distinto al que está conectado el receptor. Para más especificaciones, visite https://reolink.com/. • Consulte al distribuidor o un técnico experimentado en radio/TV para obtener ayuda. Notificación de cumplimiento Cualquier cambio o modificación no expresamente aprobado por la... - Page 40 Si usted no está satisfecho y quiere devolverlo, le es muy recomendable que restablezca la cámara a la configuración de fábrica Reolink declara que la cámara WiFi cumple con los requisitos esenciales antes de la devolución. y otras disposiciones pertinentes de la Directiva 2014/53/UE; la cámara PoE cumple con la Directiva 2014/30/UE.
- Page 41 Declaración ISED Declaración de exposición a RF para IC Este dispositivo contiene transmisor(es)/receptor(es) que cumplen Este equipo ha sido evaluado para cumplir con los requisitos generales con la(s) norma(s) RSS de exención de licencia de Innovation, Science de exposición a RF. El dispositivo puede utilizarse sin restricción en and Economic Development Canada.
Need help?
Do you have a question about the TrackMix WiFi and is the answer not in the manual?
Questions and answers