
Related Manuals for Dewenwils TD-120-12WF-1 WiFi


Summary of Contents for Dewenwils TD-120-12WF-1 WiFi
- Page 1 Low Voltage Transformer TD-120-12WF-1 WiFi TD-200-12WF-1 WiFi TD-300-12WF-1 WiFi ZONE1 ZONE2 ZONE3 Please pay attention to the warning signs Read the instructions with caution before operating and keep it properly V30423...
- Page 2 WARNING: READ ALL INSTRUCTIONS before using the Wi-Fi Low Voltage Transformer. Compatible with 2.4 GHz Wi-Fi networks. If you have multiple routers in your home, especially under the same modem and using dynamic IP address mode, please notice the routers with same LAN IP address may cause IP address conflict and make the routers involved cannot access internet.
-
Page 3: Installation Instructions
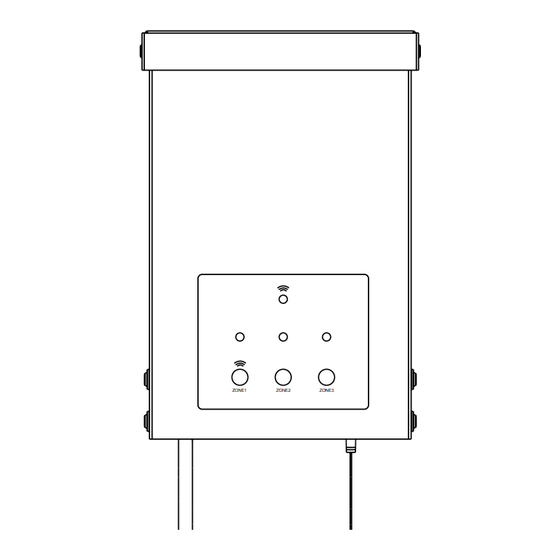
Installation Instructions: IMPORTANT:Please refer to INSTALLATION INSTRUCTION before proceeding with Wi-Fi router connection. Wi-Fi Low Voltage Transformer must be installed before connecting to Wi-Fi router. ZONE1 ZONE2 ZONE3 Wi-Fi connection button and Power Button for ZONE 1. Power Button for ZONE 2 and ZONE 3. Power Indicator Status Indicator BInking Llgh: Roady to connect to Wi-Fi router. - Page 4 INSTRUCTIONS: 1.Prepare the Cable Be careful when splitting the landscape cable. Do NOT expose the copper cable. Remove 1/2 inch of insulation from both cables and twist the ends. 2.Connect the cable to the Transformer Lay the transformer on a flat, stable surface and use screwdriver to connect the stripped ends of the cable under the terminal clamping plate.
- Page 5 3.Place Your Fixtures and Route the cable Lay your fixtures (not included) to your desired location. Be sure they do not exceed the 200-watt rating of the transformer. Coil the rest of the cable after connecting the last fixture. 4.Attach Your Fixtures Turn the transformer on.
- Page 6 INSTRUCTIONS: STEP 1: Software Installation Download the “dewenwils" App: Scan QR Code or search "dewenwils" in Google Play or the App Store to download and install the app. Note: All pictures shown are for illustration purpose only, the APP will be updated continuously, please refer to the latest APP interface to operate.
- Page 7 Auto Add Mode (Bluetooth Mode) • Turn on Bluetooth on the smartphone. • Open the “dewenwils” APP (Figure 1)and click the “+” at the top right list, it will find the Wi-Fi Low Voltage transformer automatically. (Figure 2)Tap “Go to add”, the interface in Figure 3 will appear, click the button to switch to the appropriate WiFi signal source, then type in WiFi password and click “next”...
- Page 8 Note: Automatic connection time of devices varies depending on the strength of WiFi signal, so please do not operate the phone. If the connection fails, please reconnect, or switch to other stronger WiFi signal sources, or keep your phone closer to the device, or connect it by following the Manually Mode below.
- Page 9 Figure 3 Figure 4 Figure 5 Figure 6...
- Page 10 Figure 7 Figure 8 Add Manually Mode • Click the "+" icon at the right corner and then choose the " Wi-Fi Low Voltage transformer". (Figure 9) • Please check the mode on the left side of at the top right corner, if it is not “EZ Mode”, please switch to “EZ Mode”.
- Page 11 Figure 9 Figure 10 Figure 11 Figure 12...
- Page 12 Figure 13 Figure 14 Figure 15...
- Page 13 STEP 4:Set the Function You Need 1.Interface Introduction Change Device Name Power Statistics ON/OFF button for each zone ON/OFF button for all zone Timer Setting Button Countdown Button switch 1 switch 2 switch 3 Device Switch Records 2.Timer Function Introduction Tap “Timer Setting Button”...
- Page 14 3.Schedule Tap "Schedule" to enter the interface as shown in Figure 17. You can set the Start/End time in a 7-day period with a 1 minute interval according to needs. Every program set before repeats weekly.(Figure 18, 19) Tap “Save” to return and review the overall schedule, (Figure 19) Figure 18 Figure 19...
- Page 15 You can also set the schedule for each zone individually. (Figure 21&22&23) Figure 21 Figure 22 Figure 23...
- Page 16 4.Circulate You can set the duration of each ON and OFF, Start and End time according to your needs. The ON/OFF schedule will repeat between the Start and End time. For example: Set a period from 9:00 AM to 3:00 PM on Monday through Friday, turn on your light for 1 hour , and off for 30 minutes.
- Page 17 5.Random Either +/-30 minutes than setting ON/OFF time, randomly control device when you are away from home. Figure 27 Figure 26 6.Countdown Tap "Countdown Button" then select any switch to set the hours and minutes. The zone which the low-voltage transformer is set will switch according to the setting, The Wi-Fi Low Voltage transformer will maintain the current state on or off until the end of the countdown.
- Page 18 Figure 29 Figure 28 7.Astronomical The controlled device will turn on or off at (before or after) sunset or sunrise. (Figure 30,31,32)
- Page 19 Figure 31 Figure 30 Figure 32...
- Page 20 Life" , select "Smart Life " and tap "Enable" to enable the Smart Life skills. 2. You will be directed to the account link page. Type in your "dewenwils "account and password, don't forget to select your country/ region where your account belongs to.
- Page 21 Other Functions Change the device name Share the device with your family Enter family member’s “Smart Life”account to control the device. Create Group Devices under the same group can be controlled simultaneously...
-
Page 23: Fcc Radiation Exposure Statement
FCC STATEMENT: This device complies with Part 15 of the FCC rules. Operation is subject to the following two conditions: 1) this device may not cause harmful interference, and 2) this device must accept any interference received, including interference that may cause undesired operation.
Need help?
Do you have a question about the TD-120-12WF-1 WiFi and is the answer not in the manual?
Questions and answers
I do not see a sunset on or off or sunset on countdown off?
To set the sunset on/off or sunset countdown off feature for the Dewenwils TD-120-12WF-1 WiFi, use the "Astronomical" function in the app. This feature allows the controlled device to turn on or off at a specific time before or after sunset or sunrise. Follow the steps provided in the app to configure the desired settings.
This answer is automatically generated
On device HWLT03A can I set BOTH OPEN and OFF on the sunrise and sunset schedule functions? I want to open 30 min before sunrise and close 15 minutes after sunrise. So far I am able to OPEN OR CLOSE but not BOTH! Can you assist me?