Table of Contents
Advertisement
Store this manual under the car seat, in
the designated storage location as
shown on the Illustration above.
Baby Trend, Inc.
13048 Valley Blvd.
Fontana CA 92335
CS03_1123922U
KEEP INSTRUCTIONS FOR FUTURE USE.
Carefully read and understand all instructions and warnings in this
manual. Failure to properly use this infant car seat increases the
risk of serious injury or death in a sudden stop or crash.
Store this manual in the pocket provided on the back of the seat.
EZ LIFT
35 PRO
TM
INFANT CAR SEAT
Child Weight:
4 to 35 lb (1.8 to 15.8kg).
Child Height:
32" or less (81.3 cm).
OWNER'S MANUAL
E30EF051320U_4
1-800-328-7363
(8:00 a.m. ~ 4:30 p.m. PST)
www.babytrend.com
WARNING
Carefully read and understand all instructions and warnings in this
manual. Failure to properly use this Car Seat increases the risk of
SERIOUS INJURY or DEATH in a sudden stop or crash.
KEEP INSTRUCTIONS FOR FUTURE USE.
Store this manual in the pocket provided on the side
of the car seat base.
EZ-Lift
Child Weight:
4 to 35 lb (1.8 to 15.8kg).
Child Height:
OWNER'S MANUAL
Para instrucciones en Español, conéctese a
www.babytrend.com o llamar al: 1-800-328-7363.
35 PRO
™
32" or less (81.3 cm).
CS03
Copyright © 2023, Baby Trend, Inc.
Advertisement
Table of Contents

Related Manuals for BABYTREND EZ-Lift 35 PRO


Summary of Contents for BABYTREND EZ-Lift 35 PRO
- Page 1 4 to 35 lb (1.8 to 15.8kg). Child Height: 32” or less (81.3 cm). OWNER’S MANUAL CS03 Para instrucciones en Español, conéctese a www.babytrend.com o llamar al: 1-800-328-7363. Baby Trend, Inc. 1-800-328-7363 (8:00 a.m. ~ 4:30 p.m. PST) 13048 Valley Blvd. www.babytrend.com...
-
Page 2: Table Of Contents
TABLE OF CONTENTS TABLE OF CONTENTS WARNINGS TO ALERT YOU TO POSSIBLE DANGERS ....... 3 USING INFANT RESTRAINT ................35 6.1 Securing your Child in the Safety Seat / Carrier ......... 35 HOW TO REGISTER YOUR SAFETY SEAT ........... 4 6.2 For the 5-Point Harness .............. -
Page 3: Warnings To Alert You To Possible Dangers
5. Proper use and routing of the seat belts in your vehicle is register online at essential for proper installation. Not all vehicle seat belts will https://babytrend.com/pages/car-seat-product-registration adequately secure the Safety Seat. For recall information, call the U.S. Government’s Vehicle Safety Hotline at 1–888–327–4236 (TTY: 1–800–424–... -
Page 4: Safety Information
SAFETY SAFETY SAFETY INFORMATION the safety of your child. Quick turns, sudden stops, or other maneuvers in avoiding a crash, as well as a crash, can injure your child if not properly secured in the seat or if the seat is not 3.1 About your child properly installed in the vehicle. -
Page 5: About Active Air Bags
SAFETY SAFETY 3.3 About Active Air Bags 3.5 About this Safety Seat NEVER PLACE THIS SAFETY SEAT IN A VEHICLE SEATING • This Safety Seat is constructed of plastic that can deform over LOCATION THAT HAS AN ACTIVE AIR BAG. If an Active Air time if left with any object in the seat while stored. - Page 6 SAFETY SAFETY from the surface that the seat is on as well as from the pressure - DO NOT suspend strings on or over carrier. on their chest from the safety harness. In addition, if the carrier - DO NOT attach strings to toys. is placed too upright, the child’s head can fall forward and cause - DO NOT place the carrier near a window where cords from the child to have difficulty breathing.
-
Page 7: Selecting The Best Location For The Safety Seat
LOCATION LOCATION SELECTING THE BEST LOCATION FOR • If the driver is the only adult in the vehicle and the child requires constant monitoring, then the forward seating position THE SAFETY SEAT may be used if there is no passenger side Active Air bag and all of the following requirements are met for this location. -
Page 8: Check That The Vehicle Seat Belt Is Safe To Use
LOCATION LOCATION • DO NOT place this Safety Seat in any vehicle for use with the Safety Seat. Even newer vehicles can have seat that faces to the rear or to either side of seat belts systems that are not safe for use with the Safety the vehicle (Fig. - Page 9 LOCATION LOCATION installed and locks only in a crash or sudden • DO NOT use a seat belt that is anchored on stop. These lap belts utilize an Emergency the seat more than 2 inches forward of the Locking Retractor and are often found in crease between the seat bottom and the combination with motorized shoulder belts.
- Page 10 LOCATION LOCATION Seat belt systems that are Adequate for use with the Safety This combination seat belt does not require a Seat: locking clip (Fig. 18-1). The following seat belt systems can be used with the Safety Seat • A lap/shoulder combination belt system provided, that all of the other requirements prescribed in these Fig.
-
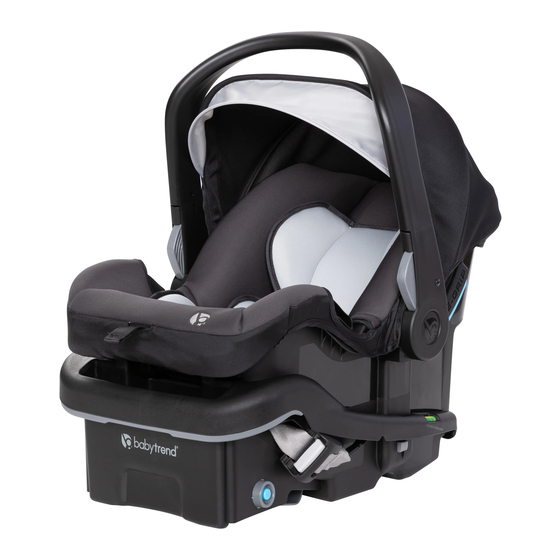
Page 11: Safety Seat Features And Their Proper Use
FEATURES FEATURES SAFETY SEAT FEATURES AND THEIR 5.2 Rear view of Car Seat PROPER USE Canopy Harness Slots x 4 5.1 5-Point Harness Carry Handle Fabric Harness Slots Canopy Base/Stroller Hook Seat Pad Harness Head Pillow Belt Insert Harness Straps Ergonomic Carry Grip Handle... -
Page 12: Rear View Of Component Locations
FEATURES FEATURES 5.3 Rear view of Component locations 5.4 Base Base/ Stroller Release Handle Locking Clip and Storage J-Hook Connector Angle Indicator Storage on underside Located on base Webbing Twist Indicator Stripe Owner’s Elevation Foot Elevation Foot Manual Release Button Release Button Holder Elevation Foot... -
Page 13: Use Of The Safety Seat With The Base
FEATURES FEATURES 5.5 Use of the Safety Seat with the Base Your Safety Seat base can be installed with either the vehicle belt or with the included LATCH attachment system. • To remove the car seat from the base, squeeze the Base Release To properly install the Safety Seat and protect your child, you handle, located below the head must carefully follow the instructions that correspond with the... -
Page 14: Operation Of The Carry Handle
FEATURES FEATURES Seat Angle Indicators 5.7 Operation of the Carry Handle WARNING The Seat Angle Indicator is used to ensure that the seat is installed at the Toys or other objects attached to carry handle can cause proper degree of recline to injury in a crash. -
Page 15: Attaching The Canopy
FEATURES FEATURES In-Vehicle Handle Use Carry 5.8 Attaching the Canopy Rebound Slip the canopy stays through the ONLY use Rebound or Carry sleeves on the canopy. Handle positions in vehicle. Use Carry position for children The canopy is attached by inserting the greater than 22 lb or if feet can ends of the canopy plastic stays into the touch the handle (Fig. -
Page 16: Insert Use
FEATURES FEATURES Safety Seat 5.10 Inserts Use Proper height is even or just below shoulder This Safety Seat features four height • Use is not mandatory adjustments for the harness shoulder Pillow Insert straps. • ONLY use inserts with children who weigh between 4-18 lbs. - Page 17 FEATURES FEATURES Belt Threading Tool 3. If the Harness Straps require 6. Using the included Belt Threading adjustment, remove your child Tool, insert the Harness Straps from the Safety Seat. Rotate through the Slots selected in step the handle to the upright carry 2 above, in the seat pad and the position (Fig.
- Page 18 FEATURES FEATURES 5.12 Adjustment of the Crotch Strap 9. Ensure the harness strap ends are Length fully hooked on the metal plate. The crotch strap is adjustable in length Both sides must be threaded in the to ensure a safe and comfortable fit for same position (Fig.
-
Page 19: Using Infant Restraint
INFANT RESTRAINT INFANT RESTRAINT USING INFANT RESTRAINT 1. Check that the Harness Straps are installed in the proper slots or adjusted to the proper height as described in section 5.9, Adjustment of the Shoulder Straps, preceding. 6.1 Securing your Child in the Safety Seat / Carrier The clothing you dress your child in will affect the proper use of the Safety Seat. -
Page 20: For The 5-Point Harness
INFANT RESTRAINT INSTALLATION 6.2 For the 5-Point Harness Thick, soft, or other compressible material in excess of 1/4 inch thick should not be placed behind or under the child or between • Insert both buckle tongues into the harness the child and harness straps. Examples of accessory products buckle on the crotch strap. -
Page 21: Preparation
INSTALLATION INSTALLATION 7.1 Preparation 7.2 Installation of the Safety Seat / Vehicle Belt Installation of Base: 1. Park your vehicle on a level surface so that the level indicator located on the left side WARNING: of the Safety Seat will properly indicate the Toys or other objects attached proper angle of recline of the seat. - Page 22 INSTALLATION INSTALLATION 4. See Fig. 40-2 for the proper threading of the vehicle belt through the Base and Fig. 41-1 for the proper threading of the belt through the Safety Seat without the Base. 5. Buckle the seat belt being careful that the seat belt is not twisted and is securely latched into the appropriate buckle, and Fig.
- Page 23 INSTALLATION INSTALLATION 8. To tighten a combination lap/shoulder • To install the locking clip, tighten the seat belt: buckled seat belt by pulling upward on the shoulder portion of the seat belt while • A lap/shoulder combination belt with a pushing down hard on the Safety Seat locking buckle is tightened by pulling or Base.
-
Page 24: Installation Of The Base Using Latch
INSTALLATION INSTALLATION 10. If you are using the Base, check 7.3 Installation of the Base using LATCH that nothing is on top of the base, or anything that will interfere with the proper latching of the Safety Seat to Lower Anchors and Tethers for Children the Base. - Page 25 INSTALLATION INSTALLATION 1. Remove any toy or other objects attached to carry handle before 5. Locate the LATCH anchors in installing car seat in vehicle. the vehicle seat (Fig. 47-2). Once located, snap the Safety Seat 2. Locate a LATCH seating position as identified in your vehicle LATCH connectors onto the steel owner’s manual.
-
Page 26: Setting Proper Recline Of The Safety Seat / Base
INSTALLATION INSTALLATION 7.4 Setting Proper Recline of the 7. Check that nothing is on top of the base or anything that will interfere with the proper latching of the Safety Seat to the Base. Safety Seat / Base Place the Safety Seat onto the Base and push down until the Safety For your child’s safety, the Seat latches securely to the Base and you hear a click. - Page 27 INSTALLATION INSTALLATION 1. Safety Seat with Base: Make sure the 2. Safety Seat without Base: vehicle is parked on level ground. Lock Check that the Safety Seat is the Safety Seat onto the Base and check level side to side on the vehicle that the Safety Seat is level side to side seat.
-
Page 28: To Deploy Elevation Foot
INSTALLATION INSTALLATION 7.5 To Deploy Elevation Foot 4- Gently Move elevation foot, back and forth to confirm the elevation foot is in the locked position (Fig. 54-1). 1- Turn Base over with elevation foot away (Fig. 53-1). Fig. 54-1 Fig. 53-1 2- Press elevation foot release 7.5 .1 To Lower Elevation Foot buttons located on the side of the... -
Page 29: Elevation Aids
INSTALLATION INSTALLATION 7.5 Pool Noodle / Elevation Aids 7.6 Base Use • If the Seat Angle Indicator level line • When placing a pool noodle(s), is not parallel with the ground, or the rolled or folded towel ensure the bubble is not centered, using the elevation aid extends beyond the Elevation Foot, stow the elevation foot ø... -
Page 30: Final Safety Checks 8.1
FINAL CHECKS ADD’L INFORMATION FINAL SAFETY CHECKS ADDITIONAL INFORMATION 8.1 Checking Safety Safety 9.1 Using the Safety Seat in an Airplane 1. If your child is already in the Safety Seat, check that the This Safety Seat may be used without the Base in an airplane in harness is properly fitted and tight as instructed in the section the same manner as it is used in an automobile. -
Page 31: Replacement Parts
Adjustment of the Shoulder Straps. hours of 8:00 a.m. and 4:30 p.m., Pacific Standard Time, Monday through Friday or visit us online at www.babytrend.com • For the 5-point harness models, place seat pad on Safety Seat, threading the Harness straps through the Pad bottom slots and... -
Page 32: Cozy Cover
Customer Service Department can be contacted at 1 (800). 328-7363 Monday through Friday between 8:00 a.m. and 4:30 p.m. (PST). Return Authorizations are required prior to returning product(s). to Baby Trend®. Please visit http://babytrend.com/pages/limited-warranty for complete warranty details. - Page 33 STOP If you experience any difficulty in using this product, please contact our customer service department at 1-800-328-7363 between the hours of 8:00 a.m. and 4:30 p.m. Pacific Standard Time for assistance. Please have your model number and manufacturing date available when you call.
Need help?
Do you have a question about the EZ-Lift 35 PRO and is the answer not in the manual?
Questions and answers