Table of Contents
Advertisement
Quick Links
STOP
If you experience any difficulty in using this product, please
contact our customer service department at 1-800-328-
7363 between the hours of 8:00am and 4:30pm Pacific
Standard Time for assistance. Please have your model
number and manufacturing date available when you call.
This information can be found on a small sticker on the
bottom of the product.
Carefully read and understand all instructions and
warnings in this manual. Failure to properly use
this Infant Car Seat incre
INJURY or DEATH in a sudden stop or crash.
KEEP INSTRUCTIONS FOR FUTURE USE.
Store this manual in the pocket provided on
Child Weight:
Copyright © 2017, Baby Trend, Inc.
www.babytrend.com
Baby Trend, Inc.
1607 S. Campus Ave.
Ontario, CA 91761
Store this manual in
WARNING
the pocket provided
ases the risk
of SERIOUS
the side of the seat.
underneath the
Car Seat Cover.
ALLIE-35
®
INFANT CAR SEAT
4 to 35 lbs (1.82 to 15.8 kg)
Child Height:
32" or less (81.3 cm)
OWNER'S MANUAL
www.babytrend.com
ALLIE_35_101917U
1-800-328-7363
(8:00am ~ 4:30pm PST)
www.babytrend.com
WARNING
Carefully read and understand all instructions and
warnings in this manual. Failure to properly use
this Infant Car Seat increases the risk of SERIOUS
INJURY or DEATH in a sudden stop or crash.
KEEP INSTRUCTIONS FOR FUTURE USE.
Store this manual in the pocket provided on
the side of the seat.
ALLY - 35
INFANT CAR SEAT
4 to 35 lbs (1.82 to 15.8 kg)
Child Weight:
Child Height:
OWNER'S MANUAL
www.babytrend.com
Copyright © 2018, Baby Trend, Inc.
™
32" or less (81.3 cm)
ALLY_35_092018U
Advertisement
Table of Contents

Subscribe to Our Youtube Channel
Related Manuals for BABYTREND CB79100A


Summary of Contents for BABYTREND CB79100A
- Page 1 INFANT CAR SEAT Child Weight: 4 to 35 lbs (1.82 to 15.8 kg) Child Height: 32” or less (81.3 cm) OWNER’S MANUAL www.babytrend.com Copyright © 2017, Baby Trend, Inc. ALLIE_35_101917U ALLY - 35 ™ INFANT CAR SEAT 4 to 35 lbs (1.82 to 15.8 kg)
-
Page 2: Table Of Contents
TABLE OF CONTENTS TABLE OF CONTENTS WARNINGS TO ALERT YOU TO POSSIBLE DANGERS ....... 3 USING INFANT RESTRAINT ................35 6.1 Securing your Child in the Safety Seat / Carrier ........ 35 HOW TO REGISTER YOUR SAFETY SEAT ........... 4 6.2 For the 5-Point Harness .............. -
Page 3: Warnings To Alert You To Possible Dangers
Campus Avenue, Ontario, CA 91761 or call 1-800-328-7363 or 5. Proper use and routing of the seat belts in your vehicle is register online at http://www.babytrend.com/registration.html. For essential for proper installation. Not all vehicle seat belts will recall information, call the U.S. Government’s Vehicle Safety adequately secure the Safety Seat. -
Page 4: Safety Information
Safety Safety SAFETY INFORMATION 3.2 About your vehicle • Proper installation of the Safety Seat in your vehicle and proper 3.1 About your child securing of your child in the Safety Seat are essential to ensure the safety of your child. Quick turns, sudden stops, or other •... -
Page 5: About Active Air Bags
Safety Safety 3.3 About Active Air Bags 3.5 About this Safety Seat NEVER PLACE THIS SAFETY SEAT IN A VEHICLE SEATING • This Safety Seat is constructed of plastic that can deform over LOCATION THAT HAS AN ACTIVE AIR BAG. If an Active time if left with any object in the seat while stored. -
Page 6: About Use As A Carrier
Safety Safety 3.6 About use as a carrier • Before lifting the carrier with the handle, check that the handle is firmly locked into position. The carrier will pivot about an Never Leave Your Child Unattended, even if they are asleep. unlocked handle and can result in injury to your child. -
Page 7: Selecting The Best Location For The Safety Seat
Location Location SELECTING THE BEST LOCATION FOR • If the driver is the only adult in the vehicle and the child requires constant monitoring, then the forward seating position THE SAFETY SEAT may be used if there is no passenger side Active Air bag and all of the following requirements are met for this location. -
Page 8: Check That The Vehicle Seat Belt Is Safe To Use
Location Location • DO NOT place this Safety Seat in any vehicle seat belts systems that are not safe for use with the Safety seat that faces to the rear or to either side of Seat. These systems may look safe but their method of the vehicle (Fig. - Page 9 Location Location • DO NOT use a lap belt that stays loose after • DO NOT use a seat belt that is anchored on installed and locks only in a crash or sudden the seat more than 2 inches forward of the stop.
- Page 10 Location Location This combination seat belt does not require a Seat belt systems that are Adequate for use with the Safety locking clip (Fig. 18-1). Seat: The following seat belt systems can be used with the Safety Seat • A lap/shoulder combination belt system provided, that all of the other requirements prescribed in these Fig.
-
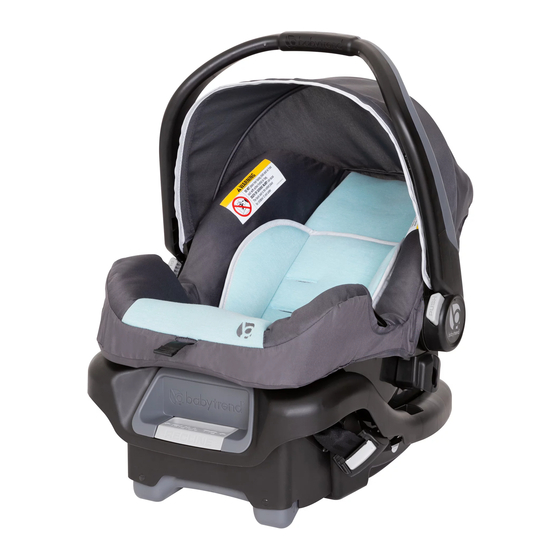
Page 11: Safety Seat Features And Their Proper Use
Features Features SAFETY SEAT FEATURES AND THEIR 5.2 Rear view of Model PROPER USE Harness Slots Locking Clip Carry Handle Canopy 5.1 5-Point Harness Owner’s Base/Stroller Moving Seat Manual Hook Back (Adjustable Holder Back Model) Seat Angle Canopy Indicator Harness Belt Seat Pad Handle... -
Page 12: Base
Features Features Your Safety Seat base can be installed with either the vehicle belt 5.3 Base or with the included LATCH Hooks attachment system. Attachment LATCH Locks Storage LATCH Connector storage in side Latch Belt Path for of base Connector Vehicle Belt Storage Installation... -
Page 13: Use Of The Safety Seat With The Base
Features Features • To remove the car seat from 5.4 Use of the Safety Seat with the Base the base and stroller, squeeze the Base Release handle, • To attach the Safety Seat to the Base, Rebound located below the head end of align the Safety seat with the Base Position the Safety Seat, to release the... -
Page 14: Other Features
Features Features Center 5.5 Other Features Bubble level indicator for use with Child 4-22lbs. Harness This Seat Angle Indicator We manufacturer several different styles is used to ensure that the of Safety Seat each with various levels of seat is installed at the proper features, adjustments, and weight and size degree of recline keep the Seat Angle... -
Page 15: Operation Of The Carry Handle
Features Features 5.6 Operation of the Carry Handle • Slowly rotate the handle to the desired position. The buttons WARNING should pop out and the handle should automatically lock into the new position (Fig. 28-1). Toys or other objects attached to carry handle can cause injury in a crash. -
Page 16: Adjustment Of The Shoulder Straps
Features Features 5.8 Adjustment of the Shoulder Straps 4. Loosen the harness straps by depressing the Harness Adjuster Button located below the flap just ahead of The Safety Seat features three height the Harness Buckle and pulling on the adjustments for the harness shoulder harness straps. -
Page 17: Low Birth Weight Adjustment
Features Features 1/2 to 1 inch above thigh You have three adjustment positions on the 5.9 Low Birth Weight Adjustment harness. Use Position A for a smaller child, and Position B or C for a larger child. The Crotch Shortening clip is only to If using Position A, loop B and C must be be used with children who’s weight is on top of the Belt Adjuster Plate (Fig. - Page 18 Features Features 1d. To thread the stamping back into 5. To shorten the buckle webbing length, thread Seat Cut-Away the strap slip the strap through the the anchor bracket through the slot forward of center by reversing steps 1b and 1c. the use position.
-
Page 19: Using Infant Restraint
INFANT RESTRAINT INFANT RESTRAINT USING INFANT RESTRAINT In a crash, the safety seat provides no protection for your child unless the Harness Straps are properly installed according to these instructions. Make sure that the harness straps are properly adjusted and secured whenever using the Safety Seat, even when 6.1 Securing your Child in the Safety Seat / Carrier using as a carrier. -
Page 20: For The 5-Point Harness
INFANT RESTRAINT INFANT RESTRAINT 6.2 For the 5-Point Harness 3. Place the Safety Seat on a firm and level surface. Move the carry handle • Type A: Put the two buckle tongues to the non rocking position. Loosen together, overlaying the left buckle tongue the Harness Straps by pulling on the onto the right buckle tongue, and insert straps while pushing on the Harness... -
Page 21: Securing The Safety Seat Or Base In The Vehicle
INSTALLATION INSTALLATION WARNING: 7.1 Preparation Toys or other objects 1. Park your vehicle on a level surface so that attached to carry handle can cause injury in a crash. Never the level indicator located on the left side of attach toys or other objects to handle when in vehicle. the Safety Seat will properly indicate the proper angle of recline of the seat. -
Page 22: Installation Of The Safety Seat / Vehicle Belt Installation Of Base
INSTALLATION INSTALLATION 7.2 Installation of the Safety Seat / Vehicle 4. See Fig. 41-2 for the proper threading of the vehicle belt through the Base and Fig. Belt Installation of Base: WARNING: 42-1 for the proper threading of the belt through the Safety Seat without the Base. - Page 23 INSTALLATION INSTALLATION 7. To tighten a lap belt only: 9. Alternate mode vs Recommended mode • An automatically retracted lap seat belt is tightened by feeding belt back into its retractor while pushing down hard on Fig. 43-1 the Safety Seat or Base. Make sure that the retractor locks the lap belt into place and that the belt remains very tight (Fig.
- Page 24 INSTALLATION INSTALLATION 10. A lap/shoulder combination seat belt with a • Re-buckle the seat belt and check that buckle that can slide freely along the seat the seat belt is very tight around the belt may require the use of a locking clip Safety Seat or Base.
-
Page 25: Installation Of The Base Using Latch
INSTALLATION INSTALLATION Ally 35 Approved Installations 1. Remove any toy or other objects attached to carry handle before On Base Vehicle Belt LATCH installing car seat in vehicle. 2. Locate a LATCH seating position as identified in your vehicle owner’s manual. Some LATCH seating positions may require deploying of anchors, or installation of guides. -
Page 26: Setting Proper Recline Of The Safety Seat / Base
INSTALLATION INSTALLATION with your knee or hand on the Base while hook release button on each Press to release pulling upward on each webbing end. connector to release the connector The webbing will automatically lock in from the anchor (Fig. 50-1b). place. - Page 27 INSTALLATION INSTALLATION WARNING • If the Seat Angle Indicator shows the bubble NOT centered between the lines ,the seat is NOT installed at the Failure to properly recline the Safety Seat on the vehicle proper level of recline for occupants seat increases the risk of death or serious injury.
- Page 28 INSTALLATION INSTALLATION • If seat angle adjuster feature does not • If the Safety Seat is too upright, place Center adjust enough to provide the proper a tightly rolled towel (Fig 53-3), or pool angle of recline, place a rolled towel, or noodle, under the foot end of the Safety pool noodle, under the base at the foot Seat until the level indicator bubble...
-
Page 29: Final Safety Checks
Final Checks ADD’L INFORMATION FINAL SAFETY CHECKS ADDITIONAL INFORMATION 1. If your child is already in the Safety Seat, check that the 9.1 Using the Safety Seat in an Airplane harness is properly fitted and tight as instructed in the section This Safety Seat may be used without the Base in an airplane in 6.1, Securing your Child in the Safety Seat / Carrier. -
Page 30: Replacement Parts
8:00 am and 4:30 pm, Pacific Standard Time, Monday described in section Adjustment of the Shoulder Straps. through Friday or visit us online at www.babytrend.com • For the 5-point harness models, place seat pad on Safety Seat, threading the Harness straps through the Pad bottom slots and... -
Page 31: Body Support Use
ADD’L INFORMATION ADD’L INFORMATION 9.5 Cold Weather Boot/ Cover 9.7 Aircraft Installation 1- Installation (Not included with 1- This Restraint is Certified for all models) Slide boot / cover Uuse in Aircraft on and off the over the front on the Infant seat. base.
Need help?
Do you have a question about the CB79100A and is the answer not in the manual?
Questions and answers