
Related Manuals for Lamona LAM4408


Summary of Contents for Lamona LAM4408
- Page 1 Built Under Double Oven LAM4408 Instructions and Installation ISSUE v2.1 130522 www.howdens.com/appliance-registration...
- Page 2 Built Under Double Oven LAM4408 www.howdens.com...
- Page 3 Instructions and Installation Welcome Dear Customer, Congratulations on your choice of oven. The user manual will help you use your product quickly and safely. • Please read this user manual before installing and using the oven. • Always follow the safety instructions. •...
-
Page 4: Table Of Contents
Built Under Double Oven LAM4408 Contents 1. Important instructions 6. How to operate the oven and warnings for safety General information on baking, and environment roasting and grilling General safety How to operate the Electrical safety electric oven Product safety... -
Page 5: Important Instructions And Warnings For Safety And Environment
Instructions and Installation 1. Important instructions and warnings for safety and environment This section contains safety • If the product is handed over to instructions that will help protect someone else for personal use from risk of personal injury or or second-hand use purposes, property damage. -
Page 6: Electrical Safety
Built Under Double Oven LAM4408 Electrical safety provided by a switch built into the fixed electrical installation, • If the product has a failure, it according to construction should not be operated unless regulations. it is repaired by an Authorised •... - Page 7 Instructions and Installation • Be careful when using • (Varies depending on the alcoholic drinks in your dishes. product model.) Placing the Alcohol evaporates at high wire shelf and tray onto the wire temperatures and may cause racks properly It is important to place the wire shelf and / or fire since it can ignite when tray onto the rack properly.
-
Page 8: Intended Use
Built Under Double Oven LAM4408 Never use the baking paper in oven door handles. This product an operating temperature higher should also not be used for room than the indicated value for the heating purposes. baking paper. Do not place the •... -
Page 9: General Warnings About Cooking In The Oven
Instructions and Installation General warnings about cooking in the oven WARNING! Risk of fire! • Do not place aluminium foil • Do not line the grill tray or any or baking trays on the base of baking trays with aluminium foil. the oven when in use. -
Page 10: Environmental Instructions
Built Under Double Oven LAM4408 2. Environmental instructions Waste regulation Disposing of the old product. Compliance with the WEEE Directive and disposing of the waste product: This product complies with EU WEEE Directive (2012/19/EU). This product bears a classification symbol for waste electrical and electronic equipment (WEEE). -
Page 11: General Information
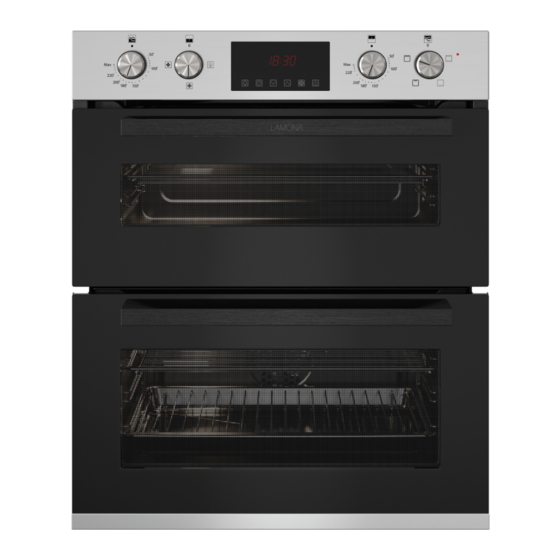
Instructions and Installation 3. General information Overview Control panel Lamp* Handle Grill heating element Top oven Shelf positions* Main oven * (This feature is optional. It may Fan motor (behind steel plate) not exist on your product.) Main oven thermostat knob Top oven thermostat knob Main oven function knob Top oven function knob... -
Page 12: Package Contents
Built Under Double Oven LAM4408 Package contents Accessories supplied can vary depending on the product model. Not every accessory described in the user manual may exist on your product. 1. User manual 4. Small wire shelf It is placed into the tray 2. -
Page 13: Technical Specifications
Instructions and Installation Technical specifications General Voltage / frequency 220 - 240 V ~ 50 Hz Total power consumption 4,1 kW Fuse 25 A Cable type / section Min. H05VV-FG 3 x 2,5mm or equivalent Oven / grill External dimensions 715mm / 595mm / 575mm (height / width / depth) Installation dimensions... -
Page 14: Installation
Built Under Double Oven LAM4408 4. Installation Product must be installed by a qualified person in accordance with the regulations in force. The manufacturer shall not be held responsible for damages arising from procedures carried out by unauthorised persons which may also void the warranty. - Page 15 Instructions and Installation All installation dimensions shown are in millimetres. All installation dimensions shown are in millimetres.
- Page 16 Built Under Double Oven LAM4408 1. The oven is designed to fit within 4. Brackets should be a 720 x 600mm aperture with a aligned with the top edge of minimum depth of 575mm. the cabinet positioned vertically 17mm back form edge of the 2.
-
Page 17: Installation And Connection
Instructions and Installation Installation and connection Connecting the power cable • The product must be installed in accordance with all local gas • IMPORTANT: The wires in and electrical regulations. the mains lead are coloured in accordance with the Electrical connections following code: •... - Page 18 Built Under Double Oven LAM4408 IMPORTANT: The appliance 2. Pass the mains lead under the cable clamp and secure clamp may be connected to the with the screw over the outer mains supply only by a cable insulation. competent person.
-
Page 19: Future Transportation
Instructions and Installation Future transportation The built-in cooling fan cools both the built-in cabinet and • Keep the product’s original the front of the product. carton and transport the Cooling fan continues to product in it. Follow the operate for about 20 to 30 instructions on the carton. -
Page 20: Preparation
Built Under Double Oven LAM4408 5. Preparation Tips for saving energy Initial use and time setting The following information will Always set the time of day before using your oven. If you help you to use your appliance do not set it, you cannot cook in an ecological way, and to in some oven models. -
Page 21: First Cleaning Of The Appliance
Instructions and Installation 1. When after the oven is If the first time is not set, energised for the first time, hour “12:00” and symbols field “12:00” and symbol will continue to flash and your flash on the display. oven will not start. For your oven to work, you must 2. -
Page 22: Initial Heating
Built Under Double Oven LAM4408 Initial heating Heat up the product for about 30 minutes and then switch it off. Thus, any production residues or layers will be burnt off and removed. Hot surfaces cause burns! Product may be hot when it is in use. -
Page 23: How To Operate The Oven
Instructions and Installation 6. How to operate the oven General information • It takes about 15 to 30 minutes longer to roast meat with on baking, roasting bones when compared to and grilling roasting the same size of meat without bones. Hot surfaces cause burns! Product may be hot when it •... -
Page 24: How To Operate The Electric Oven
Built Under Double Oven LAM4408 Turning on the oven rack to collect fats. The baking tray to be slid must be of a size When you select a operating that covers the whole grilling function you want to cook with area. -
Page 25: Rack Positions (For Models With Wire Shelf)
Instructions and Installation » Your oven will start operating immediately at the selected function and temperature will appear on the screen. When the temperature inside the oven reaches the set temperature, the symbol disappears. The oven does not switch off automatically since manual cooking is done without setting the cooking time. -
Page 26: Operating Modes
Built Under Double Oven LAM4408 Operating modes Fan heating Warm air heated by the rear All functions in your oven heater is evenly distributed (including the main oven) are throughout the oven rapidly described in this section. The by means of the fan. It is... -
Page 27: Cooking By Setting The Cooking Time
Instructions and Installation Using the oven clock Alarm key Time setting key The oven clock only controls Decrease key the bottom oven. It has no effect for the top oven. Increase key Settings key General warnings Key lock key Maximum time that can be Display symbols set for end of cooking is 5 hours 59 minutes. - Page 28 Built Under Double Oven LAM4408 To set the cooking end time to a After setting the operation later time; (It varies depending on function and temperature, the product model. It may not be you can set the cooking time for 30 minutes by touching available on your product.)
-
Page 29: Settings
Instructions and Installation When the cooking start time The cooking time increases by comes, the selected function is 1 minute in the first 15 minutes, activated and the oven heats after 15 minutes it increases by 5 minutes. up to the set temperature. The set cooking time starts to count »... - Page 30 Built Under Double Oven LAM4408 For example, you can use the alarm clock when you want to turn the food in the oven at a certain time. As soon as the time you set has expired, the clock gives you an audible warning.
- Page 31 Instructions and Installation Turning off the alarm Setting the display brightness 1. At the end of the alarm period, 1. Touch the key until symbol the warning audio for two appears on the display. minutes. Touch any key to stop the warning audio.
- Page 32 Built Under Double Oven LAM4408 3. Touch key to activate the minute field. 4. Set the minute of day by touching the keys. 5. Confirm the setting by touching key. » The time of day is set and symbol disappears on the screen.
-
Page 33: Cooking Times Table
Instructions and Installation Cooking times table Baking and roasting The timings in this chart are meant as a guide. Timings may 1st rack of the oven is the vary due to temperature of bottom rack. food, thickness, type and your own preference of cooking. -
Page 34: How To Operate The Top Oven
Built Under Double Oven LAM4408 Tips for baking cake Tips for cooking vegetables • If the cake is too dry, increase • If the vegetable dish runs out of the temperature by 10°C and juice and gets too dry, cook it decrease the cooking time. -
Page 35: Cooking Times Table
Instructions and Installation Switching off the electric oven Maximum load capacity of oven tray: 4kg (8.8lb). Turn the Function knob and 1st rack of the oven is the thermostat knob to ‘OFF’ bottom rack. (upper) position. • Do not place cookware with While cooking is in progress, rough bases on the oven door. -
Page 36: How To Operate The Top Grill
Built Under Double Oven LAM4408 How to operate the top grill • Food and plates placed onto the floor of grill compartment will Close oven door during grilling. get heated when the main oven Hot surfaces may cause burns! is in use. Do not switch on the grill... -
Page 37: Top Oven Cooking Times Table For Grilling With Electric Grill
Instructions and Installation Top oven cooking times table for grilling with electric grill 1st rack of the oven is the bottom rack. Insertion Recommended Cooking time Food level temperature (ºC) (approx. in min.) Fish 20 - 25 Sliced chicken 25 - 35 Lamb chops 20 - 25 Roast beef... -
Page 38: Maintenance And Care
Built Under Double Oven LAM4408 7. Maintenance and care General cleaning cleaning and immediately clean any food splashing information around during cooking. General warnings • Do not wash any component of your appliance in a dishwasher. • Wait for the product to cool before cleaning the product. - Page 39 Instructions and Installation • You may use the Quick&Shine • If there is residual detergent cleaning agents for the oven after cleaning, wipe it with cold interiors and grills and non- water and dry with a clean and scratching scouring wire, dry microfibre cloth.
-
Page 40: Cleaning The Accessories
Built Under Double Oven LAM4408 Cleaning the accessories or catalytic walls. It varies by model. If there is a catalytic wall, refer to Unless otherwise stated in the user the “Catalytic walls” section for manual, do not wash the product information. - Page 41 Instructions and Installation You can remove your oven door and door glasses to clean them. How to remove the doors and windows is explained in the sections “Removing the oven door” and “Removing the inner glasses of the door”. After removing the door inner glasses, clean them using a dishwashing detergent, warm water and a...
-
Page 42: Removing The Inner Glass Door
Built Under Double Oven LAM4408 Removing the inner 4. If your product is equipped with an inner glass panel; repeat the glass door same procedure to remove the The entire inner glass panel of inner glass panel the oven door can be removed 5. -
Page 43: Replacing The Oven Lamp
Instructions and Installation Replacing the oven lamp 3. If your oven lamp is type shown in the figure below, General warnings rotate the oven lamp as shown in the figure and replace it • To avoid the risk of an electric with a new one. -
Page 44: Troubleshooting
Built Under Double Oven LAM4408 8. Troubleshooting Consult the Authorised Service Agent or technician with license or the dealer where you have purchased the product if you cannot remedy the trouble although you have implemented the instructions in this section. Never attempt to repair a defective product yourself. -
Page 45: Your Guarantee
• Your full contact details. Call the Depot number on your Proof of Purchase Document supplied with the product/kitchen. Call the LAMONA Service Line on: Within the UK: 0344 460 0006 Within Republic of Ireland: 01525 5703 • Product installed within a domestic kitchen or a non-domestic kitchen where 8 or fewer people are using the appliance. - Page 46 Built Under Double Oven LAM4408 Notes _____________________________________________________________________ _____________________________________________________________________ _____________________________________________________________________ _____________________________________________________________________ _____________________________________________________________________ _____________________________________________________________________ _____________________________________________________________________ _____________________________________________________________________ _____________________________________________________________________ _____________________________________________________________________ _____________________________________________________________________ _____________________________________________________________________ _____________________________________________________________________ _____________________________________________________________________ _____________________________________________________________________ _____________________________________________________________________ _____________________________________________________________________ _____________________________________________________________________ www.howdens.com...
- Page 47 Instructions and Installation Notes _____________________________________________________________________ _____________________________________________________________________ _____________________________________________________________________ _____________________________________________________________________ _____________________________________________________________________ _____________________________________________________________________ _____________________________________________________________________ _____________________________________________________________________ _____________________________________________________________________ _____________________________________________________________________ _____________________________________________________________________ _____________________________________________________________________ _____________________________________________________________________ _____________________________________________________________________ _____________________________________________________________________ _____________________________________________________________________ _____________________________________________________________________ _____________________________________________________________________...
- Page 48 Product serial number (Place sticker here) REPRISE À DÉPOSER À DÉPOSER À LA LIVRAISON EN MAGASIN EN DÉCHÈTERIE Cet appareil se recycle Howden Joinery Ltd, Thorpe Road, Howden, East Yorkshire, DN14 7PA Imported in EU by: Houdan Cuisines SAS, Z.A. du Bois Rigault Nord, 1Rue Calmette, 62880 Vendin-le-Vieil, Cedex, France.
Need help?
Do you have a question about the LAM4408 and is the answer not in the manual?
Questions and answers