Table of Contents
Advertisement
Quick Links
All electrical appliances produced by the Company are guaranteed for one year against faulty materials or
workmanship. This applies only if the appliance has been used for purposes in accordance with the instructions
provided and has not been connected to an unsuitable electricity supply, or subject to misuse, neglect, damage
or modified or repaired by any person not authorised by us. This guarantee is offered to you as an extra benefit and
does not affect your legal rights.
The correct electricity supply voltage is shown on the rating label attached to the appliance.
Reasonable care has been taken to ensure that this guide is accurate at the time of printing. In the interests of
progress the Company reserve the right to vary specifications from time to time without notice.
C
H
USTOMER
ELPLINE
Should you need any advice on the use of your new Consort product please contact our Helpline:
Tel: 01646 692172 Fax: 01646 695195 Email: technical@consortepl.com Web: www.consortepl.com
13984168 Iss 01
1
HRXSL
Installation & Control Guide for HRXSL
Wireless Controller
Consort Equipment Products Limited
Thornton Industrial Estate, Milford Haven, Pembrokeshire, SA73 2RT
Operation hours: Mon to Thu 8.30am to 4.30pm | Fri 8.30am to 3.30pm
BS EN ISO 9001 Registered Company No FM12671
C
ONTROLLER
Advertisement
Table of Contents

Related Manuals for Consort HRXSL


Summary of Contents for Consort HRXSL
- Page 1 Company reserve the right to vary specifications from time to time without notice. USTOMER ELPLINE Should you need any advice on the use of your new Consort product please contact our Helpline: Consort Equipment Products Limited Thornton Industrial Estate, Milford Haven, Pembrokeshire, SA73 2RT Tel: 01646 692172 Fax: 01646 695195 Email: technical@consortepl.com Web: www.consortepl.com...
-
Page 2: Wireless Controller
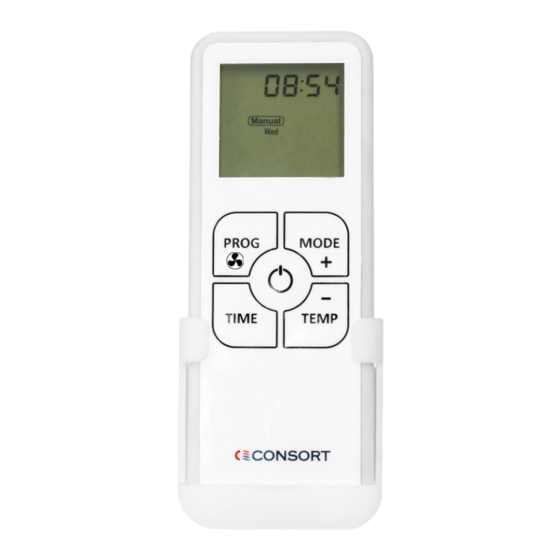
4 seconds the heating will turn off. • The appliance is now ready to be used. Basic operation The HRXSL also has a STANDBY MODE. To enter/exit this mode, press the standby button. In STANDBY MODE, the heating will not be activated and the display will be blank. -
Page 3: Manual Control Mode
Auto mode Next, use the + and - buttons to change the tem- In this mode, the HRXSL will follow the week’s time / perature. Once the temperature is set, you can leave the display to return to the main screen and temperature program. - Page 4 Heat symbol Displaying the time/temperature Every time there is a demand for heat, the display The HRXSL can display either the time & day or the will show the heat icon. room temperature when in one of the 4 standard op- erating modes.
- Page 5 Setting the automatic program schedule An example of one day program on HRXSL PROGRAM 1 PROGRAM 2 PROGRAM 5 PROGRAM 6 PROGRAM PROGRAM ºC 19ºC 22ºC 22ºC 16ºC 10ºC 4ºC 06:00 08:00 12:00 14:00 16:00 22:00 Logic diagram for setting program on HRXSL Step 4: Press the PROG button.
- Page 6 Step 2: Press and hold TIME for 5 seconds to enter the copy day setting. The HRXSL has a 7-day, 5-day 2-day and a 24 hour timer available. This can be chosen in the setup menu. Up to 6 programming steps are available for each day. In the programming you can set a start time and a temperature for each program.
-
Page 7: Setup Menu
Setup menu 9 - Closed window detection time Press and hold TEMP and MODE together for 5 seconds. The display will enter the setup menu. Use + and - to change a value. Use TIME to scroll between the settings. A - Temperature rise in closed Use PROG to exit the setup menu window detection time... -
Page 8: Mounting The Controller
When using the HRXSL for temperature control, a suitable position in the room should be chosen. Avoid areas with draught or direct sun. Do not position HRXSL above or close to the heaters or other heat sources. Damp areas or areas where HRXSL can be mechanically damaged should also be avoided. -
Page 9: Declaration Of Conformity
BSEN55014 (2006) • BSEN301 489.1 & .3 • BSEN300 220.1 & .2 • BSEN60 730.2.9 • BSEN 60335.1 (2012 ) • BS EN 60335.2.30 (2009) • HRXSL UMBER ESCRIPTION PPLIANCE ESPONSIBLE ERSON RIFFITHS OSITION RODUCTION AND UALITY ANAGER 24/04/23 ONSORT...
Need help?
Do you have a question about the HRXSL and is the answer not in the manual?
Questions and answers