
Related Manuals for Planet WDAP-3000AX


Summary of Contents for Planet WDAP-3000AX
- Page 1 Dual Band 802.11ax 3000Mbps Outdoor Wireless AP WDAP-3000AX Quick Installation Guide...
-
Page 2: Table Of Contents
3. Hardware Installation ................6 4. Connecting the AP (for Windows OS) ............. 8 5. Wired Network Configuration (Windows 10 and Windows 11) ....9 6. Entering into the Web Management ............. 10 7. Wireless Network Connection ............... 11 8. AP Discovery through PLANET NMS Controller (NMS-500/NMS-1000V) ..12 9. PLANET CloudViewer/CloudViewerPro App (Android & iOS) ..... 14 Further Information: ................16... -
Page 3: Package Contents
1. Package Contents Thank you for choosing PLANET Outdoor Wireless AP. Before installing, please verify the contents inside the package box. The device mentioned herein is the brief name of the "Outdoor Wireless AP". The WDAP-3000AX should contain the following items in the package: WDAP-3000AX QR Code Sheet x 1 RJ45 Waterproof Kit x 1 Let’s get started with your PLANET product WDAP-3000AX Please scan the QR code to browse our online User’s Manual or Quick Installation Guide and follow the instructions to complete the setup. - Page 4 IMPORTANT SAFETY PRECAUTIONS: 1) LIVES MAY BE AT RISK! Please be aware of the elec- trical wires around. Carefully read the section "OUTDOOR INSTALLATION WARNING" in the manual before installa- tion. 2) Users MUST complete grounding wired with the device; otherwise, a sudden lightning could cause fatal damage to the device.
-
Page 5: Physical Introduction
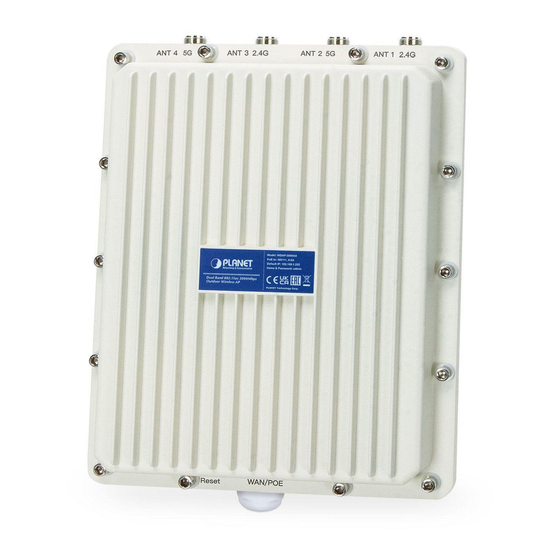
2. Physical Introduction Front Panel 5GHz N-type (F) Antenna Connectors 2.4GHz N-type (F) Antenna Connectors WAN/PoE Port Ground Terminal... -
Page 6: Hardware Installation
3. Hardware Installation Step 1: 1. Install the backplane to the back of the AP. 2 Attach the L-type bracket to the backplane and fasten it. 3 Place the AP to the pole and fasten it with the U-bolt kit. The AP can be mounted on the pole with a diameter of up to 2”. L-type Bracket U-bolt Kit U-bolt Dimensions... - Page 7 Step 2: 1. Attach the surge arrestors to each antenna connector. 2. Attach the antenna equipped with N-type (M) connector to each surge arrestor. Otherwise, connect the antenna through the N-male (male pin) to N-male (male pin) cable. 3. Plug the RJ45 Ethernet cable into the PoE port of the AP through the water- proof kit, and plug the other side of the RJ45 cable into the PoE port of the PoE switch to finish the installation.
-
Page 8: Connecting The Ap (For Windows Os)
4. Connecting the AP (for Windows OS) As the default setting of connection type of WDAP-3000AX is DHCP, your computer’s IP address has to be the same network segment as the wireless AP. To find the IP address of the AP, use the utility of “Smart Discovery Lite”, which can be found on PLANET official website. -
Page 9: Wired Network Configuration (Windows 10 And Windows 11)
7. Select “Use the following IP address” and then click the “OK” button twice to save the configuration. For example, the default IP address of the WDAP-3000AX is 192.168.1.253 and the router is 192.168.1.254. You may choose from 192.168.1.1 to 192.168.1.252. -
Page 10: Entering Into The Web Management
6. Entering into the Web Management Default IP Address: 192.168.1.253 (The default IP address will be 192.168.1.253 if there is no DHCP server in the local network.) Default Username: admin Default Password: admin Default SSID (2.4GHz): PLANET_2.4G Default SSID (5GHz): PLANET_5G Step 1: The Web management allows you to access and manage the wireless AP easily. -
Page 11: Wireless Network Connection
Step 1: Right-click on the network icon displayed in the system tray. Step 2: Highlight the wireless network (SSID) to connect and click the [Connect] button. Step 3: Enter the encryption key of the WDAP-3000AX if necessary. You have already finished the configuration of the WDAP-3000AX. Now you can use your smart phone, tablet, laptop, or any other Wi-Fi device to connect with it wirelessly and start surfing the internet. -
Page 12: Ap Discovery Through Planet Nms Controller (Nms-500/Nms-1000V)
8. AP Discovery through PLANET NMS Controller (NMS-500/NMS-1000V) The WDAP-3000AX is the Smart AP series which can be centrally managed by PLANET NMS Controller. Follow the steps below to discover the managed AP through PLANET NMS controller (NMS-500/NMS-1000V). Please ensure each managed AP uses a different static IP in the same subnet before physically connecting to the managed network. - Page 13 Step 2: Go to the “Domain” page to discover and add the managed AP to the device list. Then, you can go to the “AP Control-> AP Management” page to configure profiles to the managed AP without logging on to the AP’s web page. For information about further configuration of Managed AP by using PLANET Smart AP Control, refer to the configuration guide of the NMS controller (NMS- 500/NMS-1000V).
-
Page 14: Planet Cloudviewer/Cloudviewerpro App (Android & Ios)
9. PLANET CloudViewer/CloudViewerPro App (Android & iOS) The WDAP-3000AX is the Smart AP series which can be monitored by PLANET CloudViewer/CloudViewerPro app. Step 1: Download PLANET CloudViewer/CloudViewerPro app Get PLANET CloudViewer/CloudViewerPro app from the Apple App Store or Google play, or simply scan the QR code. Step 2: Register Launch PLANET CloudViewer/CloudViewerPro app and log in with your PLANET CloudViewer/CloudViewerPro app. If you don’t have an... - Page 15 Step 3: Bind Devices 1. Log in and go to the device NMS page 2. Select and enable PLANET CloudViewer Server – Internet function 3. Fill in PLANET CloudViewer account (e-mail address) and password. If CloudViewer server is connected, the connection status will show success. If the server fails to connect, the connection status will show authentication failed.
-
Page 16: Further Information
: / / w w w . p l a n e t . c o m . t w / e n / s u p p o r t / d o w n l o a d . php?&method=keyword&keyword=WDAP-3000AX&view=3#list PLANET Network Management Solution (NMS): https://www.planet.com.tw/en/products/network-management If you have further questions, please contact the local dealer or distributor where you purchased this product.
Need help?
Do you have a question about the WDAP-3000AX and is the answer not in the manual?
Questions and answers