Table of Contents
Advertisement
Quick Links
Advertisement
Table of Contents

Related Manuals for Perfect Prime AQ380


Summary of Contents for Perfect Prime AQ380
- Page 1 MULTI IAQ MONITOR AQ380 Instruction Manual...
-
Page 2: Table Of Contents
CONTENTS 1. APPLICATION ................ 2 2. ACCESSORIES ................ 2 ............. 3 3. SAFETY PRECAUTION 4. INSTRUMENT DESCRIPTION 4.1 FEATURE AND FUNCTION ............. 4 4.2 INDICATION ON THE LCD DISPLAY .......... 5 5. OPERATION ..............6 - 13 6. GENERAL SPECIFICATIONS .......... -
Page 3: Application
1. APPLICATION 2. ACCESSORIES 1. APPLICATION This air quality meter can measure and display CO2, PM2.5, Humidity and Temperature measurements and is ideal for monitoring indoor air quality in a variety of environments. 2. ACCESSORIES 1 Meter (with a 3.7V Rechargeable lithium battery) 1 User’s Manual 1 Micro USB cable... -
Page 4: Safety Precaution
3. SAFETY PRECAUTION Caution! Please refer to this manual. Improper use may damage the meter and its components. Complies with European Directive. Do not operate in environments with ammable gas or humid • environments. Operating altitude: up to 2000M. • Operating environment: Indoor use;... -
Page 5: Instrument Description
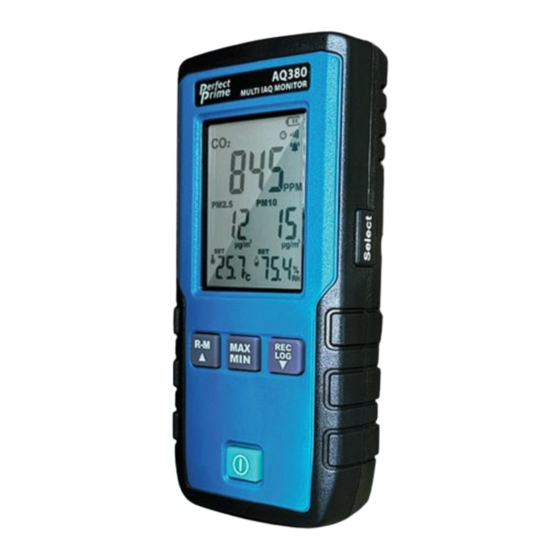
4. INSTRUMENT DESCRIPTION 4.1 FEATURE AND FUNCTION Temperature and humidity sensing port Right-side button Air outlet for sensor Memory reading / Up button Air inlet for sensor MAX / MIN / AVG button Micro USB jack Power button Single log and auto-record button/Down button... -
Page 6: Indication On The Lcd Display
4. INSTRUMENT DESCRIPTION 4.2 INDICATION ON THE LCD DISPLAY Alarm MAX / MIN /AVG /MAN MIN Manual recording Auto-recording PM2.5 Read record Temperature Battery indicator MM minute, SS second Auto-power o PM10 Buzzer Humidity... -
Page 7: Operation
5. OPERATION Please hold the meter in the following way for the correct measured value: The placement follows the This is a suitable way to hold the electrical speci cations described meter, holding for a long time in Section 7. may a ect the accuracy. - Page 8 5. OPERATION 5.1 Power on/off Press to turn the power on or o . 5.2 Auto Power Off At the power-on status, press and hold for more than 2 seconds to disable or resume auto power o function. When auto power o is activated, the indicator appearing, and it will automatically turn o after 30 minutes.
- Page 9 5. OPERATION 5.6 LOG starts the auto-recording function Press and hold for more than 2 seconds, “LOG” appears on the LCD, and auto-recording starts. If the power is insu cient during auto-record- ing, appearing, auto-recording will be forcibly stopped. When reaching themaximum log number 20, appears.
- Page 10 5. OPERATION 5.10 Turn on / off the key sound The sound is defaulted as on and the is displayed. At the shutdown status, press and hold and then press to turn on the meter, after the software version appears, release and the disappears, the key sound is o .
- Page 11 5. OPERATION SET 1. Time interval setting The LCD displays: Press to select the interval 5 seconds / 10 seconds / 5 minutes / 10 minutes / 20 minutes / 30 minutes / 60 minutes; the default value is 5 seconds. Press the “right-side button”...
- Page 12 5. OPERATION SET 3. PM2.5 alarm setting The LCD displays: Press to move the digit, and the selected digit will ash. Press to increase or decrease the CO2 value. Press the “right-side button” again to enter SET 4. PM10 alarm setting The LCD displays: Press to move the digit, and the selected digit will ash.
- Page 13 5. OPERATION SET 5. (Factory use only) CO Abc self-calibration mode The LCD displays: This is for factory calibration use only. Please do not change it. Click the “right-side button” again to enter SET 6. manual calibration The LCD displays: Directly increase or decrease the displayed value of CO2, press to move the digit, and the selected digit will ash.
- Page 14 5. OPERATION SET 7. Temperature calibration The LCD displays: Directly increase or decrease the displayed value of CO2, press to move the digit, and the selected digit will ash. Press to modify the value. Press the “right-side button” again to enter SET 8.
-
Page 15: General Specifications
6. GENERAL SPECIFICATIONS Real-time measurement of CO /PM2.5/PM10/temperature/humidity. • Maximum / minimum / average value. • Auto-power on / o function. • Adjustment and calibration function (CO2/temperature/humidity). • CO2/PM2.5/PM10 red backlight alarm. • Manual record and auto-record. • Key sound assists to ensure the operation works. •... - Page 16 6. GENERAL SPECIFICATIONS CO2 /PM2.5/PM10 red backlight alarm setting function • PM2.5 PM10 Setting value 1000PPM 35µg/m³ 75µg/m³ When the measured value reaches the setting value for alarm, the LCD backlight shines in red and related measurement items ash. 20 logs for manual and automatic recording values. •...
- Page 17 6. GENERAL SPECIFICATIONS Ambient temperature range for accurate measure: 18°C (64°F) ~ 28°C (82°F) 6.1 PM2.5 LASER PARTICULATE MATTER SENSOR SENSOR Measuring range 0-500 g/m3 ±8 g :<=50µg/m3 Accuracy ±10% of reading value:>50µg/m3 Resolution Reaction time <10seconds 6.2 PM10 LASER PARTICULATE MATTER SENSOR SENSOR Measuring range 0-500 g/m3...
- Page 18 6. GENERAL SPECIFICATIONS 6.3 CO NON DISPERSION INFRARED NDIR SENSOR Measuring range 400 to 9999ppm ±70ppm ±3% of readings. Accuracy (400-2000ppm) Resolution ±1ppm Reaction time 90% during about 2 minutes 6.4 TEMPERATURE BANDGAP TEMPERATURE SENSOR SENSOR Measuring range -10°C~50°C / 14°F~122°F ±1.0°C/±1.8°F Accuracy (Non-charging and 30 minutes after charging)
- Page 19 6. GENERAL SPECIFICATIONS 6.5 HUMIDITY CAPACITIVE HUMIDITY SENSOR SENSOR Measuring range 1-99% ±5.0%RH(10~90%); Accuracy ±8.0%RH(<10%,>90%) no condensation, at 25°C Resolution 0.1% Reaction time About 4 seconds P.18...
-
Page 20: Maintenance Or Repair
7. MAINTENANCE OR REPAIR 8. PRODUCT DISPOSAL 7. MAINTENANCE OR REPAIR For the battery-low indicator: indicates the battery full; indicates the battery low, please charge it in time. If dirty, please wipe it with a soft cloth, such as a glasses cloth. Do not wipe it with chemical solvents. - Page 21 CUSTOMER SERVICE INQUIRIES Your emails are important to us so we strive to reply all hours. In exceptional cases, inquiries and emails within we may require more time to respond. Thank you for your understanding. For more information about our products and services, please send us an email: cs@perfectprime.com For B2B or project-based application, please send an email:...
- Page 22 Tyche Smart Limited Retailer Email cs@perfectprime.com 2nd Floor, 107 Charterhouse Street, EC1M 6HW, London, Address England UNITED KINGDOM +44 203 7695377 Telephone...
Need help?
Do you have a question about the AQ380 and is the answer not in the manual?
Questions and answers