Table of Contents
Advertisement
Available languages
Available languages
Quick Links
Istruzioni per l'uso
GB
IT
English, 15
Italiano, 1
Nederlands, 43
LSB 7M121
Sommario
FR
Français, 29
Installazione, 4-5
Caricare i cesti, 7-8
Regolazione cesto superiore
Programmi, 10
Tabella dei programmi
Escludere acqua e corrente elettrica
Pulire la lavastoviglie
Evitare i cattivi odori
Pulire gli irroratori
Pulizia filtro entrata acqua
LAVASTOVIGLIE
Advertisement
Chapters
Table of Contents

Related Manuals for Hotpoint Ariston LSB 7M121


Summary of Contents for Hotpoint Ariston LSB 7M121
-
Page 1: Table Of Contents
Collegamenti idraulici ed elettrici Dati tecnici Avvertenze per il primo lavaggio Assistenza Descrizione dell’apparecchio, 6 Vista d’insieme Pannello comandi LSB 7M121 Caricare i cesti, 7-8 Cesto inferiore Cesto superiore Cestino delle posate Vassoio portaposate Regolazione cesto superiore Avvio e utilizzo, 9... -
Page 2: Scheda Prodotto
Scheda prodotto Scheda prodotto HOTPOINT ARISTON Marchio LSB 7M121 Modello Capacità nominale in numero di coperti standard (1) Classe di efficienza energetica su una scala da A+++ (bassi consumi) a D (alti consumi) 265.0 Consumo energetico annuo in kWh (2) 0.93... -
Page 3: Precauzioni E Consigli
Precauzioni e consigli Smaltimento L’apparecchio è stato progettato e costruito • Smaltimento del materiale di imballaggio: in conformità alle norme internazionali di sicurezza. attenersi alle norme locali, così gli imballaggi Queste avvertenze sono fornite per ragioni di potranno essere riutilizzati. sicurezza e devono essere lette attentamente. -
Page 4: Installazione
Installazione e Assistenza Collegamento del tubo di scarico dell’acqua In caso di trasloco tenere l’apparecchio in posizione Collegare il tubo di scarico, senza piegarlo, a una conduttura verticale; se fosse necessario, inclinarlo sul lato posteriore. di scarico con diametro minimo di 4 cm. Posizionamento e livellamento Il tubo di scarico deve essere ad un’altezza compresa tra 40 e 80 cm. dal pavimento o piano d’appoggio della lavastoviglie (A). 1. Disimballare l’apparecchio e controllare che non abbia subìto danni durante il trasporto. Se fosse danneggiato non collegarlo e contattare il rivenditore. -
Page 5: Dati Tecnici
Assistenza Striscia anticondensa Dopo aver incassato la lavastoviglie aprire la porta e incollare la striscia adesiva trasparente sotto al ripiano in legno per proteggerlo dalla eventuale condensa. Prima di contattare l’Assistenza: (vedi • Verificare se l’anomalia può essere risolta da soli Anomalie e Rimedi) Dati Tecnici • Riavviare il programma per controllare se l’inconveniente Larghezza cm. 59,5 è stato ovviato. Dimensioni Altezza cm. 82 • In caso negativo, contattare il Servizio Assistenza Profondità... -
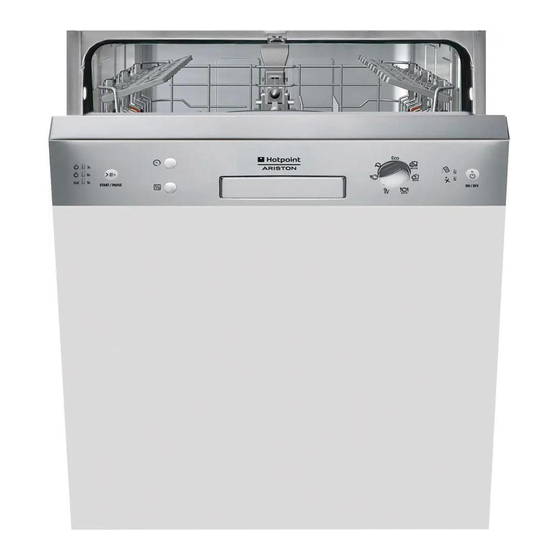
Page 6: Descrizione Dell'apparecchio
Descrizione dell’apparecchio Vista d’insieme Cestello superiore Irroratore superiore Ribaltine Regolatore altezza cestello Cestello inferiore Irroratore inferiore Filtro lavaggio Serbatoio sale Vaschetta detersivo, serbatoio brillantante e dispositivo Active Oxigen 10. Targhetta caratteristiche Pannello comandi Pannello comandi Tasto e Spia Avvio/Pausa Spia Asciugatura e Spia Sale Partenza ritardata 6h. Tasto e Spia Manopola Tasto/Spia... -
Page 7: Caricare I Cesti
Caricare i cesti Suggerimenti Alcuni modelli di lavastoviglie, dispongono di settori reclinabili Prima di caricare i cesti, eliminare dalle stoviglie i residui di gli stessi si possono usare in posizione verticale per la cibo e vuotare bicchieri e i contenitori dei liquidi rimasti. Non è sistemazione dei piatti oppure in posizione orizzontale necessario un risciacquo preventivo sotto acqua corrente. -
Page 8: Vassoio Portaposate
Ribaltine a posizione variabile Il cesto superiore è regolabile in altezza a seconda della Le ribaltine laterali sono posizionabili su tre altezze differenti per necessità: in posizione alta quando nel cesto inferiore si vogliono ottimizzare la disposizione delle stoviglie nello spazio del cesto. sistemare stoviglie ingombranti;... -
Page 9: Avvio E Utilizzo
Avvio e utilizzo Avviare la lavastoviglie Caricare il detersivo Il buon risultato del lavaggio dipende anche dal 1. Aprire il rubinetto dell’acqua. corretto dosaggio del detersivo, eccedendo non si lava 2. Premere il tasto ON-OFF: in modo più efficace e si inquina l’ambiente. 3. Aprire la porta e dosare il detersivo. 4. Caricare i cestelli (vedi Caricare i cesti) e chiudere la porta. A seconda del grado di sporco, il dosaggio può... -
Page 10: Programmi
Programmi I dati dei programmi sono misurati in condizioni di laboratorio secondo Norma europea EN 50242. A seconda delle diverse condizioni di utilizzo, la durata e i dati dei programmi possono variare. Il numero e il tipo di programmi ed opzioni variano in base al modello di lavastoviglie. Consumo Durata dei Consumo Programma Asciugatura Opzioni energia programmi... -
Page 11: Programmi Speciali Ed Opzioni
Programmi speciali ed Opzioni Note: Mezzo carico le migliori prestazioni dei programmi “Fast ed Express 40’”, Se le stoviglie sono poche, si può effettuare il mezzo si ottengono preferibilmente rispettando il numero di coperti carico risparmiando acqua, energia e detersivo. Selezionare specificati. il programma, premere il tasto MEZZO CARICO: la spia si illumina. Per consumare di meno usa la lavastoviglie a pieno carico. Un’ulteriore pressione del tasto MEZZO CARICO deseleziona Nota per i laboratori di Prove: per informazioni sulle condizioni l’opzione. -
Page 12: Brillantante E Sale Rigenerante
Brillantante e sale rigenerante erogatore dell’acqua potabile. Usare solo prodotti specifici per lavastoviglie. Accendere e spegnere la lavastoviglie con il tasto ON/OFF. Non usare sale alimentare o industriale nè detersivi per il Tenere premuto il tasto Start/Pausa per alcuni secondi fino al lavaggio a mano. segnale acustico . Accendere la lavastoviglie con il tasto ON/ Seguire le indicazioni riportate sulla confezione. -
Page 13: Manutenzione E Cura
Manutenzione e cura Pulire i filtri Il gruppo filtrante è formato da tre filtri che puliscono l’acqua di lavaggio dai residui di cibo e la rimettono in circolo: per avere buoni risultati di lavaggio è necessario pulirli. Pulire i filtri con regolarità. La lavastoviglie non deve essere usata senza filtri o con filtro sganciato. -
Page 14: Anomalie E Rimedi
Anomalie e rimedi Può accadere che l’apparecchio non funzioni. Prima di telefonare all’Assistenza controllare che non si tratti di un problema facilmente risolvibile aiutandosi con il seguente elenco. Anomalie: Possibili cause / Soluzione: La lavastoviglie non parte o non • Spegnere la macchina con il tasto ON/OFF, riaccendere dopo un minuto circa e reimpostare il programma. risponde ai comandi •... -
Page 15: English
Connecting the water and electricity supplies Advice regarding the first wash cycle Technical data Assistance Description of the appliance, 20 Overall view Control panel LSB 7M121 Loading the racks, 21-22 Lower rack Cutlery basket Upper rack Start-up and use, 23 Starting the dishwasher... -
Page 16: Product Fiche
Product Fiche Product Fiche HOTPOINT ARISTON Brand LSB 7M121 Model Rated capacity in standard place settings (1) Energy efficiency class on a scale from A+++ (low consumption) to D (high consumption) 265.0 Energy consumption per year in kWh (2) 0.93... -
Page 17: Precautions And Advice
Precautions and advice Disposal This appliance was designed and manufactured • Disposal of packaging material: observe local in compliance with international safety standards legislation so that the packaging may be reused. The following information has been provided for • The European Directive 2012/19/EU relating safety reasons and should therefore be read to Waste Electrical and Electronic Equipment carefully. -
Page 18: Installation And Assistance
Installation Connecting the water inlet hose Keep this instruction manual in a safe place for future • To a suitable cold water connection point: before attaching reference. If the appliance is sold, given away or moved, the hose, run the water until it is perfectly clear so that any please ensure the manual is kept with the machine, so that impurities that may be present in the water do not clog the the new owner may benefit from the advice contained within... -
Page 19: Advice Regarding The First Wash Cycle
Anti-condensation strip Electrical connection After installing the dishwasher, open the door and stick the Before inserting the plug into the electrical socket, make adhesive transparent strip under the wooden shelf in order sure that: to protect it from any condensation which may form. • The socket is earthed and complies with current regulations. -
Page 20: Description Of The Appliance
Description of the appliance Overall view Upper rack Upper sprayer arm Tip-up dispensers Rack height adjuster Lower rack Lower sprayer arm Washing filter Salt dispenser Detergent dispenser, rinse-aid dispenser and Active Oxygen device Data plate Control panel Control panel Start/Pause button and Salt indicator Indicator light Drying indicator light light... -
Page 21: Loading The Racks
Loading the racks Tips Several dishwasher models are fitted with tip-up sectors Before loading the racks, remove all food residues from the They can be used in a vertical position when arranging dishes crockery and empty liquids from glasses and containers. No or in a horizontal position (lower) to load pans and salad bowls preventive rinsing is needed under running water. - Page 22 Tip-up compartments with adjustable position The upper rack can be adjusted for height based on requirements: high position to place bulky crockery in the lower rack and low The side tip-up compartments can be positioned at three different heights to optimize the arrangement of crockery inside position to make the most of the tip-up compartments/sectors by creating more space upwards. the rack. Wine glasses can be placed safely in the tip-up compartments by inserting the stem of each glass into the corresponding slots. Adjusting the height of the upper rack In order to make it easier to arrange the crockery, the upper rack may be moved to a higher or lower position.
-
Page 23: Start-Up And Use
Start-up and use Measuring out the detergent Starting the dishwasher A good wash result also depends on the correct 1. Turn the water tap on. amount of detergent being used. Exceeding the stated 2. Press the ON/OFF button: amount does not result in a more effective wash and 3. Open the door and pour in a suitable amount of detergent. increases environmental pollution. -
Page 24: Wash Cycles
Wash cycles Wash-cycle data is measured under laboratory conditions according to European Standard EN 50242. Based on the different conditions of use, the wash-cycle duration and data can change. The number and type of wash cycles and options may vary depending on the dishwasher model. Wash cycle Approximate Water Energy which Wash cycle Options duration of wash consumption... -
Page 25: Special Wash Cycles And Options
Special wash cycles and Options Notes: Optimum performance levels when using the “Fast" and "Express Half load 40’” cycles can be achieved by respecting the specified number If there are not many dishes to be washed, a half load cycle of place settings. may be used in order to save water, electricity and detergent. Select the wash cycle and press the HALF LOAD button; the To reduce consumption even further, only run the dishwasher indicator light will go on. -
Page 26: Rinse Aid And Refined Salt
Rinse aid and refined salt Switch the dishwasher on and off using the ON/OFF button. Only use products which have been specifically designed Press and hold down the Start/Pause button for a few seconds for dishwashers. until you hear a beep . -
Page 27: Care And Maintenance
Care and maintenance Cleaning the filters The filter assembly consists of three filters which remove food residues from the washing water and then recirculate the water. They should be cleaned if you wish to achieve the best results in every wash. Clean the filters regularly. -
Page 28: Troubleshooting
Troubleshooting Your dishwasher may not work properly. Before contacting the Service Centre check if the problem can be solved by going through the following list. Problem: Possible causes / Solutions: • Switch off the appliance by pressing the ON/OFF button. Switch it back The dishwasher cannot be started or on after approximately one minute and reset the program. controlled. •... -
Page 29: Français
Raccordements eau et électricité Caractéristiques techniques Conseils pour le premier lavage Service Description de l’appareil, 34 Vue d’ensemble Tableau de bord LSB 7M121 Charger les paniers, 35-36 Panier inférieur Panier supérieur Panier à couverts Plateau range-couverts Réglage du panier supérieur... -
Page 30: Fiche De Produit
Fiche de produit Fiche de produit HOTPOINT ARISTON Marque LSB 7M121 Modèle Capacité nominale dans un environnement standard (1) Classe énergétique sur une échelle de A+++ (faible consommation) à D (consommation élevée) 265.0 Consommation d''énergie par année en kWh (2) 0.93... -
Page 31: Précautions Et Conseils
Précautions et conseils Mise au rebut Cet appareil a été conçu et fabriqué conformément • Mise au rebut du matériel d’emballage : se aux normes internationales de sécurité. Ces consignes conformer aux réglementations locales de manière sont fournies pour des raisons de sécurité, il faut les à ce que les emballages puissent être recyclés. -
Page 32: Installation
Installation Raccord du tuyau d’amenée de l’eau Conserver ce mode d’emploi pour pouvoir le consulter à • A une prise d’eau froide: bien visser le tuyau d’amenée à tout moment. En cas de vente, de cession ou de déménagement, un robinet à embout fileté 3/4 gaz; avant de visser, faire s’assurer qu’il accompagne bien l’appareil. -
Page 33: Caractéristiques Techniques
Raccordement électrique Ruban anti-condensation Avant de brancher la fiche dans la prise de courant, s’assurer Après avoir encastré le lave-vaisselle, ouvrir la porte et coller le que: ruban adhésif transparent sous le plan en bois pour le protéger contre la formation de condensation. • la prise dispose de mise à la terre et est conforme aux normes; • la prise est bien apte à supporter la puissance maximale Conseils pour le premier lavage de l’appareil reportée sur la plaque signalétique fixée à... -
Page 34: Description De L'appareil
Description de l’appareil Vue d’ensemble Panier supérieur Bras de lavage supérieur Clayettes rabattables Réglage hauteur du panier Panier inférieur Bras de lavage inférieur Filtre lavage Réservoir à sel Bacs à produit de lavage, réservoir à produit de rinçage et dispositif Oxygène Actif Plaque signalétique Bandeau de commandes Tableau de bord Touche et voyant Marche/ Voyant séchage et... -
Page 35: Charger Les Paniers
Charger les paniers Conseils Certains modèles de lave-vaisselle sont pourvus de secteurs Avant de charger les paniers, débarrasser la vaisselle des rabattables , qui peuvent être utilisés en position verticale pour déchets plus importants et vider les verres et autres récipients. accueillir les assiettes ou en position horizontale (abaissés) pour Pas besoin de rincer préalablement à l'eau courante. pouvoir charger plus facilement les casseroles et les saladiers. -
Page 36: Plateau Range-Couverts
Clayettes rabattables à inclinaison variable Le panier supérieur est réglable en hauteur selon les besoins : en Les clayettes latérales peuvent être placées à trois hauteurs position haute, il permet de ranger de la vaisselle encombrante différentes afin d’optimiser la disposition de la vaisselle dans dans le panier inférieur ; en position basse, il permet d'exploiter le panier. -
Page 37: Mise En Marche Et Utilisation
Mise en marche et utilisation Mettre en marche le lave-vaisselle Charger le produit de lavage 1. Ouvrir l’arrivée d’eau. Un bon résultat de lavage dépend aussi d’un bon dosage du produit de lavage. Un excès de produit de 2. Appuyer sur la touche ON-OFF : lavage ne lave pas mieux et pollue l’environnement. 3. -
Page 38: Programmes
Programmes Les données des programmes sont mesurées dans des conditions de laboratoire selon la norme européenne EN 50242. Selon les différentes conditions d’utilisation, la durée et les données des programmes peuvent être différentes. Le nombre ainsi que les types de programmes et d’options varient selon le modèle de lave-vaisselle. Consommation Consomation Durée du Programme Séchage Options d’eau (litre/ d’énergie (KWh/ programme... -
Page 39: Programmes Spéciaux Et Options
Programmes spéciaux et Options Remarque : Demi-charge pour obtenir des performances optimales avec les programmes « Fast et Express 40' » il est conseillé de respecter le nombre Le programme demi-charge permet de laver une petite de couverts indiqué. vaisselle et de faire des économies d’eau, d’électricité et de produit de lavage. Pour sélectionner le programme, appuyer Pour consommer moins, utiliser le lave-vaisselle pleine charge. -
Page 40: Produit De Rinçage Et Sel Régénérant
Produit de rinçage et sel régénérant Appuyer sur la touche ON/OFF pour allumer et éteindre le N’utiliser que des produits de lavage spéciaux lave- lave-vaisselle. Garder la touche Marche/Pause enfoncée vaisselle. pendant quelques secondes jusqu’au signal sonore . Allumer Ne pas utiliser de sel alimentaire ou industriel ni de produits le lave-vaisselle à... -
Page 41: Entretien Et Soin
Entretien et soin Nettoyer les filtres Les trois filtres qui composent le groupe filtrant débarrassent l’eau de lavage des résidus d’aliments avant de la remettre en circulation : pour obtenir de bons résultats de lavage, il faut les nettoyer. Nettoyer les filtres régulièrement. Ne pas utiliser le lave-vaisselle sans filtres ou avec filtre mal fixé. -
Page 42: Anomalies Et Remèdes
Anomalies et remèdes Il peut arriver que l’appareil ne fonctionne pas bien. Avant d’appeler le Service de dépannage, contrôler s’il ne s'agit pas par hasard d’un problème facile à résoudre à l’aide de la liste suivante. Anomalies : Causes / Solutions possibles : • Eteindre l’appareil à l'aide de la touche ON-OFF, rallumer au bout d’une minute environ Le lave-vaisselle ne démarre pas ou et sélectionner à... - Page 43 Plaatsing en waterpas zetten Hydraulische en elektrische aansluitingen Aanwijzingen voor de eerste afwascyclus Technische gegevens Service Beschrijving van het apparaat, 48 Aanzichttekening LSB 7M121 Bedieningspaneel Het laden van de rekken, 49-50 Onderrek Bestekkorf Bovenrek Het regelen van de hoogte van het bovenrek...
-
Page 44: Productkaart
Productkaart Productkaart HOTPOINT ARISTON Merk LSB 7M121 Model Beladingscapaciteit in standaard couverts (1) Energie-efficiëntieklasse op een schaal van A+++ (laag gebruik) tot D (hoog gebruik) 265.0 Jaarlijks energieverbruik in kWh (2) 0.93 Energieverbruik van de standaard wascyclus in kWh Energieverbruik in de off-modus in W Energieverbruik in de aan-modus in W 2520.0... -
Page 45: Voorzorgsmaatregelen En Advies
Voorzorgsmaatregelen en advies Afvalverwijdering H e t a p p a r a a t i s o n t w o r p e n e n g e b o u w d • Houd u aan de locale normen, zodat het overeenkomstig de internationale veiligheidsnormen. -
Page 46: Installatie, Service
Installatie - Service Aansluiting van de buis op de waterafvoer Als u het apparaat verplaatst moet u het verticaal houden; Verbind de afvoerbuis, zonder hem te buigen, aan een als dit niet mogelijk is moet u het naar achteren kantelen. afvoerleiding met een minimum doorsnede van 4 cm. -
Page 47: Aanwijzingen Voor De Eerste Afwascyclus
Service Anticondensstrip Nadat u de afwasautomaat heeft ingebouwd opent u de deur en plakt u de doorzichtige plakstrip onder het houten werkvlak, Voordat u de Servicedienst inschakelt: zodat u het beschermt tegen eventuele condens. • Dient u te controleren of u de storing zelf kunt oplossen (zie Storingen en Oplossingen). Aanwijzingen voor de eerste afwascyclus • Start het programma opnieuw om te controleren of Na de installatie moet u de beschermelementen op de rekken... -
Page 48: Beschrijving Van Het Apparaat
Beschrijving van het apparaat Aanzichttekening Bovenrek Bovenste sproeiarmen Opklaprekjes Regeling hoogte bovenrek Onderrek Onderste sproeiarmen Filter Zoutreservoir Wasmiddelbakje, reservoir glansspoelmiddel en Active Oxigen mechanisme Typeplaatje Bedieningspaneel Bedieningspaneel Toets en Controlelampje Start/Pauze Controlelampje Controlelampje Onthardingszout Drogen en Uitgestelde start 6h. Toets/ Toets en Controlelampje Controlelampje Wassen Knop Controlelampje... -
Page 49: Het Laden Van De Rekken
Het laden van de rekken Advies Enkele modellen vaatwasser beschikken over uitklapbare delen Voordat u de vaat inlaadt moet u overtollige etensresten deze kunnen in verticale positie worden gezet voor het plaatsen verwijderen en glazen en bekers legen. Het is niet noodzakelijk van borden, of in horizontale positie (neer), om pannen en de vaat met water af te spoelen voor u hem in de vaatwasser slakommen beter te plaatsen. -
Page 50: Het Regelen Van De Hoogte Van Het Bovenrek
Opklaprekjes met verschillende standen Het bovenrek kan naar believen in hoogte worden aangepast: naar boven toe als men in het onderrek volumineuze vaat wil De opklaprekjes aan de zijkant kunnen op drie verschillende plaatsen, naar beneden toe om goed te kunnen profiteren van hoogten worden gezet om de plaatsing van de vaat in het rek alle plek in de opklaprekjes of de uitklapbare delen, zodat er te optimaliseren. -
Page 51: Starten En Gebruik
Starten en gebruik De vaatwasser starten Het vaatwasmiddel toevoegen 1. Open de waterkraan. Een goed wasresultaat hangt ook af van een correcte 2. Druk op de ON-OFF toets: dosering van het vaatwasmiddel. Teveel vaatwasmiddel 3. Open de deur en doseer het afwasmiddel. betekent niet automatisch een efficiëntere reiniging. 4. -
Page 52: Programma's
Programma’s De gegevens van de programma’s zijn gemeten in laboratoriumomstandigheden volgens de Europese vorm EN 50242. Aan de hand van de verschillende gebruiksmogelijkheden kunnen de duur en de programmagegevens verschillen. Het aantal en het soort programma’s en opties verschilt aan de hand van het model afwasautomaat. Programma’s Duur van het Waterverbruik Energieverbruik Programma Opties programma (l/cyclus) (KWh/cyclus) -
Page 53: Speciale Programma's En Opties
Speciale programma's en Opties N.B.: Halve lading de beste prestaties van de programma's "Snel en Express 40'" worden bereikt als u het aantal aangegeven couverts niet Als u weinig vaat heeft kunt u een halve lading wassen en overschrijdt. zo water, energie en vaatwasmiddel besparen. Selecteer het Voor een zuiniger verbruik de afwasmachine volgeladen laten programma door op de toets HALVE LADING te drukken. -
Page 54: Glansmiddel En Onthardingszout
Glansmiddel en zout en de wasprestaties te optimaliseren. Dit gegeven kunt u bij uw Gebruik uitsluitend producten die speciaal voor plaatselijke waterbedrijf opvragen. vaatwasmachines bestemd zijn. Doe de vaatwasser aan en uit met de toets ON/OFF. Houd Gebruik geen keukenzout of industrieel zout en ook geen de Start/Pauze toets enkele seconden ingedrukt tot u een wasmiddelen voor handwas. -
Page 55: Onderhoud En Verzorging
Onderhoud en verzorging Reinig geregeld het watertoevoerfilter bij de kraan. - Doe de waterkraan dicht. - Schroef het uiteinde van de watertoevoerbuis los, verwijder het filter en reinig het voorzichtig onder stromend water. - Doe het filter op zijn plaats en schroef de buis vast. Reinigen van de filters De filtergroep wordt gevormd door drie filters die etensresten uit het waswater verwijderen en zorgen dat het weer schoon... -
Page 56: Storingen En Oplossingen
Storingen en 195111423.02 01/2014 jk - Xerox Fabriano oplossingen Het kan gebeuren dat de vaatwasser niet werkt. Voor u de Servicedienst opbelt moet u controleren of u het euvel niet gemakkelijk zelf kunt oplossen m.b.v. volgende lijst. Storingen: Mogelijke oorzaken / Oplossingen: • Schakel het apparaat uit door te drukken op de toets ON/OFF, schakel het na circa een De vaatwasser start niet of volgt de minuut weer in en stel het programma opnieuw in.