Table of Contents
Advertisement
Available languages
Available languages
Quick Links
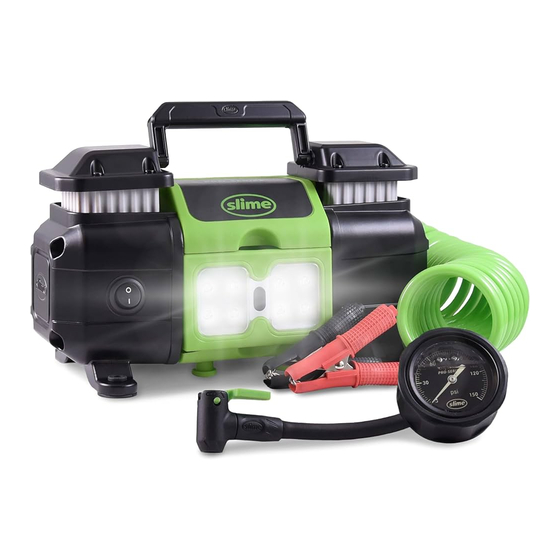
CONVENIENT
FOLDING HANDLE
AIR ADAPTORS
ON/OFF
BUTTON
QUICK CONNECT
AIR HOSE
RUGGED
CARRY CASE
ATTENTION! READ ALL INSTRUCTIONS CAREFULLY
FAILURE TO FOLLOW WARNING INSTRUCTIONS CAN RESULT IN FIRE,
BRIGHT LED
REMOVABLE
MAGNETIC LIGHT
• For nighttime emergencies
5
PP
PERSONAL INJURY OR PROPERTY DAMAGE.
INFLATOR
• Dual piston motor
• Powerful direct-drive motor
• Thermal break safety feature
• Air-cooled motor
22 FOOT
EXTENSION
AIR HOSE
• Connects to built-in air
hose for extra reach
POWER SOURCE
• Direct connect to battery
HIGH PRESSURE LIQUID-
FILLED GAUGE
• 0-150 PSI / 0-10 BAR
• Gauge can be used independently or
attached to hose for in-line use
PART# 40048 | REV062723ART
Advertisement
Table of Contents

Related Manuals for Slime PRO POWER


Summary of Contents for Slime PRO POWER
- Page 1 CONVENIENT INFLATOR FOLDING HANDLE • Dual piston motor • Powerful direct-drive motor • Thermal break safety feature • Air-cooled motor AIR ADAPTORS 22 FOOT EXTENSION AIR HOSE • Connects to built-in air hose for extra reach ON/OFF BUTTON POWER SOURCE BRIGHT LED •...
-
Page 2: Tech Specs
VEHICLE EXHAUST WITHOUT PROPER VENTILATION IS EXTREMELY DANGEROUS. ALWAYS ALLOW FOR PROPER VENTILATION. Ensure that the vehicle is outside, or in an open, well-ventilated area and NOT INSIDE A CONFINED AREA, SUCH AS A GARAGE as bodily injury or asphyxiation resulting in death could occur. -
Page 3: Inflate Tires
NOTE: Engine should be running while using this inflator. See Warning Section for further details. INFLATE TIRES 1. Attach quick connect air hose onto tire's valve stem and pull lever up to lock. 2. Attach battery clips to battery, positive side first. 3. - Page 4 REMOVING THE LIGHT 1. Using the finger-grip depressions found on the top and bottom surfaces of the removable light, grab the light and pull firmly straight out to remove it from the inflator. 2. When finished, push the light firmly back into place until it clicks, confirming the light is seated in the inflator.
- Page 5 MOUNTING THE INFLATOR Proceed with inflator vehicle mounting at your own risk! Some vehicle modifications may be necessary and are done at your own risk. Vehicle modifications may void your warranty. Manufacturer is not liable for any warranty issues, vehicle damage or inflator damage caused from inflator vehicle mounting.
-
Page 6: Troubleshooting
Dispose of this product at an e-waste recycling collection point or facility. Do not place in the trash or standard recycling receptacle. FOR WARRANTY INFORMATION GO TO: WWW.SLIME.COM / WARRANTY QUESTIONS OR COMMENTS: Call (888)457-5463 or visit www.slime.com ITW Global Tire Repair • 125 Venture Drive, Suite 210, San Luis Obispo, CA 93401 USA Slime is a trademark of Illinois Tool Works, Inc., registered in the U.S. - Page 7 INFLADOR AGARRADERA PLEGABLE • Motor de doble pistón CONVENIENTE • Potente motor de transmisión directa • Función de seguridad de interrupción térmica • Motor enfriado por aire MANAGUERA ADAPTORES DE AIRE DE DE AIRE EXTENSIÓN DE 22 PIES • Se conecta a la manguera de aire incorporada para mayor alcance...
-
Page 8: Especificaciones Técnicas
EL ESCAPE DEL VEHÍCULO SIN LA VENTILACIÓN ADECUADA ES EXTREMADAMENTE PELIGROSO. PERMITA SIEMPRE UNA VENTILACIÓN ADECUADA. Asegúrese de que el vehículo esté al aire libre o en un área abierta y bien ventilada y NO DENTRO DE UN ÁREA CERRADA, COMO UN GARAJE, ya que podrían producirse lesiones o asfixia con resultado de muerte. - Page 9 NOTA: El motor debe estar funcionando mientras usa este inflador. Consulte la sección de advertencias para obtener más detalles. INFLE LAS LLANTAS 1. Coloque la manguera de aire de conexión rapida en el vástago de la llanta y tire de la palanca hacia arriba para asegurar.
- Page 10 REMOVIENDO LA LUZ 1. Apoyandote en las superficies de arriba y de abajo de la luz removible, tome la luz y jale con firmeza hacia afuera para sacarla del inflador. 2. Cuando haya termindado, vuelva a colocar la luz firmemente en su lugar hasta que haga clic, confirmando que la luz está...
- Page 11 MONTAJE DEL INFLADOR (continuado) • Idealmente, la ubicación de montaje será plana, lo que permitirá montar el inflador de neumáticos en posición vertical. • La ubicación de montaje debe ser lo más fresca posible, lejos de fuentes de calor. • No instale el inflador de llantas en ningún lugar donde la unidad pueda entrar en contacto con el agua.
-
Page 12: Solución De Problemas
PREGUNTAS O COMENTARIOS: Llamar al +1-888-457-5463 o visitar www.slime.com ITW Global Tire Repair • 125 Venture Drive, Suite 210, San Luis Obispo, CA 93401 USA Slime® es una marca registrada de Illinois Tool Works, Inc., registrada en Estados Unidos y en otros países.
Need help?
Do you have a question about the PRO POWER and is the answer not in the manual?
Questions and answers