Advertisement
Available languages
Available languages
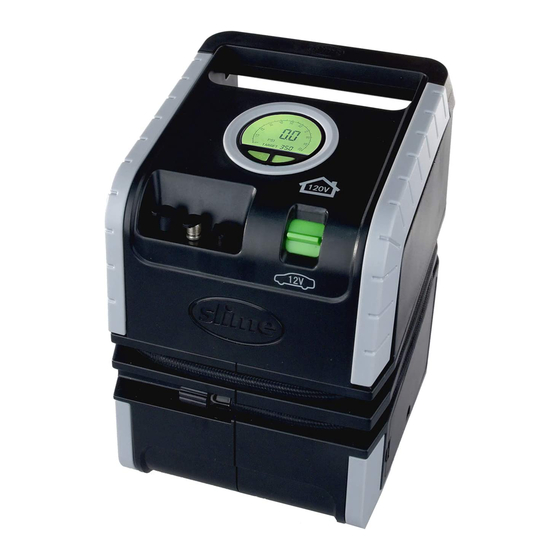
EASY GRAB
HANDLE
DIGITAL GAUGE
• Shock-resistant housing
• 0-99 PSI range
INFLATE RIGHT™
TECHNOLOGY
• Inflator automatically
shuts off when the set
pressure level is achieved
• Perfect pressure with
every use
HOME (120V)
CORD STORAGE
ATTENTION! READ ALL INSTRUCTIONS CAREFULLY
!
FAILURE TO FOLLOW WARNING INSTRUCTIONS CAN RESULT IN FIRE,
D
UAL
CARS • TRUCKS • BIKES • INFLATABLES
POWER SOURCE
• Plugs into a Home (120V) wall outlet
• Plugs into an Auto (12V) power outlet
PERSONAL INJURY OR PROPERTY DAMAGE.
P
OWER
I
NFLATOR
INFLATOR
• Dual power motor air-cooled.
MOUNTING
BRACKETS
• Mounting screws
and anchors
included
ON/OFF SWITCH
• Toggles between
Home (120V)/OFF/Auto (12V)
AUTO (12V)
CORD STORAGE
Air Accessories
PART# 40052 | REV041819ART
Advertisement
Table of Contents

Subscribe to Our Youtube Channel
Related Manuals for Slime 40052


Summary of Contents for Slime 40052
- Page 1 • Perfect pressure with • Toggles between every use Home (120V)/OFF/Auto (12V) AUTO (12V) CORD STORAGE HOME (120V) CORD STORAGE POWER SOURCE • Plugs into a Home (120V) wall outlet • Plugs into an Auto (12V) power outlet Air Accessories ATTENTION! READ ALL INSTRUCTIONS CAREFULLY FAILURE TO FOLLOW WARNING INSTRUCTIONS CAN RESULT IN FIRE, PERSONAL INJURY OR PROPERTY DAMAGE. PART# 40052 | REV041819ART...
- Page 2 CAUTION: HOT • DO NOT HOLD IN HAND WHILE OPERATING • PLACE INFLATOR ON A HARD, CLEAN SURFACE. 1. DO NOT run vehicle while inflator is operating. You may need to be in "accessory" or "on" position. Please make sure emergency brake is set and car is in park. 2. Always ensure air hose chuck touches the core of the valve stem for proper inflation. 3. DO NOT use inflator continuously for more than 10 minutes. Allow unit to cool approximately 25 minutes between uses. Do not leave inflator unattended. 4. ALWAYS use a pressure gauge to check tire pressure. DO NOT overinflate. 5. Soft inflatables (i.e. rafts, balls, etc.) may not have recommended pressure markings. Be careful not to inflate items beyond their capacity.
- Page 3 *NOTE: Correct tire pressure can be found in vehicle owner's manual or on driver's side door jamb. INFLATE RIGHT™ TECHNOLOGY INSTRUCTIONS 1. Hold the + or – button for approximately 2 seconds until the display flashes. Set the required pressure using the + or – buttons, then wait 3 seconds. The display will show the pressure value to which the tire will be inflated. (Continuously pressing the “+” or “-“ button will enter into “Fast setting mode”, increasing or decreasing the rate of target pressure at an increased speed.) 2. Use the toggle switch to power for the inflator to start. 3. When the pressure gauge reaches the pre-set value, the inflator will automatically stop inflation. Once desired tire pressure is reached, disconnect the air hose and unplug the power cord (if applicable). WALL MOUNTING / STORAGE INSTRUCTIONS Your inflator has built-in features for conveniently wall mounting the unit for storage. Use the included hardware to wall-mount the unit. Take extra care to ensure there is no wiring, plumbing, or other objects located within the wall behind your chosen mounting location. Manufacturer is not responsible for any damage or losses incurred from complications in wall-mounting. For Drywall mounting: 1. Use the template below to mark mounting locations on wall 3 1/16" apart.
- Page 4 Manufacturer’s coupon for a replacement product upon return of unit and proof of purchase. QUESTIONS OR COMMENTS: Call +1-805-489-0490 or visit www.slime.com ITW Global Tire Repair • 125 Venture Drive, Suite 210, San Luis Obispo, CA 93401 USA Slime® is a trademark of Illinois Tool Works, Inc., registered in the U.S. and other countries.
- Page 5 OMPRESOR DE OBLE OTENCIA CARROS • CAMIONES • BICICLETAS • ARTÍCULOS INFLABLES MANIJA DE FÁCIL COMPRESOR AGARRE • Motor con doble poder, enfriado por aire frío MEDIDOR DIGITAL • Carcasa resistente a golpes. • Alcance de 0-99PSI SOPORTE DE MONTAJES TECNOLOGÍA • Almacena fácilmente en INFLATE RIGHT™ el garaje. • IEl compresor se apaga automáticamente cuando se ha alcanzado el nivel de presión configurado INTERRUPTOR EN- • Garantiza una presión...
- Page 6 PRECAUCIÓN: CALIENTE • NO SOSTENGA CON LA MANO AL OPERAR • COLOQUE EL COMPRESOR SOBRE UNA SUPERFICIE FIRME Y LIMPIA. 1. NO conduzca el vehículo mientras esté funcionando el compresor. Es posible que deba estar en la posición de “accesorios” o “encendido”. Asegúrese de colocar el freno de emergencia y que el vehículo esté en park (estacionamiento). 2. Asegúrese siempre de que el conector de la válvula esté bien sellado y presione contra el vástago de la válvula con el fin de inflar de la manera adecuada. 3. NO use el compresor de manera continua durante más de 10 minutos. Permita que el aparato se enfríe durante unos 25 minutos entre usos. No deje el compresor sin supervisión.
- Page 7 *IMPORTANTE: La presión recomendada para las llantas se puede encontrar en el manual del propietario o en el marco de la puerta del conductor. INSTRUCCIONES PARA LA TECNOLOGÍA INFLATE RIGHT ™ 1. Cuando la manguera del compresor esté conectada al vástago de la válvula, sostenga el botón + o - aproximadamente 2 segundos hasta que la pantalla parpadee. Configure la presión necesaria con los botones + o - y espere 3 segundos. La pantalla dejará de parpadear e indicará el valor de la presión al cual se inflará la llanta. (Presionar los botones + o - de manera continua empezará el...
- Page 8 PREGUNTAS O COMENTARIOS: Llamar al (888)457-5463 o visitar www.slime.com ITW Global Tire Repair • 125 Venture Drive, Suite 210, San Luis Obispo, CA 93401 USA Slime® es una marca registrada de Illinois Tool Works, Inc., registrada en Estados Unidos y en otros países.
Need help?
Do you have a question about the 40052 and is the answer not in the manual?
Questions and answers