Table of Contents
Advertisement
Quick Links
IP REMOTE MICROPHONE
Thank you for purchasing TOA's IP Remote Microphone.
Please carefully follow the instructions in this manual to ensure long, trouble-free use of your equipment.
TABLE OF CONTENTS
5.1. Individual Broadcasts ........................................................................................................... 6
5.2. Group Broadcasts ................................................................................................................ 6
5.3. Function Table ...................................................................................................................... 6
Operating Panel ........................................................................................................................... 7
Left Side ....................................................................................................................................... 9
Bottom .......................................................................................................................................... 9
8.1. Transition ............................................................................................................................ 11
8.2. Home Screen ..................................................................................................................... 12
8.3. Settings Screen .................................................................................................................. 16
............................................................................................................................ 19
9.1. Manual Broadcasting .......................................................................................................... 19
9.2. Recording and Confirmation ............................................................................................... 20
9.3. How to Delate Recording Data ........................................................................................... 21
9.4. Speaker Volume Setting ..................................................................................................... 22
10.1. Changing the orientation of the microphone .................................................................... 23
10.2. Installing the remote microphone on a Wall ..................................................................... 23
11.1. Network Connection ......................................................................................................... 24
11.2. AUX Input Connection ...................................................................................................... 24
11.3. Connections to Control Input, Control Output, and Mute Terminals ................................. 25
....................................................................................................... 3
.......................................................................................... 5
.................................................................................................. 5
.................................................................................................. 7
...................................................................................... 11
.................................................................................................................... 24
INSTRUCTION MANUAL
..................................................................... 5
................................................................ 6
.................................................................................. 7
................................................................... 23
IP-A1RM
Advertisement
Table of Contents

Related Manuals for Toa IP-A1RM


Summary of Contents for Toa IP-A1RM
-
Page 1: Table Of Contents
INSTRUCTION MANUAL IP REMOTE MICROPHONE IP-A1RM Thank you for purchasing TOA’s IP Remote Microphone. Please carefully follow the instructions in this manual to ensure long, trouble-free use of your equipment. TABLE OF CONTENTS 1. SAFETY PRECAUTIONS ....................... 3 2. GENERAL DESCRIPTION AND FEATURES .............. - Page 2 12. SETTINGS ..........................27 12.1. System Settings Summary ....................27 12.2. System Requirements ...................... 28 12.3. Connection with Browser ....................28 13. INITIALIZATION OF SETTINGS ..................29 14. CAUTIONS REGARDING THE AVC/H.264 PATENT LICENSE ........30 15. OPEN SOURCE SOFTWARE ....................
-
Page 3: Safety Precautions
PoE switching hub and • To prevent the electromagnetic wave from contact your nearest TOA dealer. Make no badly influencing medical equipment, make further attempt to operate the unit in this sure to switch off the unit's power when ... - Page 4 1 Harmon Plaza, Suite 700 Secaucus, New Jersey 07094, USA TEL 650-452-1200 declares under its sole responsibility that the product IP REMOTE MICROPHONE IP-A1RM complies with Part 15 of FCC Rules. Operation is subject to the following conditions: (1) this device may not cause harmful interference, and (2) this device must accept any interference received, including interference that may cause undesired operation.
-
Page 5: General Description And Features
2. GENERAL DESCRIPTION and FEATURES The IP-A1RM is an IP Remote Microphone that is designated to make audio broadcasts to IP-A1 series receiving devices via network. • Power is supplied by way of PoE (IEEE 802.3af) switching hubs. • The IP Remote Microphone supports the following broadcasting functions: Microphone broadcasting Realtime broadcasts of microphone audio. -
Page 6: System Examples And Function Table
Individual SIP broadcasts to a single IP audio device can be performed through the P2P connection (servers can also be connected). SIP broadcasting IP-A1RM IP-A1SC15 5.2. Group Broadcasts Group broadcasts to multiple IP audio devices can be performed by way of multicast audio transmission. -
Page 7: Dimensional Drawings
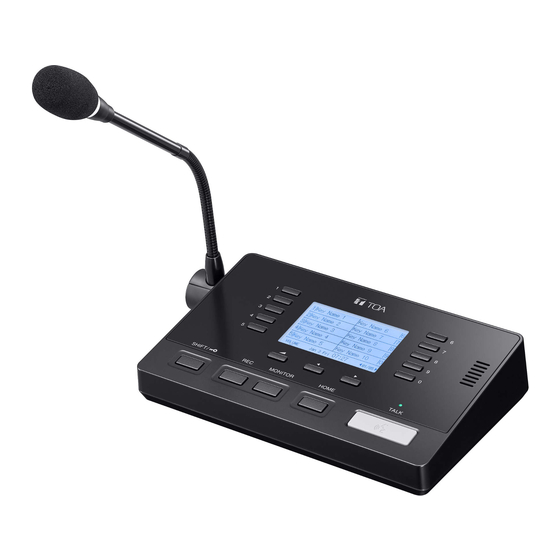
6. DIMENSIONAL DRAWINGS Unit: mm (in) [Operating Panel] [Left Side] 224 (8.82) 200 (7.87) 136 (5.35) * Reference dimension 7. NOMENCLATURE AND FUNCTIONS [Operating Panel] 1. Microphone 2. Microphone indicator (blue) Speak into this microphone when performing Lights when the microphone (1) is enabled. microphone broadcasts recording... - Page 8 3. Selection keys (0 – 9) Unit Operation Status Indicator These keys can be selected to execute System startup Flashing green the functions assigned to them in the key Broadcast standby Continuously lit settings. Key numbers correspond to the green numbers shown on the LCD screen (4).
-
Page 9: Left Side
through the monitor speaker (5). Playback The speaker symbol appears during audio stops when the key is released. When a playback after the depression of this key. Selection key (3) preset for execution of pattern broadcast is pressed, pattern audio 12:00 ◀... - Page 10 19. Functional ground terminals 25. Wall mounting bracket mounting holes Hum noise may be generated when Used when installing the IP-A1RM on the external equipment is connected to the unit. wall in conjunction with the optional wall Connecting this terminal to the functional mounting bracket.
-
Page 11: Lcd Screen And Transition
8. LCD SCREEN AND TRANSITION 8.1. Transition [Home screen] p. 12 ♫ ALL AREA LUNCH BGM Playground Teacher Room Volume down Playground Playground Volume default DOOR LOCK ENTRANCE South Area COCOLABO 3rd Lecture Room VOLUME 12:00 01/05 ◀ ▶ Jan/1 MON [Setting function screen] ♫... -
Page 12: Home Screen
8.2. Home Screen Normally, the Home screen is displayed. Pressing the Home key reverts the display to the Home screen. Appears next to the key that has ♫ the chime enabled. The chime will sound when the key is pressed to make a broadcast. - Page 13 8.2.2. Manual broadcasting screen Pressing a Selection key that has been set for manual broadcasting displays the manual broadcasting screen. Press the key again to return to the Home screen. [When manual broadcasting is selected] 8 9 10 11 [During manual broadcasting] 会議室...
- Page 14 8.2.3. Pattern broadcast screen Pressing a Selection key for which pattern broadcasting has been set displays the pattern broadcast screen. Press the key again to return to the Home screen. [When pattern broadcasting is selected] 17 18 19 [During pattern broadcasting] 会議室...
- Page 15 8.2.4. Command transmission screen Pressing a Selection key that has been set for command transmission displays the command transmission screen. Press the key again to return to the Home screen. (26) Command transmission icon This icon is displayed whenever a command is being transmitted.
-
Page 16: Settings Screen
8.3. Settings Screen [Home screen] ♫ 8.3.1. How to enter settings screen ALL AREA LUNCH BGM Playground Teacher Room Step 1. Press the Shift key on the home Volume down Playground screen. Playground Volume default DOOR LOCK ENTRANCE Step 2. Press the key. South Area COCOLABO 3rd "SETTING"... - Page 17 8.3.2. Setting top screen Pressing a Selection key displays its corresponding Settings screen. Use the or keys to adjust the Auto Key Lock (6), Backlight Time (7), Contrast (8) and Brightness (9). Use the key to return to the top screen. Selection keys Selection keys Terminal Info...
- Page 18 Allows the Remote Microphone’s Terminal The Keylock function automatically activates information to be checked. if no operation is performed during a set time interval. Terminal Info Auto Key Lock Terminal Name IP-A1RM Firmware Version 3.0.0 1 min 2 min 3 min MAC Address 00-05-F9-00-00-00 10 min...
-
Page 19: Operation
9. OPERATION 9.1. Manual Broadcasting 3, 4 Microphone indicator Step 1. Press the Selection key. Pressing a Selection key that has been set for manual broadcasting displays the following screens. 会議室 ALL AREA 会議室 ♫ [ SOURCE ] Microphone [ DEST ] Multicast 1 [STATUS]... -
Page 20: Recording And Confirmation
9.2. Recording and Confirmation Microphone indicator 1, 3 4, 5 [Recording] Step 1. Hold down the Recording key. Pressing this key for about 1 sec. turns ON the MICROPHONE RECORDING 会議室 microphone recording status and changes the display as shown at right. •... -
Page 21: How To Delate Recording Data
9.3. How to Delate Recording Data ♫ ALL AREA LUNCH BGM Step 1. Press the Shift key. Playground Teacher Room Displays "REC MENU" at the Volume down bottom of the LCD screen. Playground Playground Volume default DOOR LOCK ENTRANCE Step 2. Press the key. South Area "REC MENU"... -
Page 22: Speaker Volume Setting
9.4. Speaker Volume Setting Step 1. Press the key on the home ♫ screen. ALL AREA LUNCH BGM Displays "VOLUME" at the bottom Playground Teacher Room Volume down of the LCD screen. Playground Playground Volume default Step 2. Press the key, adjusts the DOOR LOCK ENTRANCE... -
Page 23: Installation The Ip-A1Rm On A Wall
RM500 Wall Mounting Bracket. 10.1. Changing the orientation of the microphone The IP-A1RM’s microphone is installed in the orientation shown on the right figure by default. When mounting the IP-A1RM on the wall, change the orientation of the microphone following the procedure below. IP-A1RM Step 1. Remove 2 screws securing the microphone, then detach the microphone fixing cover. -
Page 24: Connections
11. CONNECTIONS 11.1. Network Connection Connect the IP-A1RM to the PoE switching hub using a LAN cable (straight UTP or STP cable, both rated at Category 5). Power is supplied by the PoE switching hub. STRIP LENGTH LINK 52V - - -... -
Page 25: Connections To Control Input, Control Output, And Mute Terminals
Allowable current: 10 mA or less Short-circuit current: 2 mA or less DIP switch Secure the cables to the IP-A1RM’s bottom surface as shown below so that the IP-A1RM will not be pushed up by the cables. IP-A1RM bottom STRIP... - Page 26 • Output during microphone broadcasts • Output during AUX broadcasts • Output during built-in audio broadcasts For settings, please refer to the separate setup manual. The latest version of the setup manual is available on the TOA DATA Library (https://www.toa- products.com/international/).
-
Page 27: Settings
System Date and time settings, NTP server settings, language selection, time zone settings For more information, please refer to the separate setup manual. The latest version of the setup manual is available on the TOA DATA Library (https://www.toa- products.com/international/). -
Page 28: System Requirements
Step 2. Enter the username and password, and click the LOGIN button. The Status screen is displayed, enabling a range of settings. Note For details regarding the setting method, please refer to the separate setup manual. The latest version of the setup manual is available on the TOA DATA Library (https://www.toa-products.com/international/). -
Page 29: Initialization Of Settings
13. INITIALIZATION OF SETTINGS Follow the procedure below to return all unit settings to their default. When initialized with the reset key, the unit’s sound source files are left in "Media," not deleted. Initialization to factory defaults, including deletion of sound source files, should be performed using the browser settings menu. STRIP LENGTH LINK 52V - - - /ACT... -
Page 30: Cautions Regarding The Avc/H.264 Patent License
14. CAUTIONS REGARDING THE AVC/H.264 PATENT LICENSE TOA’s IP-A1RM IP Remote Microphone employs MPEG technology (AVC/H.264 Standard) regarding the handling of image information. TOA Corporation has received approval to use this technology from MPEG LA, LLC, the patent management group. - Page 32 Traceability Information for USA TOA Electronics, Inc. 1 Harmon Plaza, Suite 700 Secaucus, New Jersey 07094, https://www.toaelectronics.com/ https://www.toa-global.com/en 133-04-00054-01...
Need help?
Do you have a question about the IP-A1RM and is the answer not in the manual?
Questions and answers