
Related Manuals for Toa RM-1200


Summary of Contents for Toa RM-1200
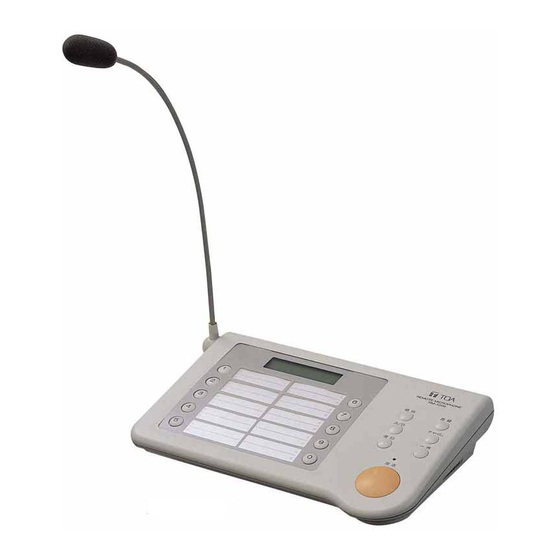
- Page 1 INSTRUCTION MANUAL REMOTE MICROPHONE RM-1200 Please follow the instructions in this manual to obtain the optimum results from this unit. We also recommend that you keep this manual handy for future reference.
-
Page 2: Table Of Contents
7.1. Notes on Connections ......................11 7.2. Connection of the RM-1200 to the Rack-Mounted Emergency PA System FS-971 Series ............ 11 7.3. Connection of the RM-1200's Push-in Terminal Block ............12 7.4. Error Message Indication ......................12 8. INITIAL SETTING 8.1. -
Page 3: Safety Precautions
• Should the following irregularity be found during use, immediately switch off the circuit breaker of the junction panel to which the unit is connected. Then, contact your nearest TOA dealer. Make no further attempt to operate the unit in this condition as this may cause fire or electric shock. - Page 4 Indicates a potentially hazardous situation which, if mishandled, could CAUTION result in moderate or minor personal injury, and/or property damage. When Installing the Unit • Avoid installing the unit in humid or dusty locations, in locations exposed to the direct sunlight, near the heaters, or in locations generating sooty smoke or steam as doing otherwise may result in fire.
-
Page 5: General Description
2. GENERAL DESCRIPTION TOA's RM-1200 is a general-purpose remote control unit designed to be used in conjunction with TOA's FS- 971 Series Rack Mounted Emergency PA Systems. Featuring a built-in high-quality FM chime unit, the RM- 1200 permits group broadcast of up to 20 groups, simultaneous all-zone broadcast, and individual zone broadcast of up to 330 zones. -
Page 6: Nomenclature And Functions
5. NOMENCLATURE AND FUNCTIONS [Front Panel] 1. Talk key 7. Registration key Make announcements while holding down this key Registers the line number (broadcast zone) when the message "In use" is displayed on the selected with the numerical key to make screen (9). -
Page 7: Bottom Panel
[Bottom Panel] [Side Panel] 13. Mode switch 16. Chime volume control Setting this switch to the ON position places unit Adjusts the chime volume. Refer to the section in the setting mode. Set this switch to the OFF "9. VOLUME LEVEL ADJUSTMENT" on p. 16. position after setting completion. -
Page 8: Operations
6. OPERATIONS • The TALK key turns on when pressed, and turns off when released. • When the message "Other in use" is displayed on your remote control unit, if other message "In use" does not appear even though you press the ALL ZONE, [1]-[0] or INDIVIDUAL ZONE key, this means the equipment with higher priority is in use. -
Page 9: Group Broadcast
6.2. Group Broadcast Press the [1]-[0] (numerical) key to select the desired broadcast group (1-0). If the [1] key is pressed, this message appears. A 1 , select multiple groups, press corresponding numerical keys continuously. If the [3] and [7] keys are pressed continuously, this message appears. -
Page 10: Individual Zone Broadcast
6.3. Individual Zone Broadcast Press the INDIVIDUAL ZONE key. Press the [1]-[0] (numerical) key to select the desired speaker line number. To cancel the key entry, press the RESET key and confirm that the indication "000" is displayed. If the [1] key is pressed, this indication is displayed (Line No. -
Page 11: Connections
7. CONNECTIONS 7.1. Notes on Connections • The maximum cable length between the main rack and the RM-1200 is 800 m. • Use cables with line resistance of less than 10Ω. • Use twisted paired cable for bus lines. • Use twin shielded cables for signal lines. -
Page 12: Connection Of The Rm-1200'S Push-In Terminal Block
RM - U S E r r o r 2. Reversed bus line polarity between the main rack and RM-1200 3. Connected RM-1200 numbers are set for "0" at the main rack. P o l i n g E r r o r 1. -
Page 13: Initial Setting
"Store?" (refer to p. 15 "8.7. Set Data Registration") on the screen. 8.2. Address Be sure to set the address for "0" when using only one RM-1200 unit. A d d e s s S e t u p Up to eight RM-1200 units can be connected. -
Page 14: Usable Group Numbers
Note The external chime refers to a chime component installed in equipment connected to the RM-1200. Selecting [5. External Chime] disables the Auto Chime Function. Pressing the REGISTRATION key stores the selected chime tone type and displays the Auto Chime screen. -
Page 15: Auto Chime Function
8.6. Auto Chime Function The Auto Chime Function automatically sounds a chime when the TALK key turns on and off. However, if [5. External Chime] is selected in Corresponding mode number 5. Chime Tone Type Setting, the Auto Chime Function is disabled. appears as the key is pressed. -
Page 16: Volume Level Adjustment
9. VOLUME LEVEL ADJUSTMENT 1. Using the slotted screwdriver, turn the microphone, chime and AUX input volume controls fully counter- clockwise. 2. Speaking into the microphone, turn the microphone volume control clockwise to adjust the volume. 3. Making broadcast from equipment connected to the AUX input, turn the volume control clockwise to adjust the volume. -
Page 17: Wall Mounting
3. Install the wall mounting bracket directly on the wall using the supplied wood screws. Wall mounting bracket Wood screws 4. Align holes in the RM-1200's bottom surface with bracket tabs, then slide the unit down into place. Wall mounting bracket... -
Page 18: Specifications
12. SPECIFICATIONS Power Source 24 VDC Current Consumption 130 mA Output 0 dBV, 600Ω, balanced Microphone Uni-directional electret-condenser microphone Speaker Control 20 groups, individual speaker line selection (up to 330 lines), all-zone broadcast AUX Input -20 dBV, 100 kΩ, unbalanced Chime Internal chime (FM sound source), 4 different tone types Volume Control... - Page 20 URL: http://www.toa.jp/ 133-12-589-4B...
Need help?
Do you have a question about the RM-1200 and is the answer not in the manual?
Questions and answers