WAGNER W 950 FLEXIO Manual
Universal sprayer
Hide thumbs
Also See for W 950 FLEXIO:
- Quick help (2 pages) ,
- Manual (130 pages) ,
- Operating instructions manual (130 pages)

Subscribe to Our Youtube Channel
Related Manuals for WAGNER W 950 FLEXIO


Summary of Contents for WAGNER W 950 FLEXIO
- Page 1 UNIVERSAL SPRAYER W 950 FLEXIO ORIGINAL- BETRIEBSANLEITUNG wagner-group.com...
- Page 2 W 950 Flexio . . . . . . . . . . . . . . . . . . . . . . . . . . . . . . . . . . . . . . . . . .1 - 31 .
-
Page 3: Table Of Contents
Translation of the original operating instructions MANY THANKS FOR PLACING YOUR TRUST IN US We would like to congratulate you on purchasing this brand product from Wagner; we are sure that you will enjoy working with it greatly. Please read the Operating Manual carefully and observe the safety information before starting the device. -
Page 4: Explanation Of Symbols Used
W 950 Flexio W 950 Flexio 1. Explanation of symbols used This symbol indicates a potential danger for you or for the device. Under this symbol you can find important information on how to avoid injuries and damage to the device. - Page 5 W 950 Flexio W 950 Flexio c) Keep children and other persons away when using the power tool. You can lose control of the tool if you are distracted. 2. Electrical Safety a) The tool plug must fit into the socket. The plug may not be modified in any form.
- Page 6 W 950 Flexio W 950 Flexio e) Avoid an unnatural posture. Ensure that you are standing securely and have your balance at all times. This ensures that you can control the tool better in unexpected situations. f) Wear suitable clothing. Do not wear wide clothing or jewellery. Keep your hair, clothes and gloves away from moving parts.
-
Page 7: Safety Instructions For Colour Application Devices
W 950 Flexio W 950 Flexio handles and grip surfaces hamper safe operation and control of the electric tool in unforeseen situations. 5. Service a) Have your tool repaired only by qualified specialist personnel and only with original spare parts. This ensures that the tool safety is maintained. -
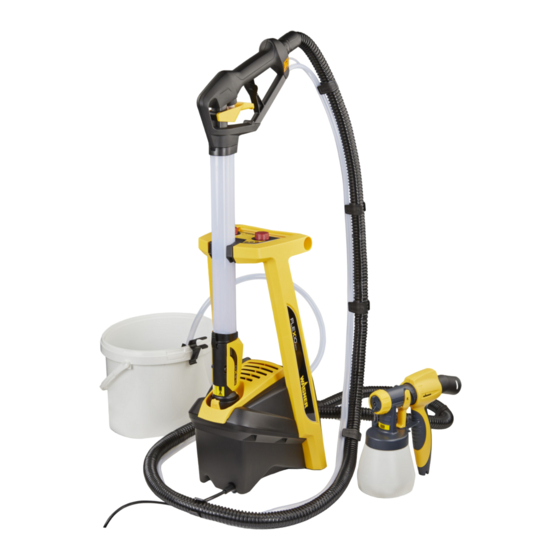
Page 8: Scope Of Delivery
• Do not lay the spray gun. With original WAGNER accessories and spare parts, you have the guarantee that all safety regulations are fulfilled. 4. Scope of delivery Scope of delivery (Fig. -
Page 9: Field Of Application
5. Field of application With the W 950, interior wall paints can be applied right from the bucket. And that is not all, for the Click&Paint adapter enables all Wagner spray attachments to be used for processing varnish paints and glazes. -
Page 10: Preparation Of The Coating Material
W 950 Flexio W 950 Flexio 8. Preparation of the Coating Material Mix the material well in the original container. When using interior wall paint, an agitator is recommended. W 950 has been developed for use with all conventional paints in their undiluted form. -
Page 11: Assembling The Spray Lance (Fig. 2)
W 950 Flexio W 950 Flexio Assembling the spray lance (fig. • Take the rolled-up pull wire (fig. 2, 1) out of the grab handle (2) and unwind it. • Put air pipe (3) in grab handle (2). After assembly, the air pipe and grab handle can no longer be separated. -
Page 12: Connecting The Hoses (Fig.3)
W 950 Flexio W 950 Flexio Connecting the hoses (fig • Attach control hose (1) to pin (2) on the underside of the grab handle (3). • Insert the thin end of the black air hose (4) into the grab handle (3) (watch out for marking) and fix it into position by turning it to the right. -
Page 13: Multifunction Switch Settings (Fig. 4, A)
W 950 Flexio W 950 Flexio 4, A) Multifunction switch settings (fig. FILL/ Settings for cleaning and CLEAN pre-filling the system System is off Operating setting When using the spray Volume attachment for varnish paints and glazes, the FILL/CLEAN functions may not be used! 13. -
Page 14: Starting Your Work With The Spray Lance
W 950 Flexio W 950 Flexio In order to reduce overspray and to improve the sprayed result, the colour on the quantity scale (white or black) should match the colour of the width of the spray jet (white or black). -
Page 15: Interruption Of Work
W 950 Flexio W 950 Flexio The spray jet can pulsate when very liquid materials are being used. However, this does not usually have a negative effect on the results. If the work being performed is of a sophisticated nature (e.g. the borders around plugs) do not pull the trigger through completely. - Page 16 W 950 Flexio W 950 Flexio • Hold the spray lance over the material container and pull the trigger to pump the remaining paint out of the system into the material container. • Turn the machine off. (Set the multifunction switch to "OFF")
- Page 17 W 950 Flexio W 950 Flexio • Loosen the pull wire by the adjustment screw (fig. 12, 1). Pull the trigger (fig. 12, 2) disengage the pull wire. • Remove the spray head (fig. 12, 3) by pressing the lever (fig. 12, 4).
- Page 18 W 950 Flexio W 950 Flexio Reconstruction • Push the nozzle seal (fig. 14, 6) over the needle (8); the groove (slot) should point towards you. • Insert the nozzle (fig. 14, 5), keeping an eye on the grooves.
-
Page 19: Rectifying Errors When Working With The Spray Lance
W 950 Flexio W 950 Flexio 19. Rectifying errors when working with the spray lance Problem Cause Remedy • No coating Nozzle clogged ➞ Clean • material Material volume setting turned ➞ Turn to the right emerges from too far to the left •... - Page 20 W 950 Flexio W 950 Flexio Problem Cause Remedy • Spray jet is Coating material in container ➞ Refill uneven/ not running out • constant Nozzle seal worn ➞ Replace • Air filter heavily soiled ➞ Change • Filter clogged at suction hose ➞...
-
Page 21: Starting Work With The Spray Attachment
W 950 Flexio W 950 Flexio The following chapters 20-26 describe working with vinyls and lacquers with the spray attachment. Read chapters 9-19 if you want to use wall paint with the W 950. 20. Starting work with the spray attachment •... -
Page 22: Setting The Spray Pattern You Require When Working With The Spray Attachment
W 950 Flexio W 950 Flexio • Attach the Click&Paint adapter (Fig. 18, 2) with the bayonet coupling to the thinner end of the air hose (1). • Insert the other end of the adapter into the gun handle (3). -
Page 23: Setting The Flow Rate For The Spray Attachment (Fig. 22)
W 950 Flexio W 950 Flexio 22. Setting the flow rate for the spray attachment (fig. 22). Set the material volume by turning the regulator on the trigger of the spray gun. lower material volume turn anti-clockwise higher material volume turn clockwise (+) 23. -
Page 24: Interruption Of Work
W 950 Flexio W 950 Flexio Interruption of Work • Turn the machine off. (Set the multifunction switch to "OFF") • Put the spray attachment on the floor. • When processing 2-component varnishes, clean the device immediately. • Clean nozzle openings after an interruption in operation. - Page 25 W 950 Flexio W 950 Flexio • Pull the ventilating hose (Fig. 26, 1) at the top from the gun body. Screw off the valve cover (2). Remove the diaphragm (3). Clean all the parts carefully. • Unscrew the union nut (Fig. 27, 1) and remove the air cap (2) and nozzle (3).
- Page 26 W 950 Flexio W 950 Flexio • Place the container seal (Fig. 29, 1) from below on the suction tube (2) and slide it over the collar, while turning the container seal slightly. • Insert the suction tube (Fig. 29, 2) with...
-
Page 27: Correction Of Malfunctions
W 950 Flexio W 950 Flexio 26. Correction of Malfunctions Problem Cause Remedy • No coating material Nozzle clogged ➞ Clean • emerges from the Material volume setting turned ➞ Turn to the right nozzle too far to the left •... -
Page 28: Maintenance
W 950 Flexio W 950 Flexio Maintenance Check the air filter (fig. 30, 1) after use and replace depending on how soiled it is. Insert a new air filter (order no. 2310 812) and replace the lid (2). WARNING! Never operate the machine without the air filter;... -
Page 29: Spare Parts
Ventilating hose, valve cover, diaphragm 2304 027 Suction tube 2362 876 Container seal 2323 039 Container with cover 800 ml 0413 909 Spare Parts List: W 950 Flexio (Fig. A3) Pos. Designation Order No. Air hose 2362 918 Securing clip 2365 340... -
Page 30: Accessories
* Denotes parts that can only be purchased together and not individually. 30. Accessories The CLICK&PAINT SYSTEM with additional spray attachments and accessories offers the right tool for each work. Further information about the WAGNER range of products for renovating is available under www.wagner-group.com 31. Technical Data Technical Data Max. - Page 31 The guarantee expires if the tool is opened up by persons other than WAGNER service personnel. Transport damage, maintenance work and loss and damage due to faulty maintenance work are not covered by the guarantee. Under any guarantee claim, there must be proof of purchase of the tool through submission of the original receipt.
- Page 32 W 950 Flexio W 950 Flexio Warning If the supply cord of this appliance is damaged, it must only be replaced by a repair shop appointed by the manufacturer, because special purpose tools are required. Warning: Do not connect the blue...
- Page 33 W 950 Flexio W 950 Flexio...
- Page 34 W 950 Flexio W 950 Flexio...
- Page 35 W 950 Flexio ÜBERSICHT / OVERVIEW / APERÇU GÉNÉRAL / OVERZICHT...
- Page 36 W 950 Flexio Auf der Rückseite dieser Ausklappseite befinden sich die Ersatzteilbilder. Die dazugehörigen Ersatzteillisten finden Sie in Kapitel 29. The pictures of spare parts can be found on the back of this fold-out page. The related spare part lists can be found in chapter 29.
- Page 37 Attiki, Greece P.O. BOX 293 T 22990 41056 F 22990 41059 Irrtümer und Änderungen vorbehalten. Not responsible for errors and changes. Part. No. 2361915 A 09/2017_RS Sous réserves d’erreurs et de modifications. © Copyright by J.Wagner GmbH Fouten en wijzigingen voorbehouden.
Need help?
Do you have a question about the W 950 FLEXIO and is the answer not in the manual?
Questions and answers