
Subscribe to Our Youtube Channel
Related Manuals for Cole Parmer ShatterBox SM-300


Summary of Contents for Cole Parmer ShatterBox SM-300
- Page 1 SM-300 Mixer/Mill Rock and Mineral Grinder (Ring and Puck Mill) for Spectroscopy Applications Operation Manual For 115V (41010-83) and 230V (41010-84)
- Page 2 SPEX SamplePrep is now part of Cole-Parmer®. The Cole-Parmer® SM-300 Shatterbox was formerly known as SPEX 8550 Shatterbox. Over the years, we’ve acquired many high-quality and reputable brands. After many years of continual growth, we realize our brands are all as brilliant as each other. Rather than have a portfolio of complementary brands, we felt consolidating them under one world-class brand name enabled us to offer a single and significant brand experience.
- Page 3 Copyright 2023 by Cole-Parmer All rights reserved. No part of the work may be reproduced or transmitted in any form or by any means, electronic or mechanical; including photocopying and recording, except as may be expressly permitted by the 1976 Copyright Act or in writing from the publisher. Requests for permission should be addressed in writing to Cole-Parmer, 65 Liberty Street, Metuchen, NJ 08840.
-
Page 5: Table Of Contents
Index Index ....................3 Introduction ..................5 Historical background ................5 The SM-300 ShatterBox................6 Accessories ....................8 Main features ................... 8 Precautions ................... 10 Installation ..................11 Location ....................11 Unpacking ....................12 Connection - electrical ................13 Connection – exhaust ................14 Leveling casters .................. - Page 6 Grinding troubleshooting ............. 36 Unit does not turn on ................36 Unit does not run ................... 36 Door remains locked ................36 Grinding container locked up, won’t grind ..........36 Excessive vibration, unit “walks” ............. 37 Locking failed ..................37 Periodic inspection ...............
-
Page 7: Introduction
Introduction Congratulations on your acquisition of the SM-300 ShatterBox, from Cole-Parmer This section intends to introduce the reader to basic grinding principles and to familiarize him or her to the SM-300 ShatterBox. Historical background Since its introduction in the 1980’s, the ShatterBox has become the most popular “swing mill”... -
Page 8: The Sm-300 Shatterbox
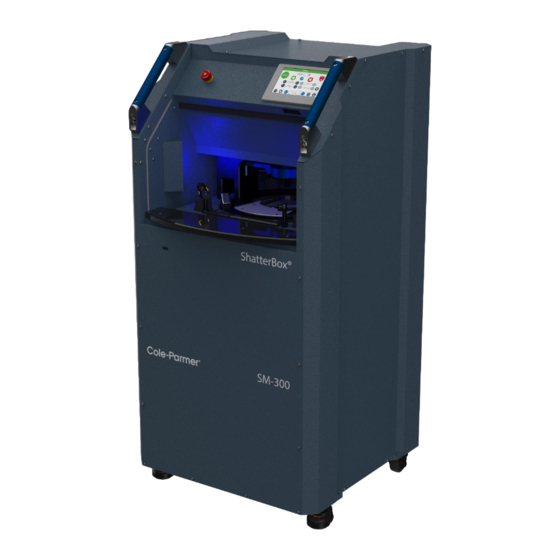
The SM-300 ShatterBox General view Emergency stop button LCD screen interface Grinding dish Door handle Safety door Door lock override Rear wheel Front caster wheel Working principle The SM-300 ShatterBox swings a dish-shaped grinding container, with a puck and (often) a ring inside, in a tight high-speed circle; the sample is quickly crushed between the wall and floor of the container and the moving puck/ring grinding elements. - Page 9 contamination, grinding containers are available in hardened steel, tungsten carbide, alumina ceramic, and zirconia ceramic. The full range of SM-300 ShatterBox grinding containers are on our website: coleparmer.com Automated dish holder Unlike some other units, this mill provides a simple and efficient system to automatically retain (or “clamp”) the dish.
-
Page 10: Accessories
Accessories The SM-300 ShatterBox requires the use of a dish with a handle assembly. For existing dishes without handle assembly, the corresponding handle assembly may be purchased separately and secured to the dish. Available Grinding Dishes: Dish and handle Handle VPN assembly Dish (grinding container) (May be... - Page 11 • Accepts various grinding dish types Productivity • Automated door opening after a grinding operation • Automated dish clamping Durability • Sturdy industrial-grade modular electronics • Robust IP65 rated industrial interface • Dedicated PLC-based programming • Low maintenance Simplicity • Easy installation, easy use •...
-
Page 12: Precautions
Precautions Pinch point This unit features a door that opens automatically. Do not touch the unit after grinding, until the door has fully opened. High voltage Disconnect power cord before attempting any cleaning, maintenance or repair operation. Be careful that no liquid infiltrates into the unit’s casing. Heavy instrument It is advisable that at least two persons roll this instrument to avoid injuries. -
Page 13: Installation
Installation Please read the following section for proper commissioning of your instrument. Do not hesitate to contact Cole-Parmer® with any question you might have with this crucial step. IMPORTANT: It is advisable that several persons carry this instrument to avoid injuries. -
Page 14: Unpacking
Safety and working clearances When this unit operates, it shakes in place, and so appropriate clearances must be kept all around the unit. Our minimum recommendations are: • 5 cm (2 in) at the left side • 5 cm (2 in) at the right side •... -
Page 15: Connection - Electrical
• 1 instruction manual (this booklet) • 1 power cable • 1 USB memory stick • 1 wrench (10 mm) • 1 set of Torx keys Additionally, if you have ordered an optional dish, you will find: • Grinding dish with handle assembly •... -
Page 16: Connection - Exhaust
Connection – exhaust A standard 3-in (76 mm) outlet allows the unit to be connected to your dust extraction/exhaust system. To connect it, a safety screw must be removed to allow for the blade of the blast gate to be pulled down in open position. We suggest using a standard flexible 3-in duct hose with worm-drive clamps to link the unit with your air extraction system. -
Page 17: Setting Up
IMPORTANT: Always lift the unit with the casters leveling nut before operating the SM-300 ShatterBox. The grinder should be fully stabilized as described above, so that it rests firmly on all four legs. Setting up After the initial unpacking and setup of the SM-300 ShatterBox, you are ready to prepare the unit for use. -
Page 18: Choice Of The Grinding Container
Choice of the grinding container There are at present ten different ShatterBox grinding containers in five different materials and four sizes; while each of the ten has a puck-shaped grinding element or a puck and ring, each has different requirements for sample size and/or grinding time. -
Page 19: Size
Alumina Ceramic is harder than tungsten carbide, but is comparatively lightweight. It grinds fairly slowly with low contamination levels and is subject to fracture. Major elements: Al. Minor elements: Si, Mg, and Ca. Size There are four sizes of ShatterBox grinding container: small, medium, large, and extra-large. - Page 20 grinding time or decreasing the sample size, or both. If caking occurs, consult the ShatterBox Accessory Manual for information about grinding aids.
-
Page 21: How The Unit Works
How the unit works Grinding methods The SM-300 ShatterBox comes pre-loaded with a basic grinding method that can be used as is, or can be customized. All grinding methods can be saved, renamed, deleted or copied, just like computer files. Only the preset method is protected to avoid accidental overwriting. -
Page 22: Using The Sm-300 Shatterbox
Using the SM-300 ShatterBox Operation of the safety door As mentioned above, the SM-300 ShatterBox is equipped with a semi-automatic safety door, which has a safety interlock to prevent the user from starting a grinding cycle if the door is still open. Automatic lock operation When the user closes the door, an electronic system will engage mechanical locks, so that the door cannot be accidentally re-opened. - Page 23 Safety door Lock override access Thin tool...
-
Page 24: The Main Running Screen
The main running screen After the booting screen, you will obtain a display similar to the following (not all buttons/icons will appear, depending on the unit’s settings): Here is a short explanation of the various zones and buttons: This zone offers a selection of Spex dish types, for enhanced safety and detection upon automatic clamping. - Page 25 This zone is where the parameters for each grinding stage are set. The first line indicates the speed (in RPM) and the second the duration of that stage. In this example, the unit is set to run at 1000 RPM, for 1 minutes (and zero seconds).
-
Page 26: Loading A Program
The padlock icon/button shows the state grinding recipe parameters. A closed padlock means that the parameters are locked, and a password is required to unlock parameter access. Conversely, an open padlock means that all parameters can now be freely changed. More details are given at page 27, Programming the SM-300 ShatterBox (advanced). -
Page 27: During A Grinding
Touch the green button to confirm, or red to cancel. During a grinding While the instrument is running, the main screen will display additional information and buttons, as well as the number of the step currently being executed and a countdown showing the total time remaining to the grinding program. - Page 28 The display instructs the user to push the safety door in a closed position. This is needed, so that internal movements of the dish locking system can be done safely. The door then freely slides down in the open position, automatically. Load the grinding container with sample, puck/ring and lid.
-
Page 29: Programming The Sm-300 Shatterbox (Advanced)
Programming the SM-300 ShatterBox (advanced) When specific sample types do not seem to be easily processed by a preset grinding method, it is necessary to manually modify its parameters. Unlocking the advanced mode Before being allowed to manage grinding programs and edit parameters, one must enter the correct password. -
Page 30: Managing Grinding Methods
NOTE: If you prefer to always keep the unit in “advanced mode”, it is possible to do so, in the Global Parameters (refer to page 30). Managing grinding methods Grinding methods can be managed just like files on a computer. In the main screen, you can press the icon corresponding to Copy, Delete and Save. -
Page 31: Grinding Steps
Grinding steps Grinding methods all have the same simple structure, having up to two steps (or stages), each featuring two parameters: Speed and Duration. Many sample types actually require only one grinding step. If you need only one grinding step, you can touch the icon of the second step, to toggle it from active (with green arrows all around) to inactive (Off, with red arrows all around.) Speed... -
Page 32: Global Parameters
Global parameters In addition to recipe-specific parameters, your mill provides extra versatility through flexible parameters that will apply to all grinding programs. To modify the global parameters, first unlock the advanced mode (see page 27, Unlocking the advanced mode), then touch the Global Parameters icon that is now available on the main display screen. - Page 33 This box shows the serial number of the ShatterBox unit. The number to the right of the “odometer” icon shows the total number of grinding cycles that the ShatterBox unit has performed.
-
Page 34: Special Parameters
Special parameters This section presents an advanced interface window that can be used to adjust the sensitivities and offsets of various sensors on the mill. WARNING: Changing these parameters should only be done by trained personnel. Incorrectly setting these parameters could cause damage to the unit. Accessing the Special parameters... -
Page 35: Parameters Description
Parameters description This parameter controls the calibration of the motor speed drive. This has been factory-set and should not be changed unless advised by a Cole- Parmer service technician. This parameter controls the delay for the opening of the shield. This has been factory-set and should not be changed unless advised by a Cole-... - Page 36 This section is used to set the maximum allowed motor speed for a given dish. Tungsten carbide large hardened steel dishes should always be limited to 1050. If you create a new calibration for those, make sure the RPM limit is limited to 1050.
-
Page 37: Dish Calibration Procedure
Dish calibration procedure If you have a dish whose height is not within the standards that existed when the grinder was manufactured, you can create a new entry for your custom dish. The same procedure can be done if frequent locking errors appear, due to parts compression/wear. -
Page 38: Grinding Troubleshooting
Grinding troubleshooting This section presents the most common grinding-related problems. For specific assistance, please do not hesitate to contact us (see page 50, Contact ). Unit does not turn on No power at all Make sure power cord is plugged into outlet. Check outlet for power and correct voltage as required. -
Page 39: Excessive Vibration, Unit "Walks
Excessive vibration, unit “walks” Casters not locked. Lock casters. Locking failed Grinding container is not well inserted. Make sure you slide it completely to the back. Locking height calibration is wrong or wrong dish is selected in the method. Please refer to Dish calibration procedure section to redo dish calibration. -
Page 40: Periodic Inspection
Periodic inspection This instrument requires some regular checking, which is very important to keep your instrument up and running. Cole-Parmer knows that a broken instrument in a laboratory setting causes sample back-up and unnecessary costs. That is why this manual comprises not only a Periodic inspection section, but also a Service operations chapter (see page 39), which guides the user in a step-by-step fashion through operations that sometimes need to be performed on-site. -
Page 41: Service Operations
Service operations This section describes tasks that are performed on a regular basis, and are performed to adjust or repair a malfunctioning system of the instrument. Some sections also describe initial operations, which need to be performed before first using the unit. Should you have any question, or need further assistance, please do not hesitate to contact us (see page 50, Contact ). -
Page 42: Top Panel Removal
Top panel removal In order to gain access to most electronic components, it is necessary to remove the top panel. IMPORTANT: Always disconnect the instrument from the power outlet when working with panels removed. 240 Volts inside! Risk of electrocution! 1. -
Page 43: Front Panel Removal
Front panel removal In order to gain access to the door mechanism and sensors, it is necessary to remove the front panel. IMPORTANT: Always disconnect the instrument from the power outlet when working with panels removed. 240 Volts inside! Risk of electrocution! 1. -
Page 44: Door Removal
Door removal The following procedure describes how to remove the sliding door. This may be necessary to resolve door operating issues (e.g. adjust the height of the locking solenoid, access the safety switch...) IMPORTANT: Always disconnect the instrument from the power outlet when working with panels removed. - Page 45 4. Remove the screws from the two bumper brackets and the counterweight bracket. 5. Hold the door up, while pulling the counterweight bracket down, to disengage it. (WARNING: Door is heavy!)
- Page 46 6. Gently let the door slide down and pull it off its guide rails.
-
Page 47: Back Panel Removal
Back panel removal In order to gain access to the flexible motor link, it is necessary to remove the back panel. IMPORTANT: Always disconnect the instrument from the power outlet when working with panels removed. 240 Volts inside! Risk of electrocution! Never operate the instrument with the back panel removed 1. -
Page 48: Firmware And Program Transfers
Firmware and program transfers Preset programs This section lists the methods that are factory programmed into the SM-300 ShatterBox. It is not possible for the user to alter or delete them. Note that Cole-Parmer cannot be held responsible for any damage to dish or mill incurred by the use of those methods. - Page 49 7. Now, choose where you want the data to be written. Double-click on “USBDISK”, then click on its sub-directory, named “disk_a_1”. 8. Click “OK” to start the transfer to the USB drive. The screen will black out, and the mill will re-boot. 9.
-
Page 50: Technical Specifications
Technical specifications Type of mill: Grinding Mill Grinding mechanism: Grinding containers with puck and ring Weight (without grinding container): 200 kg (440 lbs) Dimensions (w x d x h): 67.5 x 66 x 138 cm (26.6 x 26 x 54.3 in) Electrical: 115 V / 60 Hz (10-amp fuse) 230 V / 50~60 Hz (10-amp fuse) -
Page 51: Warranty
Warranty Cole-Parmer® guarantees its products against defects in materials or workmanship for three years from the date of original shipment. Repairs, replacements, or parts are guaranteed for 30 days or for the remaining original warranty period (whichever is greater) for the item that was repaired or replaced. -
Page 52: Contacting Spex
Contact US Repair Service Phone: 1.732.623.0465 Cole-Parmer 65 Liberty St Metuchen, NJ 08840 Attn: Service and Repair Please include RA Number on the shipping label. Germany T: +1.800.323.4340 or T: +49 (0) 9377 92030 +1.800.323.4340 de.sales@antylia.com sales@antylia.com W: coleparmer.de W: coleparmer.com Canada India Cole-Parmer®...
Need help?
Do you have a question about the ShatterBox SM-300 and is the answer not in the manual?
Questions and answers