Table of Contents
Advertisement
Available languages
Available languages
Quick Links
Advertisement
Chapters
Table of Contents

Subscribe to Our Youtube Channel
Related Manuals for RedMax RZT42


Summary of Contents for RedMax RZT42
- Page 1 RZT42 Operator's manual 2-30 ES-MX Manual del usuario 31-60...
-
Page 2: Table Of Contents
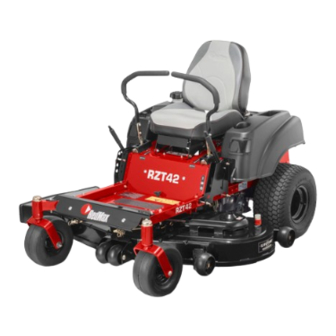
Contents Conformity certificates..........2 Troubleshooting............23 Introduction............... 2 Transportation, storage and disposal......25 Safety................6 Technical data............27 Operation..............10 Service..............29 Maintenance............14 Conformity certificates USA requirements delivery or written in the Engine manual. Take care of them as they are valuable documents. Labels are placed on the engine and/or in the To implement improvements, specifications and engine compartment stating that the machine will... - Page 3 Product overview 1. Control levers 14. Type plate 2. Parking brake Steering controls 3. Tracking control 4. Fuse The direction of the product is controlled by the 2 Product overview on page control levers. Refer to 5. Bypass linkage 3 . The control levers can be moved forward and 6.
- Page 4 Ignition key Choke control The ignition key has 4 positions: The choke control is used for cold starts to supply more fuel to the engine. Pull up the choke control • Start position (A) when you start a cold engine. •...
- Page 5 Product overview on page 3 for engaged. Refer to the position of the hour meter. Always use approved hearing protection. Do not put your foot here. Neutral gear. Reverse gear. Each 50 hours an oil level symbol will show for 2 To do a check of the engine oil level hours.
-
Page 6: Safety
Note: Other symbols/decals on the product refer to certification requirements for some commercial Choke. areas. Keep away from the dis- Product damage charge deck. We are not responsible for damages to our product • the product is incorrectly repaired. Warning! Battery acid is corrosive, explosive and •... - Page 7 on it. Local laws may regulate the age of the • Avoid holes, ruts, bumps, rocks, or other hidden user. hazards. Uneven terrain could overturn the product, or cause operator to lose their balance • Make sure that nobody else is in the vicinity of or footing.
- Page 8 Do a WARNING: check of the safety devices regularly. If the safety The muffler becomes devices are damaged, speak to your RedMax very hot during and after use and when service agent. the engine operates at idle speed. Be •...
- Page 9 • Only use tow equipment approved by RedMax. • Use the tow bar to attach the equipment. WARNING: Be careful with fuel. It •...
-
Page 10: Operation
Safety instructions for maintenance very dangerous gas. Do not run the product in closed spaces or spaces with no sufficient air flow. WARNING: Read the warning instructions that follow before you use • Keep the product in good working order. Replace the product. - Page 11 2. Loosen the seat adjustment knob (B). WARNING: Before you operate the product, you must make sure that there are no stones or other objects in the work area that can be thrown by the rotating blades. Maintenance • Do the daily maintenance. Refer to schedule on page 14 .
- Page 12 1. Park the product on level ground and stop the 4. Push the release button (A) and move the cutting engine. height lever forward to the cutting height pin. WARNING: Let the engine become cool before you disengage or engage the drive system. 2.
- Page 13 11. Let the engine run at ½ throttle for 3-5 minutes b) Pull the right control lever rearward in the before you apply full throttle. direction of the neutral position to make the product turn right. The more you pull the right 12.
-
Page 14: Maintenance
To get a good cutting result • When the mulch kit is used, cut the grass more frequently. • For best performance, do maintenance on the • To get the best cutting result, cut the grass product regularly as given in the maintenance frequently. - Page 15 Daily maintenance Do maintenance Maintenance interval in hours Maintenance at a minimum of 1 Before After time each year Make sure that there are no damage on the prod- uct. Make sure that there are no loose parts. Do a check for damages on the cutting deck.
- Page 16 Daily maintenance Do maintenance Maintenance interval in hours Maintenance at a minimum of 1 Before After time each year Start the engine and blades and listen for un- usual sounds. Sharpen the blades. Replace the blades. Replace the spark plugs. Replace the engine oil.
- Page 17 1. Connect one end of the red cable to the Note: Do not park the product on a grass POSITIVE battery terminal (+) on the weak slope when you do a check of the parking brake. battery (A). 2. Engage the parking brake. 3.
- Page 18 To remove and install the front 2. Remove the bolt and the nut from the battery bracket and remove the battery bracket from the wheels battery. 1. Remove the nut and the bolt to remove the front wheels from the forks. 2.
- Page 19 To adjust the parallelism of the 8. If the front blade tip distance is not ¼–⅜ in. / 6.35–9.52 mm higher in the rear than in the front, cutting deck turn the nuts on the front suspension linkage. Turn the nuts clockwise to increase the height This procedure will set the cutting deck in a standard and counterclockwise to decrease the height.
- Page 20 Technical data on page Refer to from the pulleys. 27 for the types of engine oil that RedMax 8. Remove the deck belt from the electric clutch on recommends. Do not mix different types of oil. the engine shaft.
- Page 21 5. Install the oil drain tube (A) on the engine oil 11. Fill with new oil and do a check of the engine oil To do a check of the engine oil drain valve (B). level. Refer to level on page 20 . 12.
- Page 22 Lubrication schedule Refer to Lubrication Interval Each 25 Each 50 Each 200 Daily hours hours hours Lubricate the grease nipple on the pivot axle with a grease gun. Do a check of the oil level. Replace the oil filter. To lubricate the front wheels Always use good quality grease.
-
Page 23: Troubleshooting
Lubricate the joint bearing of the front wheels (B) with a grease gun until grease comes out. Troubleshooting Troubleshooting schedule If you cannot find a solution to your problems in this operator's manual, speak to your RedMax service agent. Problem Cause PTO (Power Take- Engine does not start. - Page 24 Problem Cause To examine the blades on page There is vibration in the product. The blades are loose. Refer to 19 . To exam- One or more of the blades are not balanced. Refer to ine the blades on page 19 . The engine is loose.
-
Page 25: Transportation, Storage And Disposal
Problem Cause The cutting result is unsatisfactory. The tire pressure is different on the right and left sides. Refer to Tire pressure on page 18 . The blades are damaged. The suspension of the cutting deck is not level. To examine the blades on page The blades are blunt. - Page 26 • Do not discard the battery as domestic waste. • Send the battery to a RedMax service agent or discard it at a disposal location for used batteries. 2236 - 001 - 18.08.2023...
-
Page 27: Technical Data
Technical data Technical data RZT42 Engine Brand / Model Kawasaki/FR651V Nominal engine output, hp / kW 21.5 / 16.0 Displacement, cm Max. engine speed, rpm 3300 ± 100 Fuel, min. octane grade lead-free, max 10% Ethanol, max 15% MTBE Tank volume, gallons / l 3.5 / 13.3... - Page 28 RZT42 Blade Engagement Electromagnetic Clutch Productivity, acres/h / m 2.2 / 8,903.08 Tires Tire pressure, rear – front, kPa / PSI / bar 103 / 15 / 1 Front caster tires, in. 11 × 6-5 Rear tires, turf pneumatic, in.
-
Page 29: Service
Service Service When you send an order for the spare parts, give information about the purchase year, model, type, Do a yearly check at an authorized service center to and serial number. make sure that the product functions safely and at Always use original spare parts. - Page 30 Electrical diagram 2236 - 001 - 18.08.2023...
-
Page 31: Certificados De Conformidad
Contenido Certificados de conformidad........31 Solución de problemas........... 53 Introducción............31 Transporte, almacenamiento y eliminación de residuos..............55 Seguridad..............35 Datos técnicos............57 Funcionamiento............40 Servicio..............59 Mantenimiento............44 Certificados de conformidad Requisitos para EE. UU. máquina en el momento de su entrega o que estén escritos en el manual del motor. - Page 32 Descripción general del producto 1. Palancas de control 14. Placa de identificación 2. Freno de estacionamiento Controles de la dirección 3. Control de seguimiento 4. Fusible La dirección del producto se controla mediante las 2 Descripción general palancas de control. Consulte 5.
- Page 33 Control de presencia del operador • Aceleración máxima (A): aumenta el régimen del motor. (OPC) • Régimen de ralentí (B): disminuye el régimen del motor. El OPC se acciona cuando el operador se levanta del asiento. El motor y la transmisión para AVISO: No use el motor a régimen las cuchillas se detienen si las cuchillas están...
- Page 34 Fusibles La ubicación de los fusibles está en la caja de fusibles. La caja de fusibles está debajo del asiento. Use guantes protectores. Incline el asiento hacia delante para acceder a la caja de fusibles. Consulte la etiqueta de la caja de fusibles para identificar los diferentes fusibles.
-
Page 35: Seguridad
Mantenga las partes del cuerpo alejadas de las piezas giratorias. Mantenga las manos lejos de las piezas giratorias. aaaassxxxx La placa de característi- cas muestra el número de serie. aaaa es el año Tenga cuidado con las personas y de producción y ss es la los animales cuando opere el producto semana de producción. - Page 36 • No lleve pasajeros y mantenga alejados a los el uso seguro del producto. Los niños que han observadores. dado una vuelta en la máquina pueden aparecer de repente en la zona de corte para dar otra • No haga funcionar el producto bajo la influencia vuelta y podrían ser atropellados o golpeados del alcohol o las drogas.
- Page 37 Ponga atención a la presencia de surcos, de seguridad están dañados, comuníquese con agujeros y baches, y no pase transversalmente el agente de servicio de RedMax. por ellos. Existe un mayor riesgo de que el • No realice ninguna modificación en los producto se vuelque en suelo que no es plano.
- Page 38 Las palancas de control están en la posición las tierras federales. neutra. • El freno de estacionamiento está aplicado. Se puede obtener un apagachispas para el silenciador a través de su distribuidor RedMax • La transmisión de las cuchillas está desactivada. aprobado. • El OPC está presionado.
- Page 39 Si la batería tiene una • La gasolina y los vapores de gasolina son deformación o está dañada, hable con tóxicos y muy inflamables. Tenga cuidado con un taller de servicio RedMax autorizado. la gasolina para evitar lesiones personales o incendios. ADVERTENCIA: •...
-
Page 40: Funcionamiento
Para lograr mayores niveles de rendimiento ADVERTENCIA: Un escape de y seguridad, realice el mantenimiento del líquido con presión puede tener fuerza producto con regularidad como se indica en el suficiente para traspasar la piel y Programa programa de mantenimiento. Consulte causar daños graves. - Page 41 Seguridad de combustible en la consulte 5. Instale y apriete la perilla de ajuste del asiento página 38 . (A). 6. Apriete la perilla de ajuste del asiento (B). ADVERTENCIA: El motor y el Para plegar el asiento sistema de escape se calientan mucho El asiento se puede plegar hacia delante para durante el funcionamiento.
- Page 42 5. Tire los varillajes de derivación hacia arriba y 4. Presione el botón de liberación (A) y mueva la retírelos de las ranuras. palanca de altura de corte hacia delante hasta el pasador de altura de corte. 6. Acople el sistema de transmisión en secuencia Para arrancar el motor opuesta.
- Page 43 de 5 segundos cada vez. Si el motor no arranca, a) Tire de la palanca de control izquierda espere 15 segundos antes de volver a intentarlo. hacia atrás en la dirección de la posición neutra para hacer que el producto gire a la 10.
-
Page 44: Mantenimiento
3. Presione el botón de PTO para desactivar la • Empiece con una altura de corte elevada y transmisión de las cuchillas. reduzca gradualmente. • Utilice la aceleración máxima cuando corte el césped. • Avance con el producto a baja velocidad si el césped es alto y grueso. - Page 45 Para llevar a cabo un Realice el mante- Intervalo de mantenimiento en ho- mantenimiento diario nimiento por lo Mantenimiento menos 1 vez al Antes Después año. Verifique que no haya fu- gas de combustible ni de aceite del producto. Verifique que el producto no esté...
- Page 46 Para llevar a cabo un Realice el mante- Intervalo de mantenimiento en ho- mantenimiento diario nimiento por lo Mantenimiento menos 1 vez al Antes Después año. Examine el silenciador y la rejilla apagachispas. Arranque el motor y las cuchillas, y revise si hay ruidos inusuales.
- Page 47 Para limpiar la batería el arranque de emergencia debe tener también un sistema de 12 V con conexión a tierra negativa. La corrosión y la suciedad en la batería y en los Para conectar los cables de puente terminales pueden hacer que disminuya la potencia de la batería.
- Page 48 Para retirar e instalar la batería Presión de los neumáticos Para 1. Pliegue el asiento hacia delante. Consulte Asegúrese de tener la presión correcta de los plegar el asiento en la página 41 . Datos neumáticos en los 4 neumáticos. Consulte técnicos en la página 57 .
- Page 49 6. Mida la distancia entre el suelo y la parte inferior AVISO: El equipo de corte de la punta de la cuchilla en el lado opuesto puede dañarse si las ruedas de al lado de descarga. La distancia debe ser la apoyo se ajustan incorrectamente.
- Page 50 57 para ver los tipos de aceite del motor que RedMax recomienda. No 2. Coloque la correa del equipo alrededor de las mezcle diferentes tipos de aceite.
- Page 51 8. Cuando se haya drenado todo el aceite del ADVERTENCIA: No haga motor, gire la válvula de drenaje de aceite hacia funcionar el motor durante más de la derecha para cerrarla. Utilice una llave de 1-2 minutos antes de drenar el aceite 10 mm.
- Page 52 Programa de lubricación AVISO: No utilice gasolina ni otros productos petrolíferos para limpiar las correas de transmisión. Consulte Lubricación Intervalo A dia- Cada Cada Cada 25 horas 50 horas 200 horas Lubrique la boquilla de engrase en el eje de pivote con una pistola de engrase. Compruebe el nivel de aceite.
-
Page 53: Solución De Problemas
Solución de problemas Programa de solución de problemas Si no encuentra una solución a sus problemas en este manual de usuario, consulte a su taller de servicio de RedMax. Problema Causa Botón de El motor no arranca. - Page 54 Problema Causa El motor no funciona correctamente. El carburador está mal ajustado. El filtro de combustible o el suministro de combustible están obstruidos. El estrangulador está accionado y el motor está caliente. La válvula de comprobación en el tapón del depósito de com- bustible está...
-
Page 55: Transporte, Almacenamiento Y Eliminación De Residuos
Problema Causa La transmisión de las cuchillas no se ac- La correa de transmisión del equipo de corte está floja. ciona. El contacto del acoplamiento electromagnético está flojo. La transmisión de la cuchilla está defectuosa o suelta de los conectores de cable. Un fusible está... - Page 56 No deseche la batería como un residuo ADVERTENCIA: doméstico. No mantenga el • Envíe la batería a un taller de servicio RedMax producto con combustible en el depósito o deséchela en un lugar para eliminación de en interiores o en lugares con mala baterías usadas.
-
Page 57: Datos Técnicos
Datos técnicos Datos técnicos RZT42 Motor Marca / Modelo Kawasaki/FR651V Potencia normal del motor, hp / kW 21,5 / 16,0 Cilindrada, cm Máx. régimen del motor, rpm 3300 ± 100 Combustible, grado de octanos mínimo sin plomo, etanol al 10 % máx., 15 % MTBE máx. - Page 58 RZT42 Acoplamiento de la cuchilla Embrague electromagnético Productividad, acres/h / m 2,2 / 8903,08 Neumáticos Presión de los neumáticos, traseros y delanteros, 103 / 15 / 1 kPa / PSI / bar Neumáticos de la ruedecilla delantera, in 11 × 6-5 Neumáticos traseros, neumático para césped, in 18 × 8,5-8...
-
Page 59: Servicio
Servicio Servicio Cuando envíe un pedido de piezas de repuesto, dé información sobre el año de compra, modelo, tipo y Realice una comprobación anual en un centro de número de serie. servicios autorizado para asegurarse de que el Utilice siempre piezas de repuesto originales. producto funciona de forma segura y a su máximo potencial durante la temporada alta. - Page 60 Diagrama eléctrico 2236 - 001 - 18.08.2023...
- Page 61 2236 - 001 - 18.08.2023...
- Page 62 2236 - 001 - 18.08.2023...
- Page 63 2236 - 001 - 18.08.2023...
- Page 64 www.husqvarna.com Original instructions Instrucciones originales 1142441-49 Rev. 2 2023-08-29...
Need help?
Do you have a question about the RZT42 and is the answer not in the manual?
Questions and answers