Advertisement
Quick Links
Advertisement

Related Manuals for Kogan KABNCTPDW8B


Summary of Contents for Kogan KABNCTPDW8B
- Page 1 BENCHTOP DISHWASHER (8 PLACE SETTINGS) KABNCTPDW8B...
-
Page 2: Table Of Contents
Safety & Warnings Overview Installation Operation Cleaning & Care Troubleshooting Notes... -
Page 3: Safety & Warnings
• If this product, power supply cord or plug shows any sign of damage: stop use, unplug the product and contact Kogan.com support. • This appliance is not intended for use by persons (including children) with reduced physical, sensory or mental capabilities or lack of experience and knowledge, unless they have been given supervision or instruction concerning use of the appliance by a person responsible for their safety. - Page 4 • This appliance contains no user-serviceable parts. If it suffers any failure or damage, cease usage and contact help.Kogan.com for support after consulting the Troubleshooting section of this manual.
-
Page 5: Overview
OVERVIEW Step 1 Press the Power switch button to switch on the appliance and open the door. Switch on the appliance Compartment A With each wash cycle. Compartment B Step 2 For programmes with pre- Fill the detergent wash only. dispenser Step 3 Mechanical indicator C... - Page 6 Press the Start/Pause button to stop the machine. Open the door. Step 6b Add the forgotten dishes. Add forgotten dishes in Close the door, then press the Start/Pause button. The the dishwasher. dishwasher will start running again. WARNING! Open the door carefully. Hot steam may escape when the door is opened! Step 6c If the appliance is switched off during a wash cycle and...
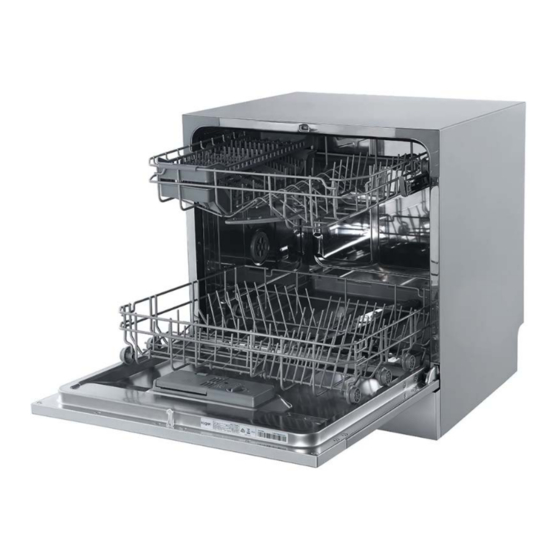
- Page 7 Front view Back view Detergent dispenser Cup shelf Filter assembly Basket Rinse aid dispenser Inlet pipe connector Spray arms Drainpipe connector...
-
Page 8: Installation
INSTALLATION Position the appliance in the desired location. The back should rest against the wall behind it and the sides, along the adjacent cabinets or wall. The dishwasher is equipped with water supply and drain hoses that can be positioned to the left or right to facilitate installation. Cold water connection Connect the cold-water supply hose to a threaded ¾"... - Page 9 Drainage hose Insert the drainage hose into a drainpipe with a minimum diameter of 4cm or let it run into the sink, making sure to avoid bending or crimping it. The free end of the hose must be at a height less than 75cm and must not be immersed in water to avoid backflow.
-
Page 10: Operation
OPERATION Before use, add rinse aid and detergent. Rinse aid dispenser The rinse aid is released during the final rinse to prevent water from forming droplets on dishes, which can leave spots and streaks. It also improves drying by allowing water to roll off the dishes. - Page 11 How to fill • To open the dispenser, turn the cap to the “open” (left) arrow and lift it out. Pour the rinse aid into the dispenser, do not overfill it. • Replace the cap by inserting it aligned with “open” arrow and turning it to the position marked by the “close”...
- Page 12 Loading and usage recommendations • Consider buying utensils which are identified as dishwasher-proof. • To prevent damage, do not take glass and cutlery out of the dishwasher immediately after the programme has ended. • Load hollow items such as glasses, pans, etc., upside down to avoid water-collection. •...
- Page 13 1. Upper basket 2. Lower basket Down shelf Up shelf Cups Dessert dishes Dinner plates Soup plates Glasses Saucers Up shelf Down shelf Teaspoons Soup spoons Dessert spoons Forks Knives...
- Page 14 Wash programmes Rinse Cycle selection Description of Detergent Running Energy Water Program information cycle pre/main time (min) (kWh) Pre-wash For heaviest (50°C) soiled Wash (65°C) crockery, 5/20g Rinse soiled pots, (or 1 1.25 pans, dishes, piece) Rinse Intensive etc., with dried Rinse (70°C) on soiling.
- Page 15 For lightly Pre-wash soiled loads, Wash (45°C) such as Rinse 5/20g glasses, Rinse (60°C) Glass crystals and Drying fine china. Wash(55°C) For lightly Wash(65°C) soiled crockery 1.15 Rinse(68°C) and glass. 90 min Drying A short wash Wash (45°C) for lightly soiled loads Rinse 0.52...
-
Page 16: Cleaning & Care
CLEANING & CARE General Maintenance • After every wash, turn off the water supply to the appliance and leave the door slightly open so that moisture and odours are not trapped inside. • Before cleaning or performing maintenance, always remove the plug from the socket. •... - Page 17 Filter The filter assembly comprises the Main Filter (A), Fine Filter (B) and Coarse Filter (C). To disassemble Step 1 Rotate filter assembly and lift upwards. Open Step 2 Remove parts B and C from the filter assembly A. Step 3 With the filter is disassembled, clean gently using a cleaning brush.
- Page 18 Spray arms Open • To remove the upper spray arm, hold the nut; rotate the arm clockwise to remove it. • To remove the lower spray arm, pull out the spray arm upward. • Wash the arms in soapy and warm water and use a soft brush to clean the jets. Replace them after rinsing thoroughly.
-
Page 19: Troubleshooting
TROUBLESHOOTING Issue Possible cause Steps to resolve Reset, remove other devices from Circuit breaker tripped. circuit. Dishwasher not Ensure power plug is inserted starting Power supply not turned on. securely and dishwasher turned Door not firmly closed. Close, ensure door latches. Kink in drain hose. - Page 20 Affected items not rust- Do not wash these in dishwasher. resistant. Rust stains on cutlery Dishwasher salt used; If using dishwasher salt, only run programme not run. basic Quick Wash programme. Lid is loose. Check and secure lid. Knocking noise Spray arm knocking against Pause programme and readjust.
- Page 21 Detergent left in Dishes blocking detergent Re-load dishes. dispenser cups. Loaded incorrectly. Re-load dishes. Refill rinse aid dispenser or add Too little rinse aid. more. Allow dishes to cool after washing is finished. Dishes not drying Dishes removed too soon. Open door slightly to allow steam to escape.
- Page 22 NOTES...
- Page 24 Need more information? We hope that this user guide has given you the assistance needed for a simple set-up. For the most up-to-date guide for your product, as well as any additional assistance you may require, head online to help.kogan.com...
Need help?
Do you have a question about the KABNCTPDW8B and is the answer not in the manual?
Questions and answers