Advertisement
Quick Links
DE | Sicherheitshinweise
EN | Safety recommendations
FR | Conseils de sécurité
NL | Veiligheidsinstructies
ES | Advertencia de seguridad
PT | Indicações de segurança
DE
IT | Indicazioni di sicurezza
E-Lok Wandsbeker Industriebahn Nr. 1 H0 Art.-Nr. 214xx
DA | Sikkerhedsanvisninger
SV | Säkerhetsanvisningar
Anleitung
PL | Wskazówki dotyczące bezpieczeństwa
Vor Gebrauch die Sicherheitshinweise und Anleitung genau lesen und
ZH | 安全提示
beachten. Vor dem Zusammenbau sollten Sie sich mit den Einzeltei-
RU | Указания по технике безопасности
len vertraut machen, diese sorgfältig abtrennen und ggf. z.B. mit klei-
ner Feile und feinem Schmirgelpapier entgraten. Auf den innenliegen-
JA | 安全に関する注意事項
den Oberflächen können lose Kunststoffpartikel anhaften. Nach Tren-
nung der Einzelteile empfiehlt sich eine Reinigung der Teile mit lau-
warmer Seifenlauge und einer weichen Bürste. Anschließend mit
klarem Wasser abspülen und gut trocknen lassen. Polyamid wird von
Methansäure (Ameisensäure) gelöst (Vorsicht: ätzend!) und kann da-
mit verklebt werden. Sonst eignen sich Kontaktkleber (z. B. Uhu®
Alleskleber Kraft, beidseitig dünn auftragen und ablüften lassen) sowie
2K-Epoxydharz- und Sekundenkleber. Letztere eignen sich auch für
die Verklebung mit Metall, z.B. Griffstangen und Zurüstteile. Dieser
Bausatz wurde sorgfältig gepackt. Sollte trotzdem ein Teil fehlen,
können Sie es unter Einsendung dieser Anleitung mit Angabe der
Teilenummer (siehe unten) direkt bei D
fordern.
Inhalt
1x 21401-1 Gehäuse (nur 2140x und 2142x)
1x 21411-1 Gehäuse (nur 2141x und 2143x)
1x 21401-2 Spritzling mit 2 Dächern
1x 21401-4 Satz Gewichte aus BiSn42 (nur 2140x und 2141x)
1x 99902 Chassis ohne Achsen (nur 2140x und 2141x)
2x 99910-9-9 2 Antriebsachsen 9x9 (nur 21401 und 21411)
2x 99910-12-9 2 Antriebsachsen 12x9 (nur 21403 und 21413)
1x 99903 Chassis ohne Antrieb (nur 2142x und 2143x)
2x ACH002 Achsen 9x7,7x14,5 (nur 21421 und 21431)
1x G001-1 klarer Kunststoff
1x M001-1 Draht D0,3
1x MAN214xx Anleitung und Sicherheitshinweise
Zusammenbau
1. Einzelteile voneinander trennen. Verbindungsstege vollständig
entfernen.
2. Bohrungen unterhalb der Stirnfenster aufbohren.
3. Drahtabschnitte nach Zeichnung biegen.
4. Drahtbügel an die entsprechenden Positionen der Gehäuses
kleben. Die Griffe der Hauben dürfen innen nicht vorstehen!
5. Dicke der quaderförmigen Gewichte prüfen, diese dürfen max.
4,5 mm dick sein. Ggf. abfeilen (nicht 2142x und 2143x).
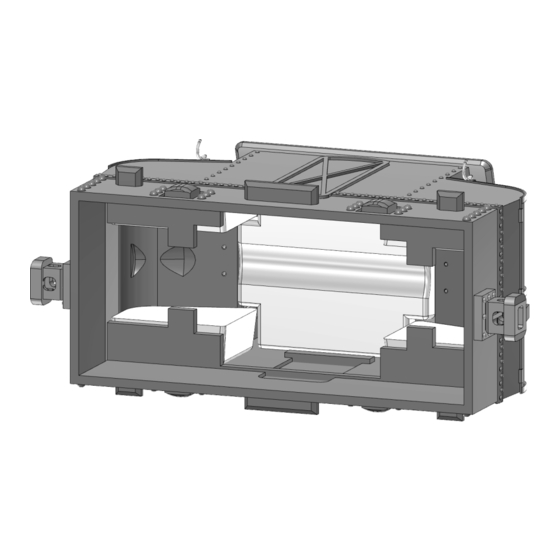
6. 4 quaderförmige Gewichte entsprechend Bild in das Gehäuse
kleben (nicht 2142x und 2143x).
7. Gehäuse und Dach nach Wunsch lackieren.
8. 2 Stücke klaren Kunststoff auf 15,2 x 7,1 mm, Toleranz -1mm,
zuschneiden und mit wenig Kleber von innen in die Stirnfenster
kleben.
9. Flaches Gewicht von oben in das Führerhaus kleben. Es sitzt
knapp unterhalb der Fenster. Die runde Ausnehmung zeigt nach
unten (nicht 2142x und 2143x).
10. Gewünschten Stromabnehmer auf das entsprechende Dach
montieren.
11. Dach auf das Gehäuse klipsen.
12. Teile des Chassis trennen, die beiden flachen Kunststoffteile wer-
den nicht benötigt (nur 21421 und 21431)
13. Drehbalken auf Breite des Motors kürzen (nur 2140x und 2141x).
14. Achsen an die inneren Positionen des Fahrwerks setzen
15. Fahrwerk in Gehäuse klipsen.
© 01-2021 DTLW - Änderungen vorbehalten
® an-
T
L
W
ESK
OP
OCOMOTIVE
ORKS
EN
Electric locomotive Wandsbeker industrial railway No. 1
H0 Art.-No. 214xx
Manual
Read and follow the safety instructions and instructions careful-
ly before use. Before assembling, you should familiarize yourself
with the individual parts, carefully separate them and, if ne-
cessary, e.g. deburr with a small file and fine emery paper. Loo-
se plastic particles can adhere to the internal surfaces. After
separating the individual parts, cleaning the parts with luke-
warm soapy water and a soft brush is recommended. Then
rinse with clear water and let it dry well. Polyamide is dissolved
from methanoic acid (formic acid) (caution: caustic!) And can be
glued to it. Otherwise, contact adhesives (e.g. Uhu® all-purpo-
se adhesive Kraft, apply thinly on both sides and allow to flash
off) are suitable, as well as 2-component epoxy resin and su-
perglue. The latter are also suitable for bonding with metal, e.g.
Handle bars and accessories. This kit has been carefully pa-
cked. Should a part still be missing, you can request it directly
from DeskTop Locomotive Works® by sending in these instruc-
tions with the part number (see below).
Content
1x 21401-1 housing (only 2140x and 2142x)
1x 21411-1 housing (only 2141x and 2143x)
1x 21401-2 injection molding with 2 roofs
1x 21401-4 set of weights of BiSn42 (only 2140x and 2141x)
1x 99902 chassis without axles (only 2140x and 2141x)
2x 99910-9-9 2 drive axles 9x9 (only 21401 and 21411)
2x 99910-12-9 2 drive axles 12x9 (only 21403 and 21413)
1x 99903 chassis without drive (only 2142x and 2143x)
2x ACH002 axes 9x7.7x14.5 (only 21421 and 21431)
1x G001-1 clear plastic
1x M001-1 wire D0.3
1x MAN214xx instructions and safety instructions
Assembly
1. Separate individual parts from one another. Completely
remove the connecting bars.
2. Drill out the holes below the front window.
3. Bend wire sections according to drawing.
4. Glue wire clips to corresponding positions on the housing.
The handles of the hoods must not protrude from the
inside!
5. Check thickness of the cuboid weights, they may not be
more than 4.5 mm thick. File off if necessary (not 2142x and
2143x).
6. Stick 4 cuboid weights into housing as shown in picture (not
2142x and 2143x).
7. Paint housing and roof as desired.
8. Cut 2 pieces of clear plastic to 15.2 x 7.1 mm, tolerance
-1mm, and glue them into front window from the inside with
a little glue.
9. Glue flat weight into the cab from above. It sits just below
the window. The round recess points downwards (not 2142x
and 2143x).
10. Mount desired pantograph on corresponding roof.
11. Clip roof onto housing.
12. Separate parts of chassis, the two flat plastic parts are not
required (only 21421 and 21431)
13. Shorten rotating bar to the width of the motor (only 2140x
and 2141x).
14.Place axles at the inner positions of the chassis
15.Clip chassis into housing.
1
von
3
Changes reserved - MAN214xx_A
Advertisement

Related Manuals for Desktop Locomotive Works H0 214 Series


Summary of Contents for Desktop Locomotive Works H0 214 Series
- Page 1 OCOMOTIVE ORKS cked. Should a part still be missing, you can request it directly fordern. from DeskTop Locomotive Works® by sending in these instruc- tions with the part number (see below). Inhalt 1x 21401-1 Gehäuse (nur 2140x und 2142x) Content 1x 21411-1 Gehäuse (nur 2141x und 2143x)
- Page 2 © 01-2021 DTLW - Änderungen vorbehalten Changes reserved - MAN214xx_A...
- Page 3 DE | Sicherheitshinweise EN | Safety recommendations DE Sicherheitshinweise EN Safety recommendations FR | Conseils de sécurité NL | Veiligheidsinstructies Bestimmungsgemäßer Gebrauch Proper use ES | Advertencia de seguridad Dieses Produkt ist ein Modellbauartikel für anspruchsvolle This product is a scale modeling article aimed at ambitious Modellbauer und Sammler und kein Spielzeug.
Need help?
Do you have a question about the H0 214 Series and is the answer not in the manual?
Questions and answers