Advertisement
Quick Links
DE | Sicherheitshinweise
EN | Safety recommendations
FR | Conseils de sécurité
NL | Veiligheidsinstructies
ES | Advertencia de seguridad
PT | Indicações de segurança
NO
IT | Indicazioni di sicurezza
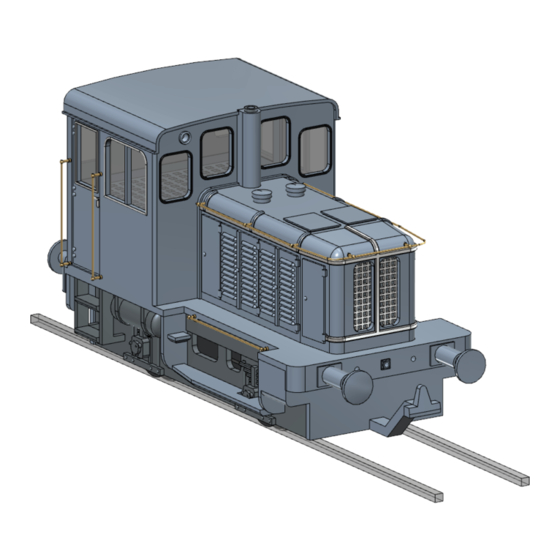
Deutz diesellokomotiv A8L 614 R nr. 30802
DA | Sikkerhedsanvisninger
SV | Säkerhetsanvisningar
Håndbok
PL | Wskazówki dotyczące bezpieczeństwa
Les og følg sikkerhetsinstruksjonene og instruksjonene nøye før
ZH | 安全提示
bruk. Før du monterer, bør du gjøre deg kjent med de enkelte
delene, skille dem nøye og om nødvendig f.eks. Avgrat med en
RU | Указания по технике безопасности
liten fil og fint sandpapir. Løse plastpartikler kan feste seg til de
JA | 安全に関する注意事項
indre overflatene. Etter å ha skilt ut de enkelte delene, anbefaler
vi at du rengjør delene med lunkent såpevann og en myk børs-
te. Skyll deretter med rent vann og la det tørke godt. Polyamid
oppløses av metansyre (maursyre) (forsiktighet: kaustisk!) Og
kan limes på den. Ellers er kontaktlim (f.eks. Uhu® universallim
Kraft, påføres tynt på begge sider og lar avblinke), så vel som 2-
komponent epoksyharpiks og superlim er egnet. Sistnevnte er
også egnet for binding til metall, f.eks. Håndtak og tilbehør.
Dette settet er nøye pakket. Hvis en del fortsatt mangler, kan du
be om den direkte fra DeskTop Locomotive Works® ved å sen-
de inn disse instruksjonene og spesifisere delenummeret (se
nedenfor).
Innhold
1x 30801-1 hus
1x 30801-2 gran med førerhusinnsats og ramme
1x 30801-3 vindusinnlegg lasert
1x 30801-4 sett med vekter laget av BiSn42
1x 30301-2 grill laser
2x M001-1 ledning 0,3 mm
1x CHA005 stasjon
1x MAN308xx instruksjoner og sikkerhetsinstruksjoner
Tekniske data for stasjonen
Motor 12 V DC, 2 svinghjul
Akselavstand 30,4 mm, hjuldiameter 9 mm
Begge akslene drev, ingen trekkdekk
Montering
1. Separer førerhusinnsatsen fra rammen og bor hull for styret
og annet tilbehør om nødvendig. Mal deler etter ønske.
2. Kontroller høyden på vektene og arkiv den runde siden om
nødvendig:
-
U-formede vekt sider 7,2 mm, midtre 8,9 mm
-
Stor vekt 8,3 mm
-
Liten vekt 5,7 mm
3. Lim den U-formede vekten inn i rammen i førerhuset. Den
må ikke stikke ut på baksiden, om nødvendig arkivere den.
Den må passe inn i rammen uten spenning, om nødvendig
arkivere den smalere. Hvis en digital dekoder (maks. 27,6
x 20,9 x 3,5 mm) er installert over vekten, må du isolere
toppen av vekten med Captron-tape. Alternativt kan dette
rommet fylles med ekstra vekt.
4. Lim stor vekt i stammen nedenfra. Den må presses mot
skilleveggen til førerhuset.
5. Lim den lille vekten i stammen nedenfra. Den må presses
mot den store vekten, den smale siden vender fremover.
Isoler undersiden med Captron-tape.
6. Fest stasjonen inn i rammen nedenfra. Kondensatoren må
vende fremover for å simulere viften.
7. Skjær ut vindusinnsatsene og bøy de to rammene ca 80 °
langs den laserede kinklinjen. Den laserede linjen er på uts-
iden.
8. Fest vindusinnsatsene fra innsiden, de holder uten å feste
seg. Bruken med de lange vingene kommer foran.
9. Lim kjølergrillen fra innsiden inn i hetten.
10. Utstyr om nødvendig førerhusinnsatsen med en sjåfør og
klikk den på plass nedenfra.
11. Fest huset på rammen.
© 08-2020 DTLW - Med forbehold om endringer
EN
Deutz diesel locomotive A8L 614 R No. 30802
Manual
Read and follow the safety instructions and instructions careful-
ly before use. Before assembling, you should familiarize yourself
with the individual parts, separate them carefully and, if ne-
cessary, e.g. Deburr with a small file and fine sandpaper. Loose
plastic particles can adhere to the internal surfaces. After sepa-
rating the individual parts, we recommend cleaning the parts
with lukewarm soapy water and a soft brush. Then rinse with
clean water and allow to dry well. Polyamide is dissolved by
methanoic acid (formic acid) (caution: caustic!) and can be
glued with it. Otherwise contact adhesives (e.g. Uhu® all-pur-
pose adhesive Kraft, apply thinly on both sides and allow to
flash off) as well as 2-component epoxy resin and superglue are
suitable. The latter are also suitable for bonding to metal, e.g.
Handle bars and accessories. This kit has been carefully pa-
cked. If a part is still missing, you can request it directly from
D
T
L
ESK
OP
OCOMOTIVE
and specifying the part number (see below).
Content
1x 30801-1 housing
1x 30801-2 sprue with driver's cab insert and frame
1x 30801-3 window inserts lasered
1x 30801-4 set of weights made of BiSn42
1x 30301-2 grille lasered
2x M001-1 wire 0.3 mm
1x CHA005 drive
1x MAN308xx instructions and safety instructions
Technical data of the drive
Motor 12 V DC, 2 flywheels
Axle base 30.4 mm, wheel diameter 9 mm
Both axles powered, no traction tires
Assembly
1. Separate the cab insert from the frame and drill holes for the
handlebars and other accessories if necessary. Paint parts
as desired.
2. Check the height of the weights and file down round side if
necessary:
-
U-shaped weight sides 7.2 mm, middle 8.9 mm
-
Large weight 8.3 mm
-
Small weight 5.7 mm
3. Glue the U-shaped weight into the frame in the driver's cab.
It must not protrude at the back, if necessary file off. It must
fit without tension into the frame, potentially, narrow it. If a
digital decoder (max. 27.6 x 20.9 x 3.5 mm) is installed
above the weight, insulate the top of the weight with
Captron tape. Alternatively, this space can be filled with
additional weight.
4. Glue large weight into the stem from below. It must be pres-
sed against the partition wall to the driver's cab.
5. Glue the small weight into the stem from below. It must
press against the large weight, the narrow side points to
front. Insulate lower side with Captron tape.
6. Snap the drive into the frame from below. The condenser
must face forward direction to the simulation of the fan.
7. Cut out the window inserts and bend the two sashes about
80 ° along the lasered kink line. The lasered line is on the
outside.
8. Snap in the window inserts from the inside, they hold wi-
thout glueing. The part with the long wings comes to the
front.
9.Glue the radiator grille from the inside into the hood.
10.If necessary, equip the cab insert with a driver and
snap it into place from below.
11.Snap the housing onto the frame.
1
von
4
W
® by sending in these instructions
ORKS
Changes reserved - MAN308xx_NO_B
Advertisement

Related Manuals for Desktop Locomotive Works Deutz A8L 614 R


Summary of Contents for Desktop Locomotive Works Deutz A8L 614 R
- Page 1 Dette settet er nøye pakket. Hvis en del fortsatt mangler, kan du flash off) as well as 2-component epoxy resin and superglue are be om den direkte fra DeskTop Locomotive Works® ved å sen- suitable. The latter are also suitable for bonding to metal, e.g.
- Page 2 Montagebilder Assembly pictures 4 - 5 Informasjon om modellen Information about the prototype Typeserien KHD A8L 614 R var et toakslet diesellokomotiv med The type series KHD A8L 614 R was a two-axle diesel locomo- kjede- eller kardanakseldrift for skiftetjenesten. tive with chain or cardan shaft drive for the shunting service.
- Page 3 Vi anbefaler bruk av Weinert styreholdere nr. 8460 We recommend the use of Weinert handlebar holders No. 8460 Ytterligere tilbehør: Further accessories: 4 takkroker Weinert 8262 4 roof hooks Weinert 8262 2x lamper Weinert 4354 2x lamps Weinert 4354 4 vindusviskere Weinert 9230 4 pcs windshield wipers Weinert 9230 ...
- Page 4 DeskTop Loco- model installation. It may exclusively be operated together with motive Works. DeskTop Locomotive Works-produkter er i utgangs- the accessories and add-on devices recommended by D punktet designet og konstruert for hobbybruk, ikke for kontinuerlig .
Need help?
Do you have a question about the Deutz A8L 614 R and is the answer not in the manual?
Questions and answers