Advertisement
Quick Links
Advertisement

Subscribe to Our Youtube Channel
Related Manuals for Pulsar LRF XQ35


Summary of Contents for Pulsar LRF XQ35
- Page 1 Manual Axion 2 LRF Specifications You can read about main parameters here. Model LRF XQ35 LRF XQ35 PRO LRF XG35 77479 77477 77502 Microbolometer Type uncooled Resolution, Pixels 384x288 640x480 Pixel Pitch, µm < 40 NETD, mK < 25 < 40...
- Page 2 Optical Magnification, Smooth Digital Zoom 2.5-20 Digital Zoom, x x1, x2, x4 x1, x2, x4, x8 Lens Focus, mm Relative Aperture, D/f' Minimum Focus Distance, m/y 5 / 5.5 Exit Pupil Diameter, mm/inch 4 / 0.16 Angular Field of View 10.7х8 12.5х9.4 (Horizontal x Vertical),...
- Page 3 External Power Supply 5 V, 9 V (USB Type-C) Battery Run Time at t=22°C, hours* Degree of Protection, IPX7 IP Code (IEC60529) Operating -25 … +40 / -13 – +104 Temperature Range, °C / °F Dimensions, mm/inch 152x74x75 / 5.98x2.91x2.95 Weight (with battery), 0.47 / 16.58 kg/oz...
-
Page 4: About The Device
* Actual operating time depends on the extent of using Wi-Fi, integrated video recorder and integrated laser rangefinder. ** Reception range may vary depending on various factors: obstacles, other Wi-Fi networks. *** Depends on the characteristics of the object under observation and environmental conditions. - Page 5 Laser Rangefinder Stream Vision 2 Package Contents Axion 2 LRF thermal monocular • APS 5 rechargeable battery • 2 battery-locking covers • Power adapter • USB Type-C cable with USB Type-A adapter • Carrying case • Hand strap • Quick reference user manual •...
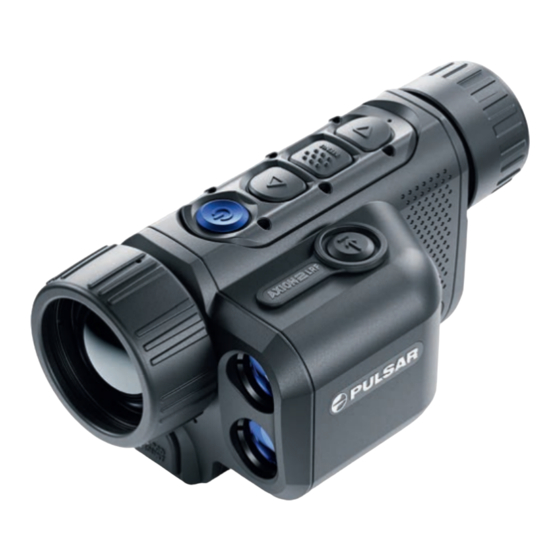
- Page 6 Components and Controls 1. Eyepiece focus ring 2. LED indicator 3. DOWN/REC button 4. MENU button 5. UP/ZOOM button 6. Power ON/OFF/CALIBRATION button 7. Lens focus ring 8. Lens cover 9. USB Type-C connector Tripod adapter socket Laser rangefinder LRF button...
- Page 7 LED indicator (2) displays the current status of the device: LED Indicator Operating Mode Device is turned on The device is turned on/video recording The device is turned on/battery charge < 10% The device is turned on/video recording/battery charge < 10% Features Compact and lightweight •...
-
Page 8: Video/Audio Recording
Video/Audio Recording Built-in video and sound recorder • Integration with iOS and Android devices • Wi-Fi remote control and viewing using a smartphone • Storing photos and videos in Cloud when using the Stream Vision 2 App • Battery Pack Quick Change Li-Ion Battery Pack APS 5 •... - Page 9 Protect the battery and charger from water and moisture. • Keep the battery out of the reach of children. • Recommendations for Battery Use The batteries should be partially charged (50 to 80 %) for long-term • storage. Charge at an ambient temperature of 0°C to +35°C (32°F to 95°F) or the •...
- Page 10 Option 1...
- Page 11 Install the APS 5 battery (15) in the battery compartment (14) of the device. 2. Connect the USB cable (19) to the USB Type-C connector (9) of the device. 3. Connect the other end of the USB cable (19) to the Power Adapter (20) by removing the USB Type-A adapter.
- Page 12 1. Insert the APS 5 battery (15) along the guide into the APS 5 charger* (16) slot as far as it will go. 2. Connect the plug of the USB Type-C cable (19) to the USB Type-C connector of the Power Adapter (20) by removing the USB Type-A adapter. 3.
- Page 13 Battery charge level is from 0% to Battery charge level is from 26% to Battery charge level is from 51% to Battery charge level is from 81% to Battery is fully charged. It can be disconnected from the charger. Defective battery. Do not use the battery! LED indication (18) in the Battery Level...
- Page 14 Attention! The charger heats up during fast charging. Excess heat is removed through the radiator and does not affect the device operation. Battery Installation Attention! Before installing the battery, make sure that there is an undamaged rubber insulating ring on the battery. The ring is designed to protect your device from moisture getting inside.
-
Page 15: Getting Started
1. Connect the external power source to the USB Type-C connector (9) on the device. 2. The device will switch to draw power from the external source while the АPS5 battery is gradually recharged. 3. A battery icon will appear on the display showing the percentage- charged level. - Page 16 the M calibration mode has been selected you must close the lens cover before calibrating manually. 7. Select the required amplification level (“Normal” , “High” “Ultra” ) by briefly pressing the UP (5) button. 8. Enter the main menu with a long press of the MENU (4) button and select the desired colour palette (for more details see the Colour Modes...
- Page 17 Turn display on short press Calibrate the microbolometer short press Switching amplification levels short press Control discrete digital zoom long press Video Recorder Button Start/pause/resume video recording short press Stop video recording long press Switch to video / photo long press Capture a photo short press Laser Rangefinder...
- Page 18 Navigation upwards/rightwards short press Navigation downwards/leftwards short press Confirm selection short press Exit submenu without confirming long press selection Exit menu (switch to viewing long press mode) Quick Menu Button Enter quick menu short press Switch between quick menu short press options Increase value short press...
- Page 19 Amplification level • Smoothing Filter (displayed when the function is on) • Calibration Mode (in Automatic calibration mode a countdown • timer will appear instead of the calibration mode icon 3 seconds before automatic calibration begins). Microphone • Magnification • Wi-Fi Connection •...
- Page 20 Brightness – press the UP (5)/DOWN (3) buttons to change display brightness from 0 to 20. Contrast – press the UP (5)/DOWN (3) buttons to change image contrast from 0 to 20. Note: display brightness and contrast settings are saved in the memory when the device is turned off.
- Page 21 4. Press and hold the MENU (4) button to exit the menu or wait for 10 seconds to exit automatically. 5. Automatic exit takes place after 10 seconds of inactivity. Note: When entering the main menu, the background image darkens to enhance the menu visibility.
- Page 22 Tab 2 Colour Modes Colour palette selection.
- Page 23 White Hot is the default display mode. To select an alternative palette, do the following: 1. Press and hold the MENU (4) button to enter the main menu. 2. Use the UP (5)/DOWN (3) buttons to select Colour Modes icon. 3.
- Page 24 3. Press the MENU (4) button briefly to turn the mode on/off. Icon Brightness Adjust brightness level of the icons and screensavers (Pulsar, Display off) on the display. 1. Press and hold the MENU (4) button to enter the main menu.
- Page 25 PiP Mode Picture in Picture mode 1. Press and hold the MENU (4) button to enter the main menu. 2. Use the UP (5)/DOWN (3) buttons to select the PiP Mode icon. 3. Press the MENU (4) button briefly to turn on/off. Wi-Fi Activation Turning Wi-Fi on/off 1.
- Page 26 2. The default password (12345678) will appear on the screen. 3. Use the UP (5)/DOWN (3) buttons to set the desired password using the UP (5) button to increase and the DOWN (3) button to decrease the values. 4. Press the MENU (4) button to toggle between the digits. 5.
- Page 27 2. Press the UP (5)/DOWN (3) buttons to select the Wi-Fi bandwidth – 5 GHz or 2.4 GHz. 3. Confirm your selection with a short press of the controller MENU (4) button. Microphone Turning microphone on/off This item allows you to enable (or disable) the microphone for recording sound during video recording.
- Page 28 This feature allows you to determine the target position angle. When the function is activated the angle is constantly displayed in the upper right corner of the display. 1. Select TPA with the UP (5)/DOWN (3) buttons. 2. Turn TPA on/off with a short press of the MENU (4) button. "THD"...
- Page 29 1. Select THD with the UP (5)/DOWN (3) buttons. 2. Turn THD on/off with a short press of the MENU (4) button 3. Hereinafter the message THD will appear above the distance readings. Calibration Mode Calibration mode selection. Calibration enables the device to equalize the microbolometer background temperature and eliminate the image flaws (such as vertical bars, phantom images, etc.).
- Page 30 2. Use the UP (5)/DOWN (3) buttons to select the Calibration Mode icon. 3. Press the MENU (4) button briefly to enter the submenu. 4. Use the UP (5)/DOWN (3) buttons to select one of the calibration modes described below. 5.
- Page 31 General Settings This menu section allows you to change the interface language, set the date, time, units of measure, return the device to factory default settings and perform memory card formatting. 1. Press and hold the MENU (4) button to enter the main menu. 2.
- Page 32 3. Press and hold the MENU (4) button to save the date and exit the submenu. Time Time setting 1. Press the MENU (4) button briefly to enter the Time menu item. 2. Select the time format (24-hour clock or AM / PM) by pressing the UP (5)/DOWN (3).
- Page 33 Video Compression Only in XG model When set to ON, standard video compression is applied so the video file size is reduced. When set to OFF, minimal video compression is applied. In this case, the quality of the recorded video is better, but its size is significantly increased. Warning! Larger video file sizes result in shorter recording times.
- Page 34 Video Recorder Mode – Video • Amplification Level – Normal • Smoothing Filter – Off • User Mode - Off • Calibration Mode – Automatic • Language – English • Microphone - off • Wi-Fi – Off (default password) • Magnification –...
- Page 35 2. Use the UP (5)/DOWN (3) buttons to select Yes to format the memory card or No to return to the submenu. 3. Press the MENU (4) button briefly to confirm your selection. If “Yes” is selected, display will show “Do you want to format memory?” •...
- Page 36 Step 1. Enter the menu to fix the defective pixels 1. Press and hold the MENU (4) button to enter the main menu. 2. Use the UP (5)/DOWN (3) buttons to select the Defective Pixel Repair menu item. 3. Press briefly the MENU (4) to open the submenu. 4.
- Page 37 3. You can then delete another defective pixel by moving the marker across the display. 4. Exit the Defective Pixel Repair submenu with a long press of the MENU (4). Warning! The display of a thermal imager may have 1- 2 pixels represented as bright white or coloured (blue, red) dots which cannot be deleted and are not a defect.
- Page 38 , High , Ultra sensitivity enhancement features are the latest in software algorithm offerings from Pulsar that enhance the quality of detection and object recognition, regardless of observation conditions. When the temperature contrast decreases due to conditions such as fog, precipitation or high humidity, increasing the amplification level can optimize the image picture.
- Page 39 Before using this feature please set the date and time (see General Settings section). For information on how to watch recorded photos and videos, see the Stream Vision 2 user manual: Android, iOS. The built-in recorder operates in two modes – Video and Photo. Video mode.
- Page 40 5. Pause and resume recording video with a short press of the DOWN/REC (3) button. 6. Stop recording video with a long press of the DOWN/REC (3) button. 7. Video files are saved to the built-in memory card after the video recording has been stopped.
-
Page 41: Single Measurement Mode
Regularly check the free capacity of the internal memory and move • recorded footage to other storage media to free up space on the internal memory card. In case of a memory card error, you can use the format function in •... -
Page 42: Scan Mode
5. The rangefinder shuts down after 3 seconds of inactivity. Scan Mode 1. Press the ON/OFF (6) button briefly to power the device on. 2. Activate the rangefinder by pressing the LRF (12) button briefly. A red mark appears on the display. 3. - Page 43 When you turn on the rangefinder, the PiP window turns off. • Additional Information: The accuracy and distance of the measurement depends on the reflection • coefficient of the object surface and weather conditions. The reflection coefficient depends on the texture, colour, size and shape of the object. Generally, lighter coloured objects and those with a shiny surface will have a higher reflection coefficient.
- Page 44 To turn on and off the PiP function see the PiP Mode section. • Press and hold the UP (5) button to change the magnification ratio in • the PiP window. The zoomed image is displayed in a dedicated window, while the image in •...
- Page 45 1. When the device is on, press and hold the ON/OFF (6) button. The display will turn off, the current time and the "Display off" icon will appear. 2. Turn the display back on with a short press of the ON/OFF (6) button. 3.
- Page 46 Installing the Device on a Tripod 1. Open the cover (22) of the socket (10). 2. Attach the tripod adaptor (21) to the socket (10). 3. Rotate the adaptor handle clockwise until it stops. 4. Secure the adaptor with the device on a tripod.
- Page 47 USB Connection 1. Connect one end of the USB cable to the USB Type-C port (9) of your device and the other end to the USB port of your PC / laptop using a USB Type-A adapter. 2. Turn the device on with a short press of the ON/OFF (6) button (a device that has been turned off cannot be detected by your computer).
- Page 48 Battery recharge feasibility depends on your computer's USB port. • When the USB is disconnected from the device when in the Power mode, • the device keeps operating with the Battery Pack if it is available and sufficiently charged. Memory Card (external memory) In this mode the device is detected by the computer as a flash card.
-
Page 49: Maintenance
3. Launch Stream Vision 2 and go to section “Settings”. 4. Select your Pulsar device and press “Check firmware update”. 5. Wait for the update to download and install. Pulsar device will reboot and will be ready to operate. Important: if your Pulsar device is connected to a phone or mobile device, please turn •... -
Page 50: Troubleshooting
Store the device in a carrying case. Remove the Battery Pack for long-term • storage. Troubleshooting For technical support please contact support@pulsar-vision.com. Answers to frequently asked questions about the devices can also be found in the section. The device does not turn on... - Page 51 The battery is completely discharged. Solution Charge the battery. The device does not operate from an external power source Possible cause The USB cable is damaged. Solution Replace the USB cable. Possible cause The external power supply is discharged. Solution Charge the external power supply (if necessary).
- Page 52 Poor quality image. There is noise or ghost images of previous scenes or objects Possible cause Manual calibration has been performed with the lens cover open. Solution Check the Calibration Mode, close the lens cover and calibrate the device. Image is too dark Possible cause Brightness or contrast level is too low.
- Page 53 Poor image quality / Detection range reduced Possible cause These problems may occur during observation in adverse weather conditions (snow, rain, fog, etc.). The image quality during the device operation at below zero temperatures is worse than at positive temperatures Possible cause In warm climates, objects in the background of a thermal image heat up differently because of thermal conductivity, generating a high...
- Page 54 The device has a 5 GHz network enabled, but the smartphone only supports 2.4 GHz. Solution Switch the device's Wi-Fi bandwidth to 2.4 GHz. More information on solving problems with connection to Stream Vision 2 by following the link. Wi-Fi signal is missing or interrupted Possible cause Smartphone or tablet is out of range of a strong Wi-Fi signal.
- Page 55 Solution Pick an object at a distance not longer than 1000m. Possible cause Low reflection ratio (i.e. leaves of trees). Solution Pick an object with higher reflection ratio (see point Additional Information in section Laser Rangefinder). Large measurement error Possible cause Inclement weather conditions (rain, mist, snow) Legal Compliances and Disclaimers Attention! A license is required for Axion Thermal Imager when exporting...
- Page 56 Repair of the device is possible within 5 years.
Need help?
Do you have a question about the LRF XQ35 and is the answer not in the manual?
Questions and answers