Table of Contents
Advertisement
Quick Links
Advertisement
Table of Contents

Related Manuals for Skywalker SWBR64-EY


Summary of Contents for Skywalker SWBR64-EY
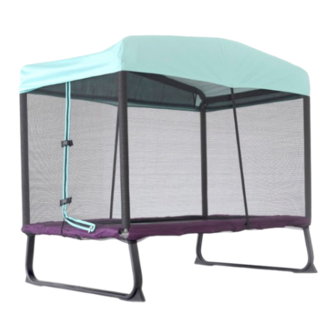
- Page 1 ASSEMBLY, MAINTENANCE, & USER MANUAL MODEL #SWBR64-WP, SWBR64-EY WARNING Read all precautions and instructions in this manual before using this equipment. Skywalker Holdings LLC Save this manual for future reference. P.O. Box 574, Brigham City, UT 84302 Maximum user weight 200 lbs.
-
Page 2: Table Of Contents
HEY WE'VE GOT SOMETHING REALLY IMPORTANT TO SAY Skywalker Trampolines belongs to a family of brands focused on providing active products. Check us out online! We've got assembly videos (for those of you who prefer movies over books), FAQs (so you know you're not the only one who asked a question), additional products (including fitness, sports, playground equipment, and trampolines), and most importantly, find us on social media! Because we want to be your friend. -
Page 3: Part List
BEFORE YOU BEGIN Thanks for choosing Skywalker Trampolines! We’re just as excited as you are to help your family live an active (but most importantly FUN) lifestyle. This model is one of our favorites, and we’re confident you’ll love it too. To make things easier for you, we’ve listed important information that you (and your little outdoor adventurers) need to know. -
Page 4: Part Identification
PART IDENTIFICATION Before you begin, take a look at the drawings below to make sure you have all the parts! The numbers in the squares to the left (key numbers) will help you identify the parts during assembly. Corner Tube 1 (x2) Corner Tube 2 (x2) Middle Tube (x4) Leg Brace 2 (x2) - Page 5 Connect Tube Top Short Tube Spring (x40) (x2) (x2) M8x45mm Bolt M8x20mm Bolt M8 Nut (x8) (x4) (x14) Wrench (x1) Spring Tool (x1) Hex Key (x1) Canopy (x1)
-
Page 6: Exploded Drawing
EXPLODED DRAWING (22) (12) (12) (12) (13) (10) (12) (13) (16) (16) (14) (14) (16) (10) (16) (17) (17) (15) (11) (18) (17) (17) (17) (18) (17) -
Page 7: Assembly
ASSEMBLY READ THIS BEFORE YOU BEGIN • You’ll probably need at least 2 adults and 1 hour to assemble your trampoline (of course, that depends on what model you have, and whether or not you’re secretly a superhero). • We’ve provided some tools to help with assembly, but you’re more than welcome to use your own. •... - Page 8 ASSEMBLY STEP 3 Now flip over the leg sections and secure the leg brace 1 (4) and leg brace 2 (5) together with a M8X20 bolt (17) as shown. Repeat this step to secure the second leg section. M8X20 Bolt Note: Do not fully tighten the bolts yet.
- Page 9 STEP 5 Lay the mat (7) on the ground inside the frame Pad with Mat (x1) STEP 6 Hook the smaller end of two springs (15) into one corner D-ring on the jumping mat. Using the spring tool (20), stretch the free end of the springs until they reach the closest frame holes on either side of the corner (see below for placement.) Repeat this step attaching two springs at each corner until you...
- Page 10 ASSEMBLY STEP 7 Next, attach two springs (15) to the middle of each side (3) for a total of eight more springs attached. Pro-Tip: Count the V-rings and spring holes to make sure everything is lining up. You now should have 16 springs attached. Spring (x8) STEP 8 Now, working in a clockwise direction, attach all of the remaining springs.
- Page 11 STEP 9 Look under the trampoline. Find the straps that are attached to the underside of the frame pad. Position the straps so that one strap is on each side of the frame and tie in a bow. Pro-Tip: Make sure to tie the straps in a bow not a knot or you may have a hard time ever untying them again. Underside of trampoline STEP 10 Attach four straight tubes (6) at each corner.
- Page 12 ASSEMBLY STEP 11 Slide a medium B foam (9) piece onto each straight tube (6) as (940mm) shown. Pro-Tip: If you are having a hard time sliding the foam onto the poles add just a few drops of water inside the foam. 940mm foam (x4) Foam Key 890mm...
- Page 13 STEP 13 Attach one top tube (12) to the end of a connect tube (13) as shown. Then slide a short A foam (8) onto that tube (890 mm) section. Repeat to create a second tube section with short A foam. Top Tube (x2) Connect Tube (x2) 890 mm foam (x2)
- Page 14 ASSEMBLY STEP 15 Slide the assembled top tube sections into the sleeves on the long side of the net as shown. STEP 16 Place the assembled top tube sections onto the top of the straight tubes (6) and push them down until they click into place.
- Page 15 STEP 17 Slide a top short tube (14) into a long C foam (1105 mm) (10). Repeat with the remaining top short tube and long C foam (1105 mm). 1105mm foam (x2) Top short Tube (x2) (10) (14) STEP 18 Slide the two top short tubes (14) into the sleeves on either end of the net.
- Page 16 ASSEMBLY STEP 19 Set the canopy (22) onto the top of the trampoline and pull the edges down and around until it fits snugly across all the top tubes. Then tie the straps at each corner directly to the straight tubes (6). Next pull the straps in the middle of the canopy down to the frame.
- Page 17 STEP 21 Congratulations on completing your new trampoline! (See, we knew you could do it!) If you just can’t get enough of this trampoline, then tell your friends and leave us a review on the retailer site you purchased it from or on our Facebook page.
-
Page 18: Maintenance And Care Information
MAINTENANCE & CARE INFORMATION Congratulations and high five on successfully assembling your new Skywalker Trampolines 6'x4' Mini Trampoline with Enclosure! Now, the best way to keep your new trampoline in tip top shape, is to periodically check for: • Missing, incorrectly placed, or unsecured frame padding, netting, or enclosure poles •... -
Page 19: Instructions For Use
INSTRUCTIONS FOR USE To reduce the risk of serious injury, read and follow all of the warnings, precautions, and instructions in this manual before you use the trampoline enclosure. Warnings and instructions for care, maintenance, and use of this trampoline and enclosure are included to promote safe enjoyable use of this equipment. -
Page 20: Warning Label Placement
Climb on to and off the trampoline. Do not jump on or off. Do not use the trampoline as a springboard to other objects. Inspect before using and replace any worn, defective or missing parts. For further equipment information contact Skywalker. For skill training information, contact a trainer certification organization. ATTACH TO TRAMPOLINE The labels shown on this page have been attached to the trampoline in the indicated locations. -
Page 21: Instructions And Model Lessons
INSTRUCTIONS & MODEL LESSONS The following lessons are examples of an instructional program. They should follow a complete discussion and demonstration of body mechanics between the supervision and the student(s). 1. Fundamental bounce: Demonstration and practice. 2. Knee Drop: Demonstration and practice. 3. - Page 22 Lesson 5: Seat Drop Lesson 6: Front Drop 1. Land in a sitting position with your legs parallel to the 1. Start from a low bounce and land on the mat in a mat. prone position. 2. Place your hands on the mat beside your hips. 2.
- Page 23 Lesson 9: Mounting and Dismounting Lesson 10: Breaking 1. Users should climb onto the trampoline by placing 1. Starting from a standing position, jump into the their hands on the frame and stepping or rolling up air. onto the frame, across the springs and onto the mat. 2.
-
Page 24: Trampoline Safety Information
TRAMPOLINE SAFETY INFORMATION In trampoline use, as in all active recreational sports, participants can be injured. However, there are steps that can be taken to reduce risk of injury. In this section, primary accident patterns are identified and the responsibilities of supervisors and jumpers in accident prevention are described. -
Page 25: Enclosure Safety Information
ENCLOSURE SAFETY INFORMATION NEED FOR TRAMPOLINE ENCLOSURE SAFETY A trampoline enclosure is a recreational product. The information on this page identifies important safety precautions. The precautions are not all-inclusive, because an enclosure can be used in ways that this manual cannot cover completely. -
Page 26: Methods Of Accident Prevention
METHODS OF ACCIDENT PREVENTION THE SUPERVISOR’S ROLE IN PREVENTING ACCIDENTS It is the responsibility of the supervisors of trampoline users to provide knowledgeable and mature supervision. They need to know and enforce all of the rules and warnings printed in this manual to minimize the likelihood of accidents and injuries. -
Page 27: Limited Warranty
LIMITED WARRANTY Skywalker Holdings, LLC warrants its products to be free from defects in material and workmanship under normal use and service conditions. The steel frame is warranted for three (3) years after the date of purchase. All other parts are warranted for one (1) year after the date of purchase. Warranty coverage extends only to the original retail purchaser from the date of original purchase. - Page 28 NOTE: SKYWALKER HOLDINGS, LLC IS NOT RESPONSIBLE OR LIABLE FOR INDIRECT, SPECIAL OR CONSEQUENTIAL DAMAGES ARISING OUT OF OR IN CONNECTION WITH THE USE OR PERFORMANCE OF THE PRODUCT OR OTHER DAMAGES WITH RESPECT TO ANY ECONOMIC LOSS, LOSS OF PROPERTY, LOSS OF REVENUE OR PROFITS, LOSS OF ENJOYMENT OR USE, COST OF REMOVAL, INSTALLATION OR OTHER CONSEQUENTIAL DAMAGES.
Need help?
Do you have a question about the SWBR64-EY and is the answer not in the manual?
Questions and answers