Table of Contents
Advertisement
Available languages
Available languages
Quick Links
37-72
months
Electric Ride-On
CAUTION:
•This package contains small parts.
•Adult assembly required.
•Before giving to children, remove all plastic bags and tyre packaging.
•Protective equipment recommended.
•Not to be used in traffic.
•Keep this manual for future reference.
"Mercedes-Benz" and
Mercedes-Benz Group AG. They are used by Ningbo Prince
Toys Co.,Ltd under license.
IMPORTANT, RETAIN FOR FUTURE REFERENCE: READ CAREFULLY
ASSEMBLY INSTRUCTION
Installation and operation manual
are the intellectual property of
IN220800632V02_UK
1
370-222V70
Advertisement
Table of Contents

Subscribe to Our Youtube Channel
Related Manuals for Aiyaplay 370-222V70


Summary of Contents for Aiyaplay 370-222V70
- Page 1 IN220800632V02_UK 37-72 370-222V70 months Electric Ride-On Installation and operation manual CAUTION: •This package contains small parts. •Adult assembly required. •Before giving to children, remove all plastic bags and tyre packaging. •Protective equipment recommended. •Not to be used in traffic. •Keep this manual for future reference.
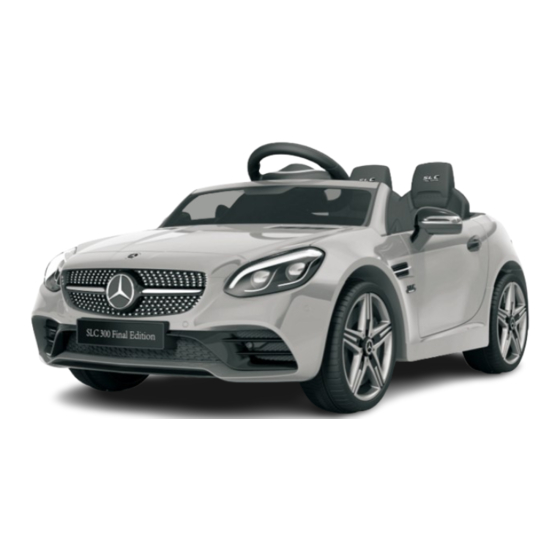
- Page 2 12V1000mA 1. 1 x Car body 2. 1 x Steering wheel 3. 1 x Seat 4. 1 x Windshield 5. 2 x Rear-view mirro 6. 2 x Front wheel 7. 2 x Rear wheel 8. 4 x Wheel cap 9. 5 x Cotter pin (one replacement piece) 10.
- Page 3 Insert the two rear wheels, First, insert the two washers tighten using a washer and cotter together with the two front pin, then cover the wheel caps. wheels – tighten using a washer and cotter pin, then cover the wheel caps. Insert the windshield at the front Connect the wire plug, then of the car body, ensuring it is...
- Page 4 Place the seat into the car body, Insert the RED cable terminal into then tighten the three screws the battery's positive hole. with a screwdriver (not included). Insert the two rear-view mirrors into the car body, ensuring it is firmly fixed.
- Page 5 1.Charging socket is located at the lower part of the car seat. 2.Only use the provided or recommended charger and battery. 3.Do not play with the charger and battery. 4.Only adults should charge the battery. 5.Before the first use, ensure the battery is fully charged.
-
Page 6: Troubleshooting
Troubleshooting Problems Possible solutions 1) Ensure the power switch, plugs under the seat and battery terminal line are properly inserted. 2) When the car is overloaded or blocked, the over 1.The car does current protector automatically disconnects the circuit, not drive. protecting the motor and controlling IC board. - Page 7 5) Wear shoes when using this product. Take protective measures, such as fastening the seatbelt and wearing a helmet, gloves, kneepads etc. 6) Not suitable for children under three years. 7) Regularly check the battery, charger, wire, plug, casing and other parts. If there are any damages, do not use the product until it has been repaired.
-
Page 8: Remote Control Instructions
Remote control instructions Loosen the screw with a screwdriver, then insert two AAA batteries. Place the battery cover, then tighten with a screw. Forward/backward button Turn left/right button Brake button Speed change button Frequency bind button Operation manual: For first time use, need to frequency bind. ●... - Page 9 Care and maintenance 1)Regularly wipe and clean with a cloth. 2)Regularly check rotating parts of the car, seeing if there is any debris obstructing the rotation. Ensure parts are lubricated for the ride-on to function normally. If you have any questions, please contact our customer care center. Our contact details are below: 0044-800-240-4004 enquiries@mhstar.co.uk...
-
Page 10: Instructions D'assemblage
IN220800632V02_FR 37-72 370-222V90 mois Voiture Autoportée Électrique Manuel d'installation et d'utilisation AVERTISSEMENT ATTENTION •Cet emballage présente de petites pièces. ASSEMBLAGE PAR •L'assemblage par un adulte est requis. •Avant de le remettre aux enfants, retirez tous les sacs en plastique et les UN ADULTE REQUIS. -
Page 11: Spécifications
SPÉCIFICATIONS. MODÈLE Âge recommandé 3 à 6 ans Dimensions du produit Poids maximum Vitesse Moteur Chargeur 12V1000mA Batterie 2.4G fonction one to one Télécommande Piles de la télécommande 2*AAA (non incluses) Température ambiante de fonctionnement Liste des pièces. 1. 1 x Carrosserie 2. - Page 12 Instructions d'assemblage. <Étape 1> <Étape 2> Insérez les deux roues arrière, Commencez par insérer les fixez à l'aide d'une rondelle et deux rondelles et les deux d'une goupille fendue, puis roues avant - fixez à l'aide couvrez les enjoliveurs. d'une rondelle et d'une goupille fendue, puis posez les enjoliveurs.
- Page 13 <Étape 5> <Étape 6> Posez le siège dans la Insérez la borne de câble carrosserie de la voiture, puis ROUGE dans le trou positif de la serrez les trois vis à l'aide d'un batterie. tournevis (non fourni). <Étape 7> Insérez les deux rétroviseurs dans la carrosserie de la voiture, en vous assurant qu'ils sont bien fixés.
- Page 14 Fonction et Mode d'emploi. 1.Tableau de bord 2.Volant Vitesse élevée/basse (double moteur uniquement) Commutateur principal d'alimentation Marche Lecteur multimédia avant/marche arrière Klaxon Klaxon Pédale de commande 3.Ceinture de sécurité 4.Ouverture de la portière Attachez votre ceinture Ouvrez ① Interface disque de mémoire ②...
-
Page 15: Dépannage
Dépannage Problèmes Solutions Possibles 1. Assurez-vous que l'interrupteur d'alimentation, les fiches sous le siège et la ligne de la borne de la batterie sont correctement insérés. 1.La voiture ne 2. Lorsque la voiture est surchargée ou bloquée, le roule pas. protecteur de surintensité... - Page 16 2). Pour prévenir tout risque de suffocation, gardez les sacs en plastique hors de portée des enfants. Jetez tous les sacs immédiatement. 3). Lorsque des enfants conduisent ce produit, la surveillance d'un adulte est nécessaire. 4). Cette voiture doit être conduite sur un terrain plat et régulier. Ne pas conduire sur les routes publiques, les pentes raides ou près des piscines.
- Page 17 Instructions relatives à la télécommande Desserrez la vis avec un tournevis, puis insérez deux piles AAA. Placez le couvercle des piles, puis serrez avec une vis. Bouton avant/arrière Bouton de rotation gauche/droite Bouton de frein Bouton de changement de vitesse Bouton de liaison de fréquence Manuel d'utilisation : Pour la première utilisation, nécessité...
-
Page 18: Entretien Et Maintenance
Entretien et maintenance 1. Essuyez et nettoyez régulièrement avec un chiffon. 2. Examinez régulièrement les pièces rotatives de la voiture, pour voir si des débris n'entravent pas la rotation. Veillez à ce que les pièces soient lubrifiées pour que l'autoportée fonctionne normalement. Si vous avez la moindre question, veuillez contacter notre centre d'assistance à... - Page 19 IN220800632V02_DE 37-72 370-222V90 Monate Elektrofahrzeug Montage- Und Betriebsanleitung WARNUNG VORSICHT: • Diese Verpackung enthält Kleinteile. MONTAGE DURCH EINEN • Montage durch einen Erwachsenen erforderlich. • Entfernen Sie alle Plastiktüten und Reifenverpackungen, bevor Sie es an ERWACHSENEN Kinder weitergeben. ERFORDERLICH. • Schutzausrüstung empfohlen. •...
-
Page 20: Spezifikationen
SPEZIFIKATIONEN. MODELL Geeignetes Alter 3 bis 6 Jahre Produktabmessungen Maximales Gewicht Geschwindigkeit Motor Ladegerät 12V1000mA Akku 2,4G Eins-zu-Eins-Funktion Fernsteuerung 2 x AAA Größe (nicht enthalten) Batterien für die Fernbedienung Betriebsumgebungstemperatur Liste der Bauteile. 1.1 x Karosserie 2.1 x Lenkrad 1.1 x Sitz 4.1x Windschutzscheibe 5.2 x Rückspiegel 6.2 x Vorderräder 7.2 x Hinterräder... - Page 21 Montageanleitung. <Schritt 1> <Schritt 2> Setzen Sie die beiden Setzen Sie zuerst die beiden Hinterräder ein, ziehen Sie sie Unterlegscheiben zusammen mit einer Unterlegscheibe und mit den beiden Vorderrädern einem Splint fest und befestigen ein - ziehen Sie sie mit einer Sie dann die Radkappen.
- Page 22 <Schritt 6> <Schritt 5> Setzen Sie den Sitz in die Setzen Sie die ROTE Karosserie ein und ziehen Sie Kabelklemme in das Plus-Loch die drei Schrauben mit einem des Akkus. Schraubenzieher (nicht enthalten) fest. <Schritt 7> Setzen Sie die beiden Rückspiegel in die Karosserie ein und achten Sie darauf, dass sie fest sitzen.
-
Page 23: Funktion Und Bedienung
Funktion und Bedienung. 1. Das Armaturenbrett 2. Das Lenkrad Hohe/niedrige Geschwindigkeit (nur Doppelmotor) Ein-/Aus-Schalter Multi-Media-Spieler Vorwärts/Rückwärts Taste für Taste für die Hupe die Hupe Fußschalter 3. Der Sicherheitsgurt 4. Offene Tür Anschnallen Öffnen ① Speicherdatenträger-Schnittstelle ② Speicherkarte-Karten-Schnittstelle ③ AUX-Schnittstelle. ④ Kurzer Druck: Vorheriger Titel/ Langer Druck: Lautstärke verringern ⑤... -
Page 24: Fehlersuche
6. Beim Aufladen ist es normal, dass der Akku und das Ladegerät warm werden. Fehlersuche Mögliche Lösungen Probleme 1.Vergewissern Sie sich, dass der Ein-/Aus- Schalter, die Stecker unter dem Sitz und die Akku- Klemmenleitung richtig eingesteckt sind. 1. Das 2.Wenn das Fahrzeug überlastet oder blockiert ist, Fahrzeug fährt unterbricht der Überstromschutz automatisch den nicht. - Page 25 2. Produktwarnung 1) Vormontierte Teile können scharfkantig sein – der Zusammenbau des Produkts muss von einem Erwachsenen ausgeführt werden. Halten Sie die Teile von Kleinkindern fern. 2) Um Erstickungsgefahr zu vermeiden, halten Sie Plastiktüten von Kindern fern. Entsorgen Sie alle Tüten sofort. 3) Wenn Kinder mit diesem Produkt fahren, ist die Aufsicht eines Erwachsenen erforderlich.
- Page 26 WARNUNG Es sollte eine Schutzausrüstung getragen werden. Fahren Sie nicht im Straßenverkehr. WARNUNG Aufgrund der maximalen Geschwindigkeit ist dieses Produkt nicht für Kinder unter drei Jahren geeignet. Anleitung für die Fernbedienung Lösen Sie die Schraube mit einem Schraubenzieher und legen Sie dann zwei AAA-Batterien ein.
-
Page 27: Pflege Und Wartung
Gebrauchsanweisung: Bei der Erstverwendung muss die Frequenz gebunden werden. ● Nehmen Sie die Fernbedienung heraus und legen Sie die Batterie ein. ● Halten Sie die 'M'-Taste für 2-4 Sekunden gedrückt – die Anzeige blinkt. ● Schalten Sie das Auto ein. Wenn die Anzeige leuchtet, ist die Frequenzbindung erfolgreich. -
Page 28: Instrucciones De Montaje
IN220800632V02_ES 37-72 370-222V90 meses Ride-On Eléctrico Manual de instalación y operación ADVERTENCIA PRECAUCIÓN: •Este paquete contiene piezas pequeñas. EL MONTAJE DEBE SER •El montaje debe ser realizado por los adultos. REALIZADO POR LOS •Antes de dárselo a los niños, retire todas las bolsas de plástico y el embalaje de los neumáticos. -
Page 29: Especificaciones
ESPECIFICACIONES MODELO Edades adecuadas 3-6 años Dimensiones del producto Peso máximo Velocidad Motor Cargador 12V1000mA Batería 2.4G función uno a uno Control remoto Baterías de control remoto 2*AAA tipo (no incluidas) Temperatura ambiente de operación Lista de componentes 1.1 x Carrocería del 2.1 x Volante 3.1 x Asiento automóvil... - Page 30 Instrucciones de montaje <Paso 1> <Paso 2> Inserte las dos ruedas traseras En primer lugar, inserte las en su lugar, utilice un pasador dos arandelas junto con las de chaveta y las arandelas para dos ruedas frontales; utilice apretarlas, luego cubra las un pasador de chaveta y las tapas de las ruedas.
- Page 31 <Paso 5> <Paso 6> Coloque el asiento en la Inserte el terminal del cable carrocería del automóvil, ROJO en el orificio positivo de la luego utilice un destornillador batería. para apretar los tres tornillos (el destornillador no está incluido). <Paso 7> Inserte los dos espejos retrovisores en la carrocería del automóvil, asegurándose...
-
Page 32: Función Y Operación
Función y Operación 1.Salpicadero 2.Volante Velocidad alta/baja (solo para el modelo con motor dual) Interruptor principal Reproductor de Hacia adelante / multimedia hacia atrás Botón de la Botón de Interruptor bocina la bocina de pie 3.Cinturón de seguridad 4.Abrir la puerta Anschnallen Öffnen ①lnterfa disco de memoria... -
Page 33: Solución De Problemas
Solución de problemas Problemas Soluciones posibles 1. Asegúrese de que el interruptor de alimentación, los enchufes debajo del asiento y la línea de terminal de la batería estén conectados de manera correcta. 1.El automóvil 2. Cuando el automóvil está sobrecargado o no puede bloqueado, el protector de sobrecorriente desconecta marchar. - Page 34 2.Advertencia sobre el producto 1) Las piezas premontadas pueden estar afiladas; el montaje de este automóvil debe ser realizado por un adulto. Mantenga las piezas alejadas de los niños pequeños. 2) Por motivo de evitar la asfixia, mantenga las bolsas de plástico alejadas de los niños.
- Page 35 ADVERTENCIA Debe usar el equipo de protección. No utilice este automóvil en el tráfico. ADVERTENCIA Debido a su velocidad máxima, este automóvil no es apto para los niños menores de 3 años. Instrucciones de control remoto Utilice un destornillador para aflojar el tornillo, luego inserte dos baterías AAA.
-
Page 36: Cuidado Y Mantenimiento
Manual de operación: Para el uso por primera vez, se necesita emparejar la frecuencia. ● Saque el control remoto e instale la batería en su lugar correctamente. ● Mantenga presionado el botón de “M” durante 2 a 4 segundos; El indicador parpadeará. -
Page 37: Istruzioni Di Assemblaggio
IN220800632V02_IT 37-72 370-222V90 mesi Auto elettrica per bambini Manuale di Istruzione e Funzionamento AVVERTENZA PRECAUZIONI: •Questa confezione contiene parti di piccole dimensioni. RICHIESTO UN ADULTO •L’assemblaggio deve essere eseguito da parte di un adulto. •Prima di consegnarlo ai bambini, rimuovere tutti i sacchetti di plastica e gli PER ASSEMBLAGGIO. -
Page 38: Lista Dei Componenti
I. SPECIFICHE MODELLO Età adatta 3-6 anni Dimensioni del prodotto Peso massimo Velocità Motore Caricabatterie 12V1000mA Batteria 2,4G Funzione uno a uno Telecomando 2 x AAA Capacità (non in dotazione) Batterie del telecomando Temperatura ambiente di funzionamento II. Lista dei componenti 1.1 x Carrozzeria 2.1 x Volante 3. - Page 39 III. Istruzioni per assemblaggio <Passo 1> <Passo 2> Inserire le due ruote posteriori, Inserire prima le due rondelle serrare con una rondella e una e le due ruote anteriori - coppiglia a molla R, e poi serrare con una rondella e una coprire coi copriruota.
- Page 40 <Passo 5> <Passo 6> Inserire il sedile nella Inserire il terminale del cavo carrozzeria, e poi serrare le tre ROSSO nel foro positivo della viti con un cacciavite (non in batteria. dotazione). <Passo 7> Inserire i due specchietti retrovisori nella carrozzeria, assicurandosi che siano ben fissati.
-
Page 41: Funzionamento E Utilizzo
IV. Funzionamento e utilizzo 1.Cruscotto 2.Volante Velocità Alta/Bassa (solo motore doppio) Interruttore di alimentazione principale Lettore Multi-media Avanti/Indietro Pulsante Pulsante Clacson Clacson pedale 3.Cintura di sicurezza 4.Aprire la porta Allacciare la cintura Aprire ①Interfaccia disco di memoria ②Interfaccia scheda di memoria ③Interfaccia AUX ④Pressione breve: Traccia precedente/ Pressione lunga: diminuire il volume... -
Page 42: Risoluzione Dei Problemi
VI. Risoluzione dei problemi Soluzioni Possibili Problemi 1. Assicurarsi che l'interruttore di alimentazione, le spine sotto il sedile e il cavo terminale della batteria siano inseriti correttamente. 1.L’auto non 2. Quando l'auto è sovraccarica o bloccata, il funziona protettore di sovracorrente scollega automaticamente il circuito, proteggendo il motore e il pannello IC di controllo. - Page 43 2.Avvertenze sul prodotto 1) Le parti preassemblate possono essere taglienti - l'assemblaggio del prodotto deve essere effettuato da un adulto. Tenere le parti lontano dalla portata dei bambini. 2) Per evitare il soffocamento, tenere i sacchetti di plastica lontano dai bambini.
- Page 44 AVVERTENZA Si devono indossare i dispositivi di protezione. Non guidare nel traffico. AVVERTENZA A causa della sua velocità massima, questo prodotto non è adatto ai bambini di età inferiore ai tre anni. VIII. Istruzioni per il telecomando Allentare la vite con un cacciavite, e poi inserire due batterie AAA. Riporre il coperchio del vano batterie, e poi serrarlo con una vite.
-
Page 45: Cura E Manutenzione
Manuale d'uso: Per il primo utilizzo, bisogna eseguire il collegamento frequenza. ● Estrarre il telecomando e installare la batteria. ● Tenere premuto il pulsante 'M' per 2-4 secondi: la spia lampeggerà. ● Avviare l’auto. Quando la spia rimane accesa, il collegamento della frequenza è...
Need help?
Do you have a question about the 370-222V70 and is the answer not in the manual?
Questions and answers