Table of Contents
Advertisement
Quick Links
Advertisement
Table of Contents

Related Manuals for LINOVISION IOT-R51W


Summary of Contents for LINOVISION IOT-R51W
- Page 1 Routers IOT-R51W User Manual Updated on July 01, 2023...
-
Page 2: Installation
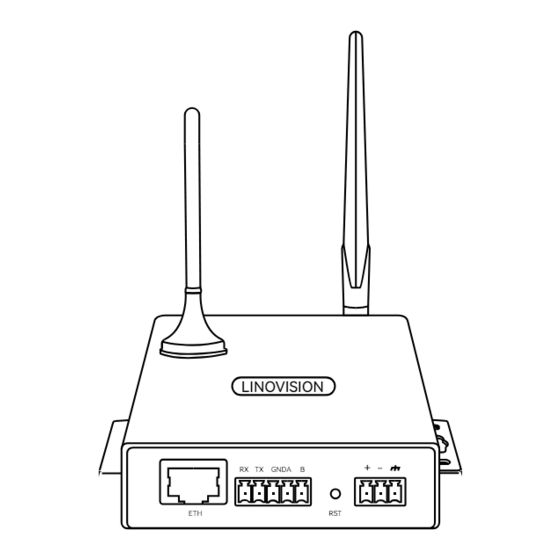
LINOVISION RX TX GNDA 4G Mag-mount antenna x 1 Scan QR code Scan the QR code on the label at the top of the router or visit https://linovision.com/ pages/vsim-data-plan, to activate your vSIM Data Plan. vSIM Cellular Router IOT-R51W Power Input: DC 6 ~ 35V Default IP: 192.168.1.1... - Page 3 Connect IOT-R51W router to PC Connect the Ethernet cable to the router’s Ethernet port and to the Ethernet port on the PC. Or use WiFi open web browser type in default IP to gain access to the web platform. RJ45...
- Page 4 Access the router's web platform Open a web browser on a computer and go to your router's IP address. The default IP is “192.168.1.1”. Yon can find the SSID ( network name ) and wireless password printed on the label at the top of the router. Enter the default username and password The default user name is "admin"...
- Page 5 The default SSID is “2.4_2xxxxxxxxxx” and the password is “12345678”. Click “Network > WLAN > Edit” to modify. The IOT-R51W router provides two functions of Access Point mode ( AP ) and Client mode ( STA ). Through the function of AP mode, you can provide wireless LAN hotspots for easy access to the network and save wiring troubles;...
-
Page 6: Save Your Settings
Save your settings Once you are finished naming and securing your wireless network, click the OK button. The changes will be applied to your router, which may take a few moments. Once the router has finished resetting, your wireless network will be enabled. -
Page 7: Advanced Settings
Use Case ( Set up remote access for IP camera ) Plug and play easy installation, instant connection (12V) RX TX GNDA Advanced Settings DTU Setting DTU provides wireless connectivity, data collection, and transmission for industrial applications. Click “Applications > DTU > Create”... - Page 8 Click “Applications > DTU > Edit" Supports MQTT Protocol Convert Click Applications > DTU > Configuration > Select Protocol > OK" Lightweight publish/subscribe messaging transport that is ideal for connecting remote devices with a small code footprint and minimal network bandwidth. MQTT is used in a wide variety of industries, such as water, mining, power, oil and gas, etc.
- Page 9 Click "+Topic” to create multiple public topics...
- Page 10 MQTT topic is a string used in the MQTT protocol to identify and route messag- es. It is a key element in communication between MQTT publishers and subscribers. In the MQTT publish/subscribe model, publishers send messages to specific topics, while subscribers can subscribe to those topics to receive the messages.
- Page 11 Port Configuration Parameters Parameter Caption Configuration Method Set the IP address Manually enter in the input box Format: X.X.X.X IP address of the LAN port Default value: 192.168.1.1 Set the subnet mask Manually enter in the input box Format:X.X.X.X Subnet mask of the LAN port Default value: 255.255.255.0 Set the MAC address...
- Page 12 Devices on Different Network Segments ( For situation when you are unable to modify your camera’s IP address, you can modify router’s IP address to match instead. ) Click “Network > LAN” 1. VFirst change the netmask of the router to match with your camera. 2.
-
Page 13: Need Help
Need Help? Hardware issues All router's indicator lights are off •The power supply is not connected to the router’s power port •If the power supply does not meet the requirements, please ensure that the power supply is 12V SIM card cannot be inserted into the SIM card tray, all router's indicator lights are off •If the SIM card holder is damaged, please contact our technical support for repair •If the SIM card is inserted in the wrong direction, please make sure that the SIM card... - Page 14 Web platform operation issues Unable to log in to the Web platform page normally •The browser is not compatible, please use Google Chrome or IE10 or above •Check the IP address obtained by the computer, the router IP and the computer IP are in the same network segment •If you forget to configure the IP address of the interface, please press and hold the Reset button for 5 seconds with a needle, and wait for the router to restart.
Need help?
Do you have a question about the IOT-R51W and is the answer not in the manual?
Questions and answers