Table of Contents
Advertisement
Available languages
Available languages
Quick Links
Advertisement
Chapters
Table of Contents

Subscribe to Our Youtube Channel
Related Manuals for Pelgrim NF925B


Summary of Contents for Pelgrim NF925B
- Page 1 Handleiding Manual NF925B NF930B...
- Page 2 Nederlands ............1 - 18 English.
-
Page 3: Table Of Contents
Introductie Inhoud Als u deze gebruiksaanwijzing doorleest, bent Introductie ......3 u snel op de hoogte van alle mogelijkheden Toestelinformatie . - Page 4 NF925 / NF930 NF925 NF930 NF925 NF930...
-
Page 5: Toestelinformatie
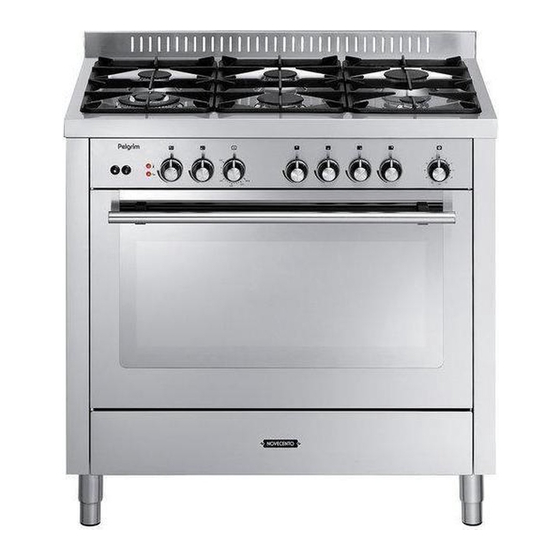
Toestelinformatie Type NF925 Type NF930 kookgedeelte kookgedeelte 1 – normaalbrander 1 – normaalbrander 2 – normaalbrander 2 – normaalbrander 3 – sterkbrander 3 – sterkbrander 4 – wokbrander (drievoudige vlam) 4 – wokbrander (drievoudige vlam) 5 – sterkbrander 5 – sterkbrander 6 –... -
Page 6: Ingebruikname
Lees de separate veiligheids- voorschriften voordat u het toestel in gebruik neemt! Uitschakeltimer (NF 925) Kookplaat Inbranden email De pandrager wordt door de kookbrander zeer sterk verhit, waardoor na verloop van tijd het email op de dragerpunt kan inbranden. Dit is niet te voorkomen en valt dan ook niet onder de garantie. -
Page 7: Bediening
Ontsteking kookgedeelte Fout: Elektrische vonkontsteking Er ontsnapt veel warmte langs de pan. Draai de branderknop linksom tot volstand en druk gelijktijdig de branderknop in. Er springen dan vonken over op de brander, die nu vanzelf Goed: fig. 4 ontsteekt. Hierna kan de vlam traploos ingesteld De warmte wordt worden tussen groot en klein. -
Page 8: Inschakelen Van De Oven
Inschakelen van de oven Controlelampje Schuif het gerecht in de bakoven, wanneer het niet nodig is de oven voor te verhitten. Gedurende het verwarmen brandt het Enkele aanwijzingen hiervoor vindt u in de controlelampje. Het lampje dooft als de overzichtstabel. ingestelde temperatuur bereikt is. - Page 9 Grillleren met de grillset Type NF930 Door op de knop te drukken, kunt u grillen met gebruik van het draaispit. De gerechten worden verwarmd door de stralingswarmte van het gecombineerde grill-/bakelement. De thermostaat regelt ook de grill. Het element zal daarom niet continu maar van tijd tot tijd rood oplichten.
-
Page 10: Toepassing
Bak-, braad- en grilltips Inzethoogten De taart wordt aan de bovenkant te donker Afhankelijk van de hoogte van gebak of koekjes De taart op een lagere richel in de oven plaatst u de bakplaat op de tweede of derde plaatsen, de temperatuur lager instellen, de richel van onderen. -
Page 11: Grilltijdentabel
Bakhoogten Rookontwikkeling Bij kleinere hoeveelheden de braadslede Het grilleren van vlees, direct op het rooster, bovenin de oven plaatsen (richel 4). gaat vaak gepaard met rookontwikkeling, Gerechten die een langere grilltijd vergen doordat vetspetters inbranden op de bodem. lager in de oven plaatsen (richel 3). Dit geldt U kunt de rookontwikkeling beperken door de ook bij het grillen van gerechten met grotere braadslede te vullen met water en hem onder... -
Page 12: Baktijdentabel
Baktijdentabel Conventioneel NF925 / Gasoven NF930 Gerecht temperatuur richel tijd in in °C hoogte* min. Roerdeeg Cake 160 - 180 65 - 70 Kruidkoek 160 - 180 70 - 80 Notentaart 160 - 180 60 - 70 Vruchtentaart bakblik 170 - 180 2, 3 35 - 45 Vruchtentaart bakvorm... -
Page 13: Onderhoud
Oven reinigen Let op: Ovenlamp vervangen Maak het toestel spanningsloos voordat met Verwijder de stekker uit het stopcontact. reparatie of schoonmaken wordt gestart. Draai de beschermkap (A), tegen de klok Bij voorkeur door de stekker uit het in, los. stopcontact te halen of de schakelaar in Vervang de lamp door een nieuwe (230 V- ... -
Page 14: Deur Verwijderen
Demontage van de ovendeur Bij normaal gebruik hoeft de ovendeur niet Maak de deur schoon. De deur kan uitgenomen te worden. Mocht u dit toch eventueel gekanteld worden om zo met willen doen, volg dan de onderstaande een zachte flessenwisser de tussenruimte instructies op. -
Page 15: Installatie
Installatie Algemeen Vervanging van de kabel Dit toestel mag alleen door een erkend Vervang de kabel bij beschadigingen als volgt: gastechnisch installateur aangesloten worden. Het toestel wordt niet aangesloten op Open het aansluitkastje (zie fig. 13). een rookgas-afvoerkanaal. Draai schroef “A” van de trekontlasting ... - Page 16 Gasaansluiting: RC 1/2” (ISO 7/1-RC 1/2) Tabel: De gasaansluiting moet voldoen aan de G25/25mBar nationale en lokale voorschriften. Voor Brandertype (kW) Nederland zijn dit onder andere de GAVO- sudderbrander 1,00 voorschriften (NEN 1078). normaalbrander 1,75 Deze bepalen onder andere dat: sterkbrander 3,00 –...
- Page 17 Als het fornuis in een keukenmeubel wordt geplaatst moet de minimale ruimte worden aangehouden zoals aangegeven in fig. 15. Als het fornuis vast tussen keukenkastjes wordt ingebouwd dan moet de bekleding van het meubel bestand zijn tegen temperaturen van minimaal 90 °C. Waterpas stellen Met de stelvoetjes is het fornuis in hoogte verstelbaar (zie fig.
-
Page 18: Afvoeren Verpakking En Toestel
Afvoe ren ver pak king en toe stel Verpakking en toestel afvoeren Om op de verplichting tot gescheiden De verpakking van het toestel is recyclebaar. verwerking van elektrische huishoudelijke Voor de verpakking kunnen gebruikt zijn: apparatuur te wijzen, is op het product het kar ton symbool van een doorgekruiste vuilnisbak ... -
Page 19: Introduction
Introduction Table of contents When you have read these instructions for Introduction ..... . . 19 use, you will quickly be aware of all the Appliance description . - Page 20 NF925 / NF930 NF925 NF930 NF925 NF930...
-
Page 21: Appliance Description
Appliance description Type NF925 Type NF930 hotplate hotplate 1 – semi-rapid burner 1 – semi-rapid burner 2 – semi-rapid burner 2 – semi-rapid burner 3 – rapid burner 3 – rapid burner 4 – wok burner (triple flame) 4 – wok burner (triple flame) 5 –... -
Page 22: Preparations
Read the separate safety instructions before using the device! Timer clock (NF 925) Gashob Burning in of the enamel The burners cause the saucepan supports to get extremely hot. In time the enamel on the support points can burn in. This cannot be prevented and is not covered by the guarantee. -
Page 23: Lighting The Burners
Lighting the burners Electrical spark ignition Wrong : Turn the control knob anti-clockwise to A great deal of heat is maximum and press it at the same time. Sparks lost along the sides of appear around the burner which then ignites. the saucepan. -
Page 24: Switching On The Oven
Switching on the oven Indicator light Slide the dish into the oven if it is not The indicator light comes on while the oven necessary to pre-warm the oven. See the is warming up. Once the set temperature has temperature table to determine the height of been reached, the light goes out. - Page 25 Grilling with the spit or kebab set Type NF930 By pressing the buttton you can grill using the roasting spit. Dishes are warmed using radiant heat from the combined grill and baking element. The thermostat also regulates the grill. Consequently the element should light up red from time to time but not continuously.
-
Page 26: Application
Baking-, roasting- and grilling tips Oven levels The cake is too dark on the top Depending on the height of the pastry or Put the cake on a lower ridge in the oven, set cookies, place the baking sheet on the second a lower temperature, bake the cake for a little or third level from the bottom. - Page 27 Oven levels Smoke When grilling smaller quantities, place the Smoke caused by burning grease will often roasting tin at the top of the oven (shelf 4). develop when meat is grilled directly on Dishes which require a longer cooking time the rack.
- Page 28 Table for baking Conventional NF925 / Gas oven NF930 Dish Temp Ridge Time in in °C level* Min. Stir dough Shortbread 160 - 180 50 - 70 Fruit-cake 160 - 180 70 - 80 Cake with nuts 160 - 180 60 - 70 Fruit pie baking tin 180 - 200...
-
Page 29: Maintenance
Oven cleaning Please note: Replacing the oven light bulb Disconnect the appliance before starting with Remove the plug out of the socket. cleaning or reparation. Preferably by taking Unscrew the protective cover (A) in an the plug out of the socket or by turning off the anticlockwise direction. -
Page 30: Removing The Door
Disassembly of the oven door In normal use, the oven door will not need To put the door back in place, proceed in to be removed. However, should you want reverse order. The door hinges are in the to do this, please follow the instructions extended position. -
Page 31: Installation
Installation General Replacing the cable The fitting of the appliance should only be If the cable becomes damaged, replace it as carried out by a registered Corgi gas fitter. follows: The appliance is not connected to the flue gas outlet channel. Open the junction box (see fig. - Page 32 Gasconnection: RC 1/2” (ISO 7/1-RC 1/2) Table : The gas connection must comply with G25/25mBar national and local regulations. Amongst Burner type (kW) other things these regulations instruct that: simmerburner 1,00 – only approved materials are to be used. semi rapid burner 1,75 rapid burner...
- Page 33 If the oven is installed in a kitchen unit, the minimum space must be observed as indicated in fig. 15. If the oven is to be installed between kitchen units, the panelling of the adjacent kitchen units must be able to withstand temperatures of at least 90 °C.
-
Page 34: Packaging And Appliances
Disposal of packaging and appliances As a reminder of the need to dispose of In the manufacturing of this appliance use household appliances separately, the product has been made of durable materials. The is marked with a crossed-out wheeled appliance packaging is recyclable. The dustbin.
Need help?
Do you have a question about the NF925B and is the answer not in the manual?
Questions and answers