Advertisement
Advertisement
Table of Contents

Related Manuals for Safe Fleet PRIME DESIGN AAL-8011


Summary of Contents for Safe Fleet PRIME DESIGN AAL-8011
- Page 1 MODELS AVAILABLE: AAL-8011 (CLEAR ANODIZED) AAL-8011-BLK (BLACK ANODIZED) H3 2015+ FORD TRANSIT PRIME DESIGN, A SAFE FLEET BRAND Address: 580 Opperman Drive, Eagan, MN 55123 ▪ Toll Free: 1.8.PRIME.RACK Fax: 651-552-1799 ▪ Email: info@primedesign.net ▪ Website: www.primedesign.net...
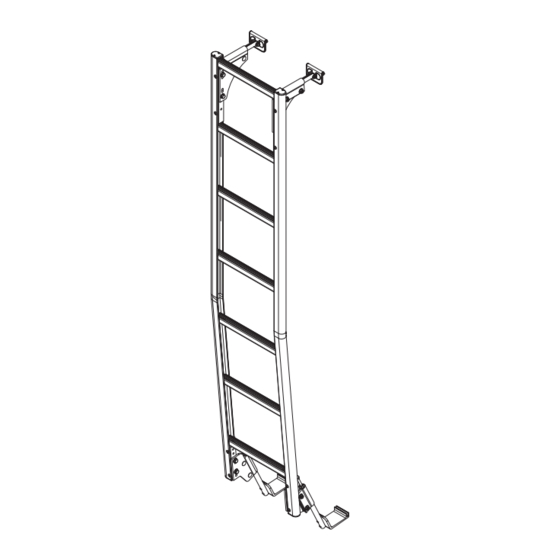
- Page 2 CONTENTS OVERVIEW 1—Access Ladder ..........(Qty 1) Clear or Black (BLK), Anodized 2—Mounting Bracket Assembly ......(Qty 1) Access Ladder Upper, LH/RH Pair Clear or Black (BLK), Anodized Left Hand (1X) Right Hand (1X) 3—Hanger Brackets..........(Qty 1) Ladder Bottom, LH/RH Pair Clear or Black (BLK), Anodized Left Hand (1X) Right Hand (1X)
- Page 3 INSTALLATION PROCEDURES • Do not use power tools to tighten fasteners as power tools may lead to overtightening and cause damage to the vehicle, or the Ladder hardware. Use only hand tools as shown below. INSTALLER NOTE: It is important to correctly follow these assembly instructions.
- Page 4 Assemble the right side Upper Bracket to the Ladder using the indicated hardware. The bolts must screw into bolt holes #1, and #3 of the Hanger Connector. Repeat Step 1.2 to attach the right side Upper Bracket. Push the Upper Bracket up until the Bracket Plate stops, and torque Bolts to 90 in-lb.
- Page 5 LOWER MOUNTING HANGER RODS Assemble the right side Lower Bracket to the Ladder using the indicated hardware. The bolts must screw into bolt holes #3, and #5 of the Hanger Connector. Repeat Step 2.2 to attach the right side Lower Bracket. Push the Lower Bracket down until the Bracket Plate stops, and torque...
- Page 6 ACCESS LADDER INSTALLATION INSTALLER NOTE: For an accurate installation, it is recommended the vehicle that is receiving this ladder be sitting on as level of ground as possible. Starting at the inner door seam (A and B), measure horizontally outward approximately 4.00”...
- Page 7 INSTALLER NOTE: Overtightening the Hanger Rod nuts may cause the Door Brackets to damage the door skin. Align the upper left Door Bracket edge to the pencil mark made during Step 4.1 Tighten Door Bracket bolt until the Bracket is snug. Adjust the bottom of the Ladder until the bubble is centered in the level.
- Page 8 USE AND MAINTENANCE Maintenance Cont’d: • When repairs are effected to an Access Ladder, the materials must be direct END USER NOTE: The following Use and Maintenance OEM replacements. guidelines found in this section do not cover every proper and improper procedure for the use and maintenance •...
Need help?
Do you have a question about the PRIME DESIGN AAL-8011 and is the answer not in the manual?
Questions and answers